Installing OpenMRS on Amazon EC2
Overview
Amazon Web Services (AWS) offers server hosting through Elastic Computing Cloud (EC2) . Through EC2 you can create a server and run OpenMRS on it. AWS is a for-pay service, but offers free trials as a promotion from time to time.
AWS EC2 servers are virtual machines. They can run the same software that runs on your desktop computer, but they don't use an actual separate machine. A user can't tell whether a web page is served by a physical or virtual server. It's a fast way to acquire a new server without having to buy hardware. This is especially useful when you need a server for a short time or a special purpose, like testing an upgrade. Amazon isn't the only vendor who provides virtual machine services, but it is the focus of this walk through.
These instructions detail how to set up a server with a community contributed snapshot of an Ubuntu 10.10 server which already has Java, MySQL, and Tomcat installed. It will permit you to create a server quickly. It may not be suitable for a production server.
If you simply want to run a demo, it's much simpler to run the OpenMRS appliance on your own computer.
Additional Reading
Amazon's EC2 overview page and EC2 FAQ.
The EC2 API tools let you administer your EC2 instance from the command line. The functionality is available from the AWS Management Console, but the command line utility can be easier to find.
Here's an intro to EC2 with OSX. It has some good general explanations of EC2 key pair files, as well as OSX instructions for setting up the EC2 API tools.
TODO: any other good background articles?
Before Beginning
Privacy
An EC2 server, like any Internet-accessible and hosted server, has security vulnerabilities. Your organization may be required to conform to local privacy laws or professional standards for safeguarding patient information. Amazon has a whitepaper on Creating a HIPAA Compliant Medical Data Application with AWS. Amazon recommends that your own legal staff review your security arrangements.
OpenMRS has a setting to mask the display of patient names. This is insufficient for safeguarding privacy. The un-masked data is still in the database, and still exposed through API calls.
See Anonymizing Data for more guidance. If you are making data available to researchers you can scramble identifying information.
Security
This page describes how to install a preconfigured server snapshot of Ubuntu. The snapshot was created by an unknown third party and made available to the Amazon community. It is unknown what changes were made to the Ubuntu system. If you're going to use it for production, you should have the Ubuntu expertise to do a security audit or create your own image with a clean installation of Ubuntu, MySQL, Java, and Tomcat.
Performance
What will you use this server for? An EC2 server might not meet performance requirements without additional configuration.
Survive with a Micro-Instance
How to setup a Micro-Instance for DEMO purpose (not suitable for production) :
Amazon EC2 provides a free tier for Micro instances (which is an awesome and almost free service). It's a very cheap way to host an OpenMRS demo online! However, the OpenMRS web app is not performant on an AWS micro instance (with 1GB of RAM) under default configurations. You may increase performance somewhat by adding more swap space (eg 1GB). Follow the instructions here for a Linux installation : https://forums.aws.amazon.com/thread.jspa?messageID=221044
Afterwards, remember to do the following steps for more stability (to get rid of: java.lang.OutOfMemoryError: PermGen space issue) http://www.mkyong.com/tomcat/tomcat-javalangoutofmemoryerror-permgen-space/
Connectivity
You can't use your OpenMRS server if you can't connect to it. Your site should have excellent, reliable internet connectivity.
Project lifespan
How long will you need the server to run? The Ubuntu community guarantees Long Term Support for certain versions. Ubuntu 10.10, the version used in this walkthrough, is not a Long Term Support version. If your project will run for a long time, you may prefer to use an AMI with a different version and install Java, MySQL, and Tomcat yourself.
NEED MORE INFORMATION ABOUT: recommendations from implementers who've used it, especially how it's performed in practice
Amazon Setup
Open the Getting Started with EC2 Guide.
Sign up
The guide begins with how to sign up for AWS.
Create an instance
"Launch a Server Instance" walks you through creating a server.
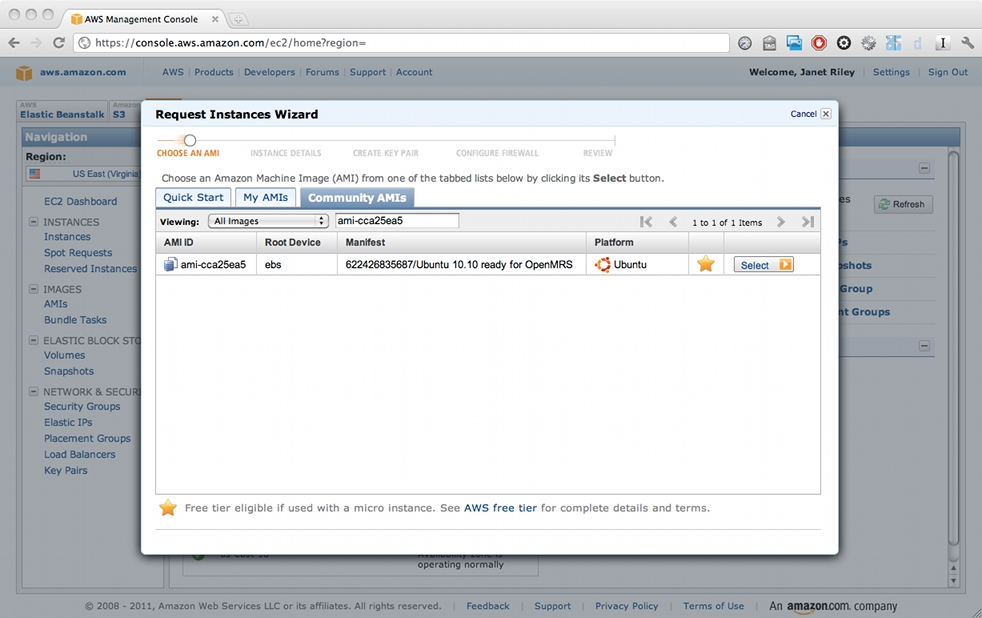
On step 2, "Choose an AMI," click the Community AMI tab. Search for ami-cca25ea5, "Ubuntu 10.10 ready for OpenMRS." Click the Select button.
UPDATE: ami-cca25ea5 is no longer available on AWS. An image can be built using SDK as explained here.
On the next screen, you will select the system configuration from the Instance Type dropdown. Pick an instance type that meets the OpenMRS system requirements for your organization's kind of installation.
You can accept the defaults in Advanced Instance Options. You may add a key/value tag to the instance if you wish (e.g. "dev").
On step 3 and 4, you'll create a Key Pair. This is the security credential you'll need to connect to the server later. It will download the credential file. The file cannot be re-created, so remember where you save it.
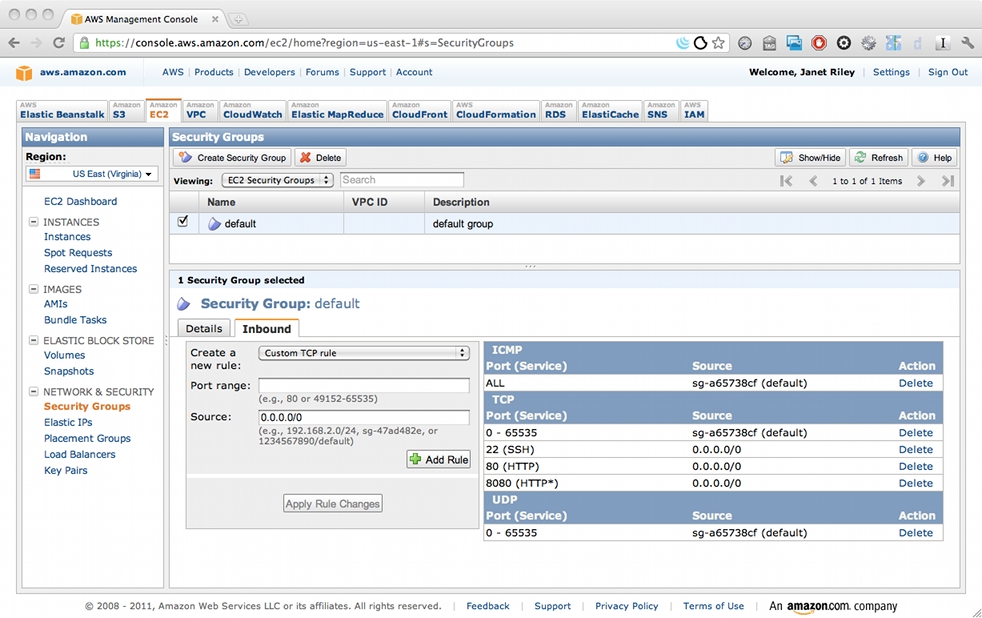
On step 5, "Create a Security Group," add two rules:
- Enable web browser access:
Port range: 80 Source (default): 0.0.0.0/0
- Enable Tomcat manager access:
Port range: 8080 Source (default): 0.0.0.0/0
Keep the rule for port 22 for SSH access.
Finish the installation. Your instance is up and running.
Now the whole world can access your new server on these ports. Note the guide's caution about restricting IP addresses that can access your instance, especially if you put sensitive or private data on the server.
Connect to Your Server
In the getting started guide, continue to "Next: Connect to a Linux/UNIX instance."
Follow the directions to ssh into your new instance.
The ssh connect command will be like this:
ssh -i your_keypair_file.pem ubuntu@your_dns
-i identity_file
This is the file you downloaded when you created the Key Pair. It must be on your filepath, or you must specify the full filepath.
user@
The Ubuntu installation includes a user named ubuntu. Connect as this user.
your_dns
AWS creates a DNS hostname so you can connect. To find it, open your AWS console in another window. On the Navigation menu on the left, expand INSTANCES and click on Instances. Your new server will appear in the My Instance area. Click on the row, and the description of your server will appear beneath. Scroll down to the Public DNS address.
Change Default Passwords
Because this Ubuntu image is publicly available, other people know the passwords for MySQL and Tomcat Manager. Let's change the passwords now.
MySQL
There's no documentation about what password was assigned to the root user on this image. To reset the MySQL root password, follow these instructions.
Tomcat6
Edit /etc/tomcat7/tomcat-users.xml. Change the password for admin. Restart Tomcat to pick up the changes:
sudo service tomcat7 restart
Confirm the change by opening a web browser to http://your_aws_dns_here:8080/manager/html.
Change Settings for UTF8
If you're going to use UTF8, there are some configuration changes for MySQL. Follow these directions for using UTF-8 characters.
There's already a [mysqld] section in /etc/mysql/my.cnf Don't re-add the [mysqld] line. You can insert the new lines anywhere in the section.
Tomcat7 is already set to use UTF8.
Change Java
Follow the Ubuntu instructions at https://openmrs.atlassian.net/wiki/display/docs/Step+2+-+Install+Java
Change Tomcat
I encountered PermGen memory errors with a 1.7.1 install. This manifested as a failure to complete installation, and a failure to restart OpenMRS from the Tomcat manager. The log file at /var/log/tomcat7/catalina.out contained an OutOfMemoryError.
To change memory allocations, follow the directions at Troubleshooting Memory Errors to change CATALINA_OPTS. Scroll down to Jonah Mwogi's notes in the comments.
OpenMRS 1.8.x made significant improvements to performance, so these changes may be unnecessary.
Make a Backup
You now have a pristine server, ready to go. This is a great time to take a backup. You can roll back to this snapshot later if you need to start clean again.
From the AWS Management Console in your web browser, select ELASTIC BLOCK STORE > Snapshots. Follow the directions for creating a snapshot.
Install OpenMRS
Follow the OpenMRS installation instructions up to Step 6, Configuration.
When you begin configuration, you'll get an error message that tomcat7 isn't allowed to create a directory. You'll have to do it from the Ubuntu command line.
For this example, the directory will be /usr/share/tomcat7/.OpenMRS. Use the directory that appears in the error message.
Ssh into Ubuntu as before.
Create the directory :
mkdir /usr/share/tomcat7/.OpenMRS
Change permissions group:
chown tomcat7 /usr/share/tomcat7/.OpenMRS
Grant write permissions for tomcat7 group. Initial permissions are 744.
chmod 774 /usr/share/tomcat7/.OpenMRS
On your web browser, click the Retry button. The installation will continue normally.
When prompted for a database user, use root and the password you chose when you reset root's password.
If the installation began properly, but shows the installation screen again with a "can't create openmrs-runtime.properties" error, check the logs at /var/log/tomcat7/catalina.out. It may mean the OpenMRS installation failed.
Overview
Amazon Web Services (AWS) offers server hosting through Elastic Computing Cloud (EC2) . Through EC2 you can create a server and run OpenMRS on it. AWS is a for-pay service, but offers free trials as a promotion from time to time.
AWS EC2 servers are virtual machines. They can run the same software that runs on your desktop computer, but they don't use an actual separate machine. A user can't tell whether a web page is served by a physical or virtual server. It's a fast way to acquire a new server without having to buy hardware. This is especially useful when you need a server for a short time or a special purpose, like testing an upgrade. Amazon isn't the only vendor who provides virtual machine services, but it is the focus of this walkthrough.
These instructions detail how to set up a server with a community contributed snapshot of an Ubuntu 10.10 server which already has Java, MySQL, and Tomcat installed. It will permit you to create a server quickly. It may not be suitable for a production server.
If you simply want to run a demo, it's much simpler to run the OpenMRS appliance on your own computer.
Additional Reading
Amazon's EC2 overview page and EC2 FAQ.
The EC2 API tools let you administer your EC2 instance from the command line. The functionality is available from the AWS Management Console, but the command line utility can be easier to find.
Here's an intro to EC2 with OSX. It has some good general explanations of EC2 key pair files, as well as OSX instructions for setting up the EC2 API tools.
TODO: any other good background articles?
Before Beginning
Privacy
An EC2 server, like any Internet-accessible and hosted server, has security vulnerabilities. Your organization may be required to conform to local privacy laws or professional standards for safeguarding patient information. Amazon has a whitepaper on Creating a HIPAA Compliant Medical Data Application with AWS. Amazon recommends that your own legal staff review your security arrangements.
OpenMRS has a setting to mask the display of patient names. This is insufficient for safeguarding privacy. The un-masked data is still in the database, and still exposed through API calls.
See Anonymizing Data for more guidance. If you are making data available to researchers you can scramble identifying information.
Security
This page describes how to install a preconfigured server snapshot of Ubuntu. The snapshot was created by an unknown third party and made available to the Amazon community. It is unknown what changes were made to the Ubuntu system. If you're going to use it for production, you should have the Ubuntu expertise to do a security audit or create your own image with a clean installation of Ubuntu, MySQL, Java, and Tomcat.
Performance
What will you use this server for? An EC2 server might not meet performance requirements without additional configuration.
Survive with a Micro-Instance
How to setup a Micro-Instance for DEMO purpose (not suitable for production) :
Amazon EC2 provides a free tier for Micro instances (which is an awesome and almost free service). It's a very cheap way to host an OpenMRS demo online! However, the OpenMRS web app is not performant on an AWS micro instance (with 1GB of RAM) under default configurations. You may increase performance somewhat by adding more swap space (eg 1GB). Follow the instructions here for a Linux installation : https://forums.aws.amazon.com/thread.jspa?messageID=221044
Afterwards, remember to do the following steps for more stability (to get rid of: java.lang.OutOfMemoryError: PermGen space issue) http://www.mkyong.com/tomcat/tomcat-javalangoutofmemoryerror-permgen-space/
Connectivity
You can't use your OpenMRS server if you can't connect to it. Your site should have excellent, reliable internet connectivity.
Project lifespan
How long will you need the server to run? The Ubuntu community guarantees Long Term Support for certain versions. Ubuntu 10.10, the version used in this walkthrough, is not a Long Term Support version. If your project will run for a long time, you may prefer to use an AMI with a different version and install Java, MySQL, and Tomcat yourself.
NEED MORE INFORMATION ABOUT: recommendations from implementers who've used it, especially how it's performed in practice
Amazon Setup
Open the Getting Started with EC2 Guide.
Sign up
The guide begins with how to sign up for AWS.
Create an instance
"Launch a Server Instance" walks you through creating a server.
On step 2, "Choose an AMI," click the Community AMI tab. Search for ami-cca25ea5, "Ubuntu 10.10 ready for OpenMRS." Click the Select button.
UPDATE: ami-cca25ea5 is no longer available on AWS. An image can be built using SDK as explained here.
On the next screen, you will select the system configuration from the Instance Type dropdown. Pick an instance type that meets the OpenMRS system requirements for your organization's kind of installation.
You can accept the defaults in Advanced Instance Options. You may add a key/value tag to the instance if you wish (e.g. "dev").
On step 3 and 4, you'll create a Key Pair. This is the security credential you'll need to connect to the server later. It will download the credential file. The file cannot be re-created, so remember where you save it.
On step 5, "Create a Security Group," add two rules:
- Enable web browser access:
Port range: 80 Source (default): 0.0.0.0/0
- Enable Tomcat manager access:
Port range: 8080 Source (default): 0.0.0.0/0
Keep the rule for port 22 for SSH access.
Finish the installation. Your instance is up and running.
Now the whole world can access your new server on these ports. Note the guide's caution about restricting IP addresses that can access your instance, especially if you put sensitive or private data on the server.
Connect to Your Server
In the getting started guide, continue to "Next: Connect to a Linux/UNIX instance."
Follow the directions to ssh into your new instance.
The ssh connect command will be like this:
ssh -i your_keypair_file.pem ubuntu@your_dns
-i identity_file
This is the file you downloaded when you created the Key Pair. It must be on your filepath, or you must specify the full filepath.
user@
The Ubuntu installation includes a user named ubuntu. Connect as this user.
your_dns
AWS creates a DNS hostname so you can connect. To find it, open your AWS console in another window. On the Navigation menu on the left, expand INSTANCES and click on Instances. Your new server will appear in the My Instance area. Click on the row, and the description of your server will appear beneath. Scroll down to the Public DNS address.
Change Default Passwords
Because this Ubuntu image is publicly available, other people know the passwords for MySQL and Tomcat Manager. Let's change the passwords now.
MySQL
There's no documentation about what password was assigned to the root user on this image. To reset the MySQL root password, follow these instructions.
Tomcat6
Edit /etc/tomcat6/tomcat-users.xml. Change the password for admin. Restart Tomcat to pick up the changes:
sudo service tomcat7 restart
Confirm the change by opening a web browser to http://your_aws_dns_here:8080/manager/html.
Change Settings for UTF8
If you're going to use UTF8, there are some configuration changes for MySQL. Follow these directions for using UTF-8 characters.
There's already a [mysqld] section in /etc/mysql/my.cnf Don't re-add the [mysqld] line. You can insert the new lines anywhere in the section.
Tomcat7 is already set to use UTF8.
Change Java
Follow the Ubuntu instructions at https://openmrs.atlassian.net/wiki/display/docs/Step+2+-+Install+Java
Change Tomcat
I encountered PermGen memory errors with a 1.7.1 install. This manifested as a failure to complete installation, and a failure to restart OpenMRS from the Tomcat manager. The log file at /var/log/tomcat7/catalina.out contained an OutOfMemoryError.
To change memory allocations, follow the directions at Troubleshooting Memory Errors to change CATALINA_OPTS. Scroll down to Jonah Mwogi's notes in the comments.
OpenMRS 1.8.x made significant improvements to performance, so these changes may be unnecessary.
Make a Backup
You now have a pristine server, ready to go. This is a great time to take a backup. You can roll back to this snapshot later if you need to start clean again.
From the AWS Management Console in your web browser, select ELASTIC BLOCK STORE > Snapshots. Follow the directions for creating a snapshot.
Install OpenMRS
Follow the OpenMRS installation instructions up to Step 6, Configuration.
When you begin configuration, you'll get an error message that tomcat7 isn't allowed to create a directory. You'll have to do it from the Ubuntu command line.
For this example, the directory will be /usr/share/tomcat7/.OpenMRS. Use the directory that appears in the error message.
Ssh into Ubuntu as before.
Create the directory :
mkdir /usr/share/tomcat7/.OpenMRS
Change permissions group:
chown tomcat7 /usr/share/tomcat7/.OpenMRS
Grant write permissions for tomcat6 group. Initial permissions are 744.
chmod 774 /usr/share/tomcat7/.OpenMRS
On your web browser, click the Retry button. The installation will continue normally.
When prompted for a database user, use root and the password you chose when you reset root's password.
If the installation began properly, but shows the installation screen again with a "can't create openmrs-runtime.properties" error, check the logs at /var/log/tomcat7/catalina.out. It may mean the OpenMRS installation failed.