System Administration: Manage Apps
Overview:
The Manage App Definitions app allows implementers to add or remove applications to the system without having to build a module. This app is in it's first iteration and is a little rough around the edges. We hope this page provides a good understanding of available App Definitions. If you have trouble ask a question on Ask OpenMRS. This feature is available in OpenMRS v 2.2.
Steps:
- Navigate to System Administration>Manage Apps
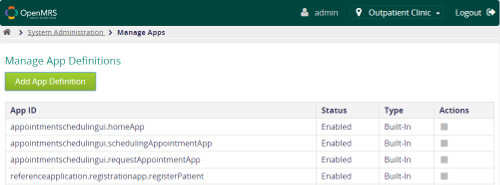
- The table on this screen lists all apps that are currently installed in the Reference Application.
- App ID: is the unique name of the app
- Status: The status of the app (Enabled/Disabled)
- Type: This describes if the app was built-in to the Reference Application or a custom definition
- Actions: This allows you to start, stop or edit the app. Note, you can only edit the app if it's not built-in. This is critical if you wish to replace functionality in a particular app. For example, you can adjust the registerPatient app to allow your team to enter manual patient identifiers or to define a different redirect URL after registering a patient e.g the redirect URL could be to page where they can print an ID card of the registered patient. To do this, you would have to add the app definition, start it under actions and stop the referenceapplication.registrationapp.registerPatient App ID. (More on that below)
Common Uses
Implementers use the "Manage Apps" area to adjust configuration options differently than what is deployed in the standard installation of OpenMRS. For example, the app labeled "Register a Patient" has the ability to manually type in identifiers, as defined in the configuration options template. This is turned off by default in the reference application. The manage apps area allows implementers to quickly define a new "Register a Patient" app with that configuration option turned on and stop the default app to ensure users choose the correct app all the time. Additionally, implementers are able to define implementation specific permissions for each app.
Add App Definition
Background
Template Definitions:
OpenMRS utilizes app templates that standardize the configuration for apps. Templates are available in the source code of each app provider which is often available on the OpenMRS github page. We have tried to define templates on this page for ease of use.
The green button "Add App Definition" allows you to add your own app.

App Definition Explanation
Each app definition has to have an App ID. This is the piece of information that differentiates your app from others in the system. Most apps have "Extensions" and "Configuration Options." Extensions define the app properties and the extension point so the system knows where the app will be placed. Configuration Options are available for some apps based on the team that created them. These configuration options are often available as templates found in the github repository of each app module. We have done our best to provide links on this page to each github repository with configuration options a well as examples of the active apps in v.2.2 of OpenMRS. Note that the JSON you enter is for a single app and not a collections of apps i.e DONOT wrap the JSON inside square brackets like their inbuilt counterparts.
Register Patient
The registration app can have basic version without Contact Info. You can enable this functionality going to System Administration>Manage Apps, in App ID column you have registrationapp.basicRegisterPatient, in Action column click on Enable triangle. You can also switch off this functionality clicking on Disable.
App ID: referenceapplication.registrationapp.registerPatient
The Register Patient App is found in the openmrs-module-registrationapp. The template definition can be found at this link, which describes the config fields. The code pasted in the following code block is what's currently used in the Reference Application app definition found here (note that the square brackets before and after should not be used).
Follow step-by-step instructions for Registration App Configuration.
Find Patient
App ID: coreapps.findPatient
The Find Patient App is found in the openmrs-module-coreapps. The template definition can be found at this link, which describes the config fields. The code pasted in the following code block is what's currently used in the Reference Application app definition found here (note that the square brackets before and after should not be used).
Active Visits
App ID: coreapps.activeVisits
The Active Visits App is found in the openmrs-module-coreapps. The template definition can be found at this link, which describes the config fields. The code pasted in the following code block is what's currently used in the Reference Application app definition found here (note that the square brackets before and after should not be used).
Vitals
App ID: referenceapplication.vitals
The Vitals App is found in the openmrs-module-registrationapp. The template definition can be found at this link, which describes the config fields. Notice that the vitals app uses the coreapps.template.findPatient template to search for the patient and then redirects the user to the "capture vitals" patient page as defined in "afterSelectedUrl" config option. The code pasted in the following code block is what's currently used in the Reference Application app definition found here (note that the square brackets before and after should not be used).
Reporting UI App
App ID: my.reportingui.reports
The Reporting UI Module can be configured via a custom App. Step-by-Step instructions for configuring the Reporting UI App can be found on the Reporting UI Module page, under the "Configure the Module" section.
App to Link to Any Page in OpenMRS
App ID: referenceapplication.legacyRunReport
Imagine you need to provide a quick link from the home screen to somewhere that's not generally accessible in the Reference Application. For example, you need to run a report, using the legacy report UI. You can configure a custom app to do this.
You can customize the json configuration to your liking...
"id": The first "id": must match the name of the App ID to be able to save the report.
"icon": The icon that appears on the main page. You can choose from the icons in uicommons, specifying them by name. See http://demo.openmrs.org:8080/openmrs/uicommons/icons.page
"label": The text that gets displayed with the icon on the main page.
"url": Points to any URL in OpenMRS, including legacy UI or modules. In my example, I point it to the legacy reporting UI, to collect the run-time parameters for a specific report, identified by it's UUID in the URL.
"requiredPrivilege": This allows you to limit which users can see/click on this custom link.
Custom links widget in Patient Dashboard
App ID: coreapps.customLinks
This widget allows you to add custom links related to currently viewing patient on patient dashboard.
"id": The first "id": must match the name of the App ID
"icon": The icon that appears on the main page. You can choose from the icons in uicommons, specifying them by name. See http://demo.openmrs.org:8080/openmrs/uicommons/icons.page
"label": The text that gets displayed as widget header
"links": Links that you can specify by using variables such as: patientId, patientUuid, visitId, visitUuid.
coreapps.customLinks