HTML Form Entry Designer - Rendering (Design)
This page details how rendering is done in the WYSIWYG designer. The HTML Form Entry Designer uses CKEditor as a base for WYSIWYG editing of HTML Forms.
Glossary
This section clarifies some terms used during this document.
- Designer Element - a block of HTML Form code handled by the designer (associated with a UI Element).
- HTML Form code - code used in HTML Form Entry module. Basically HTML with more tags that are rendered by the HTML Form Entry module.
- UI Element - a widget that produces a Designer Element.
CKEditor Data Processor
The CKEditor Data Processor is responsible for converting user input into HTML (that's rendered in the designer) and for converting HTML into HTML Form code (more details):
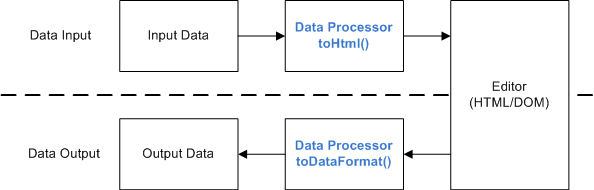
The default CKEditor package is able to translate the common HTML elements, that are also translated in the HTML Form Entry module.
However, there are special elements that only exist in the HTML Form code. These are (for instance) <obs>, <lookup>, <section>, .. tags. The way these elements are handled in the designer is the purpose of this design document.
Representation of Designer Elements
Because there are different UI Elements in the HTML Form Entry Designer, knowing automatically how HTML Form Entry code translates into those elements is not practical.
As such, and considering that UI Elements can encompass more than one XML tag, in order to represent these elements in CKEditor, they will be wrapped in a special tag <designerWidget>.
The htmlformentry module should ignore this tag (while rendering its contents). The designer should translate this tag into a span element, with a specific css style so the user can identify the element in the editor.
In order to keep the designer element structure intact, they should be non-editable:
- the element content shouldn't change in the designer
- the element can be moved around the document
- the element can be erased
- the element can be edited (with the aid of the designer)
The first 2 requirements can be accomplished by setting the span attribute "contenteditable" to false.
For the last 2 requirements, a context menu can be created (with erase and edit functionality).
The CKEditor's placeholder plugin provides a base for this functionality (by making content non-editable, while providing a dialog for editing), although it should be extended to support all requirements fully.
In order to know how the content is mapped as attributes into the designer elements, a "data" attribute should be added to the span, containing a string of text serialized by the UI Element.
Following these assumptions, a Designer UI Element that adds form fields regarding the Encounter, could be translated as a Designer Element like this:
<designerWidget type="encounterFields" data="allElements:'true'">
    <b>Encounter Information:</b>
    <table>
        <tr> <td>Date:</td> <td> <encounterDate /> </td> </tr>
        <tr> <td>Location:</td> <td> <encounterLocation /> </td> </tr>
        <tr> <td>Provider:</td> <td> <encounterProvider /> </td> </tr>
    </table>
</designerWidget>
This approach works for the following use case:
- The user creates and edits the form only in the designer.
However, there are more use cases that need to be covered:
- The user imports an existing form (which has not any or has few designerWidget elements).
- The user wants to use the designer while editing the source code manually for some adjustments.
When the designer finds a htmlformentry module tag without a designerWidget tag surrounding it, it will use the default TagHandlerUiElement to handle it. This way, every element can still be properly represented in the designer, allowing the same editing flexibility.
For editing elements manually, the user must get rid of the designerWidget tag surrounding the element, in order to manually edit the code inside.
HTML Rendering of Tags
The tags specific to the HTML Form Entry module will be rendered using the getHtmlPreview method. Alternatively, a UI Element can override this option to render a specific representation of its element.
Designer Rendering Example Workflow
This section provides some examples of how the rendering works.
Importing an existing form (raw elements)
At the beginning, each TagHandler tag (<obs>, <lookup>, etc. ) is registered in CKEditor as a "special" tag
- Process each HTML tag normally
- Each "special" tag will be "transformed" into a designerWidget span:
DATA:
<obs conceptId="123" />
HTML:
<span type="obs" data="conceptId:'123'">
    <!-- output rendered by the getHtmlPreview method -->
</span>
This will be done automatically (DATA to HTML to DATA):
DATA:
<tagName attributeId1="value1" ... />
HTML:
<span type="tagName" data="attributeId1:'value1';...">...</span>
- The rendering is done on the fly, whenever the source and designer view is changed.
Adding a Designer Element
- Choose an UI Element to add.
- Specify its attributes (on the editor dialog).
- Generate the HTML Form Entry code (with the designerWidget tag surrounding it):
<designerWidget id="designerWidgetXXX" type="elementId" data="serializableData">
   <!-- RAW HTML FORM ENTRY MODULE CODE -->
</designerWidget>
Each time a Designer Widget is added, a record of it is stored in the session. The following is stored in a Map:
class DesignerWidget {
    String id; //corresponding to the id of the element
    String type; //id of the UI Element
    String data; //corresponding to the data to be serialized in the UI Element
    String xmlCode; //Raw HTML Form Entry code
    String htmlPreview; //the HTML preview to be rendered in the designer
}
This way, whenever it is needed to do the DATA<->HTML conversion in CKEditor for the designerWidget class, it would simply render the appropriate XML or HTML Preview code.
Importing an existing form (designer widget elements)
When the editor finds a <designerWidget> tag, it will import them in the Map with DesignerWidget, by deserializing the data attribute
Editing a Designer Element
A <designerWidget> element can only be edited with the appropriate context menu in the Designer View. Changes in the source view will not be reflected.
- Select the element to edit (right-click, Edit)
- Edit its attributes
- Regenerate the HTML Form Entry code and update the DesignerWidget element.