Data Synchronization Create New Sync Node Project
<html><head><title></title></head><body>See the main Data Synchronization Project for more information about the background and breakdown of the OpenMRS Synchronization Project
GSoC 2009 Intern: Nzeyimana Antoine
Mentor(s): Maros Cunderlik and Ben Wolfe
PROJECT DESCRIPTION
<u>Abstract</u>
Data synchronization is a new OpenMRS feature allowing synchronization of data amongst a set of loosely networked servers. Such ability to exchange data is essential for operation of EMR system in rural areas where connectivity amongst sites maybe unreliable yet the need for timely centralized collection and analysis of data from remote sites exists.
One of the challenges in creating and maintaining the network of servers is the initial setup of 'child' node and establishing the relationship between parent and child such that no data is lost during the process. This process is today performed as a set of manual steps including:
- register newly created child with parent
- back up parent server DB and move the backup to the new child server
- restore parent's DB
- assign new server sync ID
- change any server identifying information from parent to child (i.e. form entry server URL)
- test sync connection between parent and child and finally establish periodic sync schedule
As shown above, performing these steps requires administrative knowledge and access to the system resources such as DB login. What is needed is the user administration interface in OpenMRS that will allow system administrator to add new child node to the system without resorting to manual procedure as outlined above.
<u>Target</u>
Successful completion of the project would include:
- Design and document the best programmatic approach to the manual process. Some considerations: What steps may be easy/hard to do in code? What is the best and most reliable way to 'clone' database from 'active' web application?
- Design the appropriate user interface: identify and document user interactions; design web screen for the admin user interface.
- Create project approach utilizing Agile software development methods: define user stories to document design, create task backlog, plan sprints, and deliver feature in several increments.
- create appropriate unit tests using standard OpenMRS unit testing approach, see Unit_Testing_Conventions and Unit_Testing
- for each user story create automated behavior and/or integration tests thus providing minimally one-to-one integration test coverage for each user story
<u>Extra Credit</u>
At times, it is also necessary to physically bring existing child node that may have been offline, or otherwise unavailable back onto parent's network. In those cases, what is generally needed is to 'send' any data entry performed offline to parent and then rebuilt the child database from 'scratch'. The solution developed to to create new child would ideally support this need also.
DESIGN & DOCUMENTATION
<u>Manual process of cloning a DB from an active web application</u>
The manual process of sync child creation involves many steps including:
- create the child user account at the parent installation
- backup the parent DB
- restore the parent DB at the child
- assign a new server sync ID and change any server identifying information
- test sync connection between parent and child and finally establish periodic sync schedule
The parent DB backup and restore are the most difficult part of the process since there is an admin UI for the rest of steps .
*DB backup(cloning parent DB)
There are many methods for Mysql database backup but the most widely used is the mysqldump command line program .
The mysqldump program comes along with Mysql installation and it has many options .
The documentation about mysqldump program can be found in mysql reference manual [.
The most common uses of mysqldump are :
Backup the whole database on a ddl file(dump file)
<code lang="sql">
mysqldump –-user user name] –-password=password database name > dump file
or
mysqldump –u user name –p password database name > dump file
</code>
example
<code lang="sql">
mysqldump –-user root –-password=rootpassword openmrs_sync > openmrs_sync_backup.sql
or
mysqldump –u root –p rootpassword openmrs_sync > openmrs_sync_backup.sql
</code>
Backup a specific table in the DB
<code lang="sql">
mysqldump –-user user name –-password=password database name table name > dump file
example
mysqldump –u root –p rootpassword openmrs_sync synchronization_journal > /home/user/Desktop/openmrs_sync_journal_backup.sql
</code>
*DB restore(child DB setup)
The mysqldump utility is used only to take the MySQL dump. To restore the database from the dump file that you created in previous step, use mysql command .
<code lang="sql">
mysql --user username --password=password database name < dump file
example
mysql --user root --password=myrootpassword openmrs_sync < /home/user/Desktop/openmrs_sync_journal_backup.sql
</code>
After the database restore the administrator proceeds to other steps concerning the child-parent configuration .
<u>Automated process</u>
Using mysqldump command-line manually to backup the parent database needs to be carried out carefully.
There are even some tables that are supposed to be skipped because we don't need to export them to the child.
Dumping each table manually sometimes become a hassle leading to errors.
This automated process will automate the whole process of cloning the parent DB and restoring it on the child side.
Fewer steps are required now and everything will be done via the sync admin UI page .
Required functionalities:
Parent capabilities:
- register the newly created child
- backup the database in a customized way so that some tables or data bay be skipped
- write the clone script to a file or to an HTTP response
- export the DB backup script file to download for off-line restore at the child side
Child capabilities:
- request the parent DB backup
- restore a the parent DB backup from an HTTP response
- import the parent DB and restore it via an uploaded file
- ability to edit/change parent identification
Implementation process
- The DB dump and restore are done by SynchronizationHibernateDAO class via JDBC or by calling mysqldump/mysql command-line programms.
- Two JDBC methods: exportChildDB(OutputStream out) and importParentDB(InputStream in) in the Sync DAO layer are exposed to the sync service layer
- Two JDBC methods: generateDataFile(File) and execGeneratedFile() in the Sync DAO layer are also exposed to the sync service layer
- These methods can be called via Spring Controllers, Servlets or DWR Sync Service to make the process easier .
- The exported/imported database DDL files are stored in OpenMRS local directory first.
*JDBC vs. mysql/mysqldump methods: the process of dumping and restoring the database can be done by either JDBC methods (J methods) or by the methods that calls mysql/mysqldump command programs; the results of these methods are fully identical but there are some points to put into consideration for choosing which one is more efficient .- The mysql/mysqldump methods (M methods) are faster and less expensive(CPU/memory) because there are just calls to the operating system to execute commands
- The M methods are depend on the fact that mysql bin directory is in the path
- The J methods are cross-platform and DBMS-independent
- Any DBMS migration from Mysql will make the M methods invalid
<u>Admin UI Screen Design for the automated process</u>
The sync settings page has a link for adding or setting up the parent DB, this will lead to the child node creation or editing .
This user interface has four main parts:
- Parent server connection setup: address, credentials and connection testing button
- Parent DB cloning: the OpenMRS system administrator can clone the parent DB via web or uploading a backup file downloaded from the parent installation
- Sync schedule: this helps to set up automatic synchronization between parent and server after every amount of time specified here
- Saving changes: After setting up everything, the changes needs to be saved
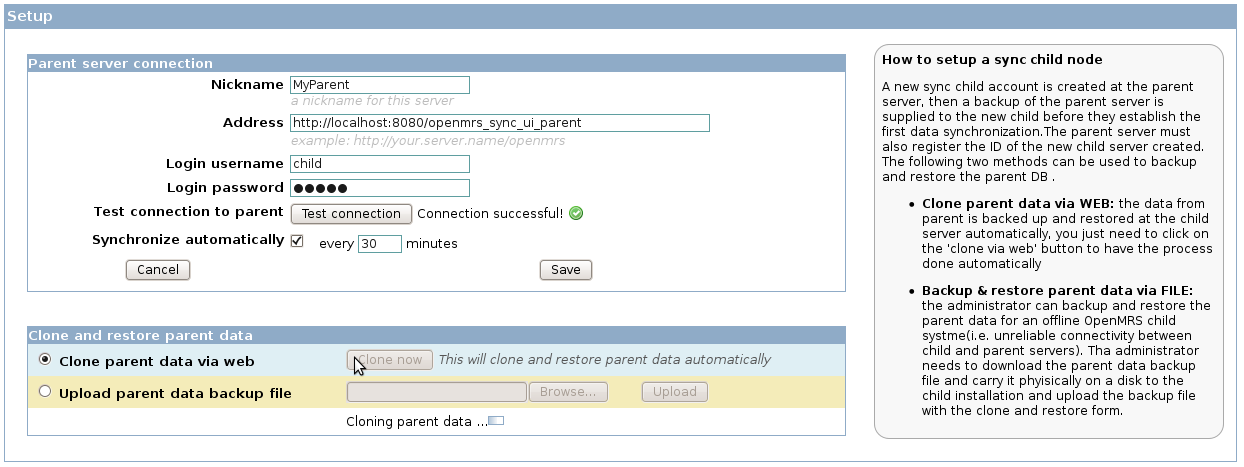
OpenMRS Data Synchronization: create a new sync node, admin UI .
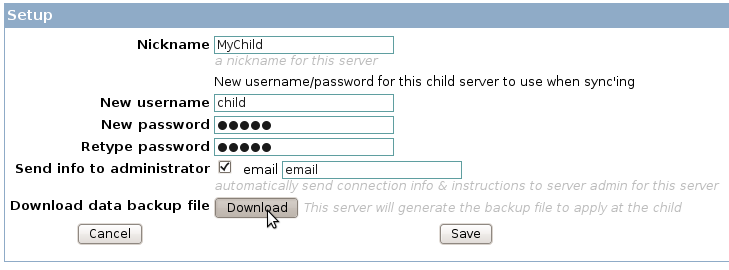
OpenMRS Data Synchronization: setup a new sync child and be able to download data backup file for offline restore.
PROJECT GOALS
<u>Mid-term goals</u>
- Manual process documentation included in the help page
- Merge the data-synchronization-admin-ui branch from data_synchronization_bidirectional branch(1.4.x data model)
- Develop the automated process including:
- Ability for the parent to export the backup of the database via the web(HTTP) response(ConnectionResponse class)
- Ability for the parent server installation to download a backup file of the database
- Child can import the parent db backup via the web
- Ability for the child installation to upload a parent db backup file
- Ability to store the backup files in the OpenMRS local directory
- Design and implement the administrative user interface for this automated process
- Document the automated process in the help page and define use cases(i.e. automated web cloning, backup files, download and upload the backup file)
<u>Final Goals</u>
- Unit and integration testing
- Finish the documentation and and help page for all use cases
- Clean up, update and finish the Sync Admin UI where necessary(e.g. Help & Documentation)
- 'Project-wise' code commenting and licence inclusion
- Modify the Admin UI for the user to be able to select which tables to dump in the data backup similar to the way he can to select which tables to sync
SOURCE CODE
The project codes can be browsed [ HERE|http://trac.openmrs.org/browser/openmrs/branches/data-synchronization-admin-ui].
This source code is available for free under the terms of OpenMRS Public Licence .
You can do a checkout using the following command :
<code lang="sql">svn checkout http://svn.openmrs.org/openmrs/branches/data-synchronization-admin-ui</code>
OTHER IDEAS AND COMMENTS
We welcome everyone to leave any useful feedback
</body></html>