XForms Module User Guide
Installation
- Download the latest version from the OpenMRS module repository and add it to your OpenMRS application using the Administration->Manage Modules page.
Entering Data
- Search for a patient and select him or her.
- Click the Form Entry tab.
- Click Edit to open an existing encounter. If you want to fill a new encounter, select the form you want to fill and Click the add button to display the form.
- After filling the form, click the Submit button to save it or Cancel button to discard the changes and go back to the patient screen.
Creating an Xform
You can create an xform by:
- On the "Administration" screen, select "Manage Forms"
- Click the "Add Form" link and fill in the details before you click the "Save Form" button.
If you have a form to copy, select it from the drop down list and click the "Duplicate" button. Enter the name and description of the form and then click the "Create Form and Duplicate Schema" button. - After saving, you will be taken to the list of forms from which you can select it in order to design its schema.
Versions 3.9.9 and above of the xforms module make it easier to create forms because you just add a new form and then the default fields are automatically created, hence not requiring duplicating the Basic Form, which may not be available for installations that do not have demo data.
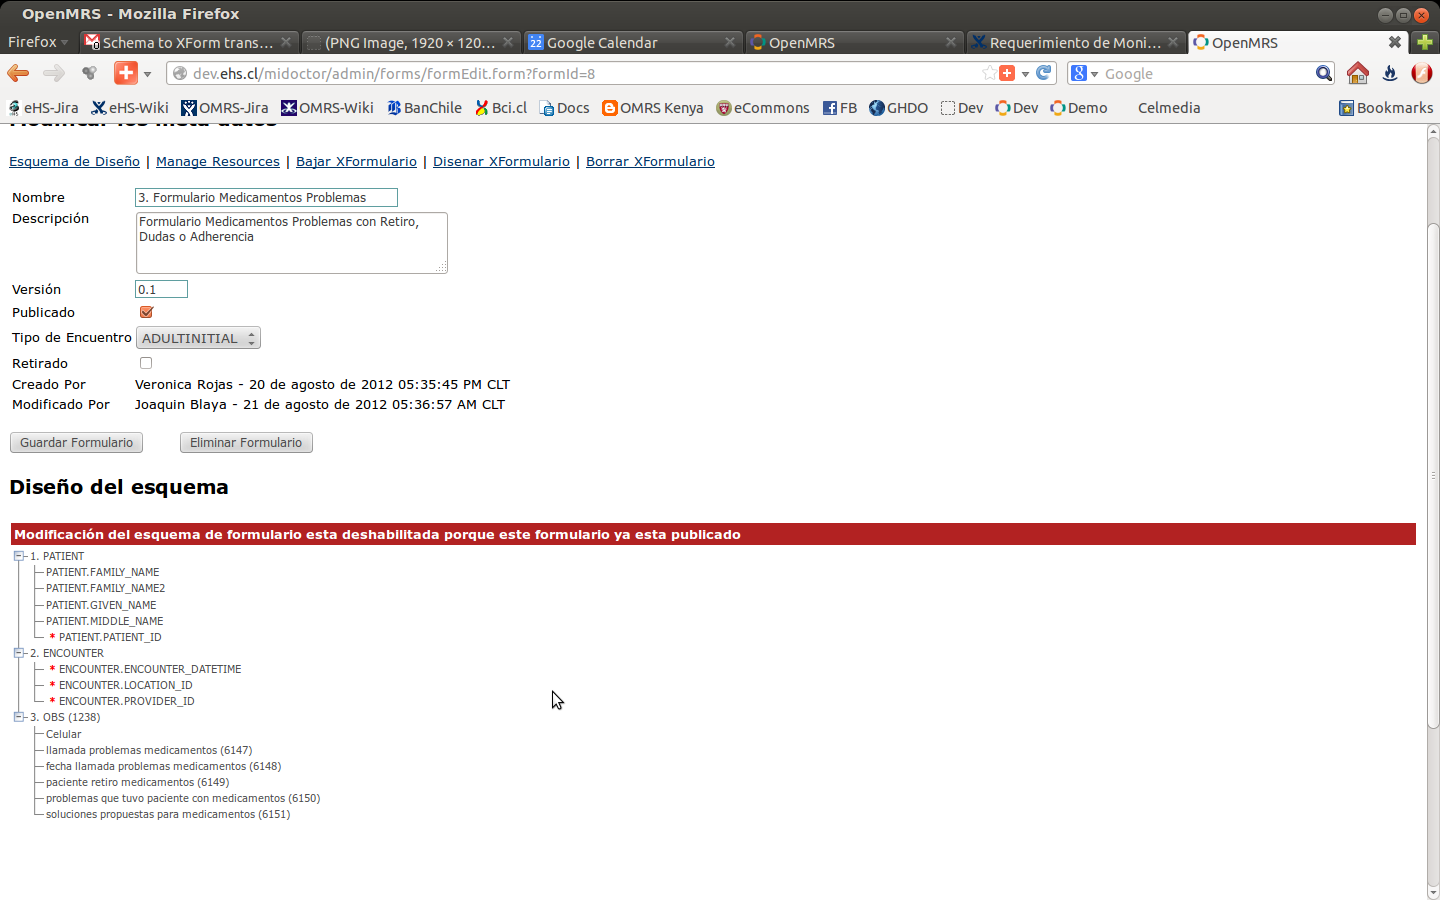
Because an xform is built from a form schema, you may want to read about creating form schema at ?Administering Forms. If you already have your concepts created, you do not need to read the administering forms link. Just search for these concepts, from the right hand "Find Field Elements" textbox, then drag and drop them onto the OBS section of the form on the form schema screen as shown in the diagram below.
Ensure that your form has the Encounter Type field set. Forgetting to do so will result into errors while trying to submit form data. If no encounter type exists, then go to the Administration screen and select Manage Encounter Types to click the Add Encounter Type link.
One note is that all concepts should be entered under the OBS branch of the schema as shown in the image below
4. Once you are done with building the form schema, click the "Design XForm" link which will open the XForms Module Form Designer to allow you customize the form. Check the Design Surface Tab to ensure that you can see some widgets. If the form looks good (even if you have made no changes) you should save the form. When you save the form, it will be ready for data entry.
Note that after customizing and saving the form in the designer, if you later on remove from or add more fields to the form schema, in order to have them picked up by the form designer, you will need to right click on the form name under the form designer's "Form Fields" panel and then select "Refresh" from the menu that pops up. That way the new fields that you added to the form schema will show up in the form designer. Remember to save after doing any such changes in the form designer.
Customizations
You can customize the automatically created XForm by using the "Administration" screen, selecting "Manage Forms" and then select the form. Add as many fields as you want to the form schema with the mandatory ones being:
- (PATIENT section) PATIENT.PATIENT_ID
- (ENCOUNTER section) ENCOUNTER.ENCOUNTER_DATETIME
- (ENCOUNTER section) ENCOUNTER.LOCATION_ID
- (ENCOUNTER section) ENCOUNTER.PROVIDER_ID
You will see the menu items as explained below:
Download XForm
Lets you save an XForm on the file system. You can do this to use other XForms designers for making any modifications, or transfer to xforms applications which do not fetch xforms from the sever at runtime. If you have not yet uploaded an XForm into the database, it is the default one which will be downloaded.
Design XForm
This launches the form into the designer and lets you customize and save it into the database. Details on using the form designer can be found at ?XForms Module Form Designer
Upload XForm
Allows you to save an XForm from the file system into the database. Possibly one modified in any xforms designer.
Delete XForm
Allows you to delete an existing XForm from the database. This item will be shown only when you have saved an XForm into the database.
Settings
Use the following settings for further customizations:
- xforms.useEncounterXform: Set to true if you want to use XForms to edit encounters instead of the default openmrs edit encounter screen, else set to false. Default value is false
- xforms.usePatientXform: Set to true if you want to use XForms to create new patients instead of the default openmrs create patient form, else set to false. Default value is false
- xforms.timeDisplayFormat: The display format of time used by the xforms module. Default value is hh:mm:ss a
- xforms.timeSubmitFormat: The format of the time passed in the xml of the xforms model. Please make sure this matches with the date format of your data entry applications, else you will get wrong times on the server. Default value is hh:mm:ss a
- xforms.dateDisplayFormat: The display format of dates used by the xforms module. Default value is dd/MM/yyyy
- xforms.dateSubmitFormat: The format of the dates passed in the xml of the xforms model. Please make sure this matches with the date format of your data entry applications, else you will get wrong dates on the server. Default value is yyyy-MM-dd
- xforms.dateTimeDisplayFormat: The display format of datetime used by the xforms module. Default value is dd/MM/yyyy hh:mm:ss a
- xforms.dateTimeSubmitFormat: The format of the datetime is passed in the xml of the xforms model. Please make sure this matches with the date format of your data entry applications, else you will get wrong dates on the server. Default value is yyyy-MM-dd hh:mm:ss a
- xforms.smsFieldSepChar: The separator between questions and answers in the sms text. Default value is =
- xforms.smsSendFailureReports: Set to true if you want sms sender to get failure reports, else set to false. Default value is true
- xforms.smsSendSuccessReports: Set to true if you want sms sender to get success reports, else set to false. Default value is true
- xforms.defaultFontFamily: The default font family used by the xforms module. Default value is Verdana, 'Lucida Grande', 'Trebuchet MS', Arial, Sans-Serif
- xforms.defaultFontSize: The default font size used by the form designer. Default value if 16
- xforms.complexobs_dir: Directory for storing complex obs used by the xforms module. Default value is xforms/complexobs
- xforms.error_dir: Directory containing the xforms error items. This will contain xform model xml files that have not been submitted into the formentry queue because of processing errors. Default value is xforms/error
- xforms.queue_dir: Directory containing the xforms queue items. This will contain xforms xml model files submitted and awaiting processing to be submitted into the formentry queue. Default value is xforms/queue
- xforms.archive_dir: Directory containing the xforms archive items. This will contain xform model xml files that have been processed and then submitted successfully into the formentry queue. Default value is xforms/archive/%Y/%M
- xforms.showSubmitSuccessMsg: Set to true if you want to display the form submitted successfully message every time a form is submitted successfully, else set to false. Default value is false
- xforms.localeList: The list of locales or languages supported by the form designer. The format is key:name,key:name,key:name ... Default value is en:English,fr:French,gr:German,swa:Swahili. These will be displayed in the form designer's language drop down list to be used when designing forms in multiple languages.
- xforms.showLanguageTab: Set to true if you want to display the language xml tab of the form designer, else set to false. Default value is false.
- xforms.showLayoutXmlTab: Set to true if you want to display the layout xml tab of the form designer, else set to false. Default value is false.
- xforms.showModelXmlTab: Set to true if you want to display the model xml tab of the form designer, else set to false. Default value is false.
- xforms.showXformsSourceTab: Set to true if you want to display the xforms source tab (xml tab) of the form designer, else set to false. Default value is false.
- xforms.showJavaScriptTab: Set to true if you want to display the JavaScript tab of the form designer, else set to false. Default value is false.
- xforms.setDefaultProvider: Set to true if you want to automatically set the encounter provider to the logged on user, if he or she has the provider role, when filling a form. Default value is false.
- xforms.setDefaultLocation: Set to true if you want to automatically set the encounter location to that of the logged on user, when filling a form. Default value is false.
- xforms.showOfflineFormDesigner: Set to true if you want to show the form designer in off line mode, else set to false. Default value is false. The off line mode form designer is accessed from the admin screen after selecting the "Xforms Designer" link.
- xforms.allowBindEdit: Set to true if you want to allow editing of question bindings in the form designer, else set to false. Default value is false.
- xforms.encounterDateIncludesTime: Set to true if the encounter date should include time, else set to false. Default value is false.
- xforms.saveFormat: The format in which the xforms will be saved. For OpenRosa / JavaRosa based clients, the value is: javarosa. The default value is purcforms.
- xforms.new_patient_identifier_type_id: The id of the patient identifier type which will be used when creating new patients from forms which do not have a patient_identifier.identifier_type_id field. If a form has the patient_identifier.identifier_type_id field, it takes preference over the one in the global property.
Copying xforms between servers
You can copy xforms from one server to another as long as the two servers have the same concept dictionary. These are the steps of doing so:
- On the source server, open the form in the form designer and select "Save As" from the "File" menu. This will save a file which you will use to copy the form into the destination server.
- On the destination server, create a new form as a duplicate of the OpenMRS basic form. Give it the same name as the form you want to copy.
- Under the "Manage Forms" screen, select the new form and click the "Design Xform" link which will take you to the form designer.
- Delete the form from the designer by clicking the "Delete Selected" toolbar icon or right click on the form in the Forms tree and select "delete" from the menu that pops up.
- Select "Open" from the "File" menu or click the open toolbar icon and browse to locate the file you saved from the source server.
- After opening the file and seeing the form loaded in the designer, select "Save" from the "File" menu or click the save toolbar icon. That's all.
NOTE: The above steps do not copy the form schema. Therefore you may need to use the FormImportExport Module to copy the form schema.
If you are copying the patient registration xform, below are the steps:
- On the source server, go to the admin page and select the Patient Registration XForm to load it in the form designer. Select "Save As" from the "File" menu. This will save a file which you will use to copy the form into the destination server.
- On the destination server, go to the admin page and select the Patient Registration XForm to load it in the form designer.
- Delete the form from the designer by clicking the "Delete Selected" toolbar icon or right click on the form in the Forms tree and select "delete" from the menu that pops up.
- Select "Open" from the "File" menu or click the open toolbar icon and browse to locate the file you saved from the source server.
- After opening the file and seeing the form loaded in the designer, select "Save" from the "File" menu or click the save toolbar icon. That's all.
How to include time for encounter date
In order to include time for the encounter date field, you need to do the following:
- While in the form designer, change the type of the ENCOUNTER DATE TIME field from "Date" to "Date and Time".
- Set the value of setting named "xforms.dateTimeSubmitFormat" to yyyy-MM-dd'T'HH:mm:ssZ
- Set the value of the setting "xforms.encounterDateIncludesTime" to true
- For OpenMRS version up to 1.8, change the default form style sheet, which you can access by clicking the "View XSLT" link on the form schema screen, as explained below.
Change the hl7Date value to hl7Timestamp in these sections as show below:
- First section
Change this:
<xsl:call-template name="hl7Date">
      <xsl:with-param name="date" select="encounter/encounter.encounter_datetime" />
</xsl:call-template>
to:
<xsl:call-template name="hl7Timestamp">
     <xsl:with-param name="date" select="encounter/encounter.encounter_datetime" />
</xsl:call-template>
- Second section
Change this:
<!-- We use encounter date as the timestamp for each observation -->
<xsl:variable name="encounterTimestamp">
      <xsl:call-template name="hl7Date">
	      <xsl:with-param name="date" select="encounter/encounter.encounter_datetime" />
      </xsl:call-template>
</xsl:variable>
to:
<!-- We use encounter date as the timestamp for each observation -->
<xsl:variable name="encounterTimestamp">
      <xsl:call-template name="hl7Timestamp">
              <xsl:with-param name="date" select="encounter/encounter.encounter_datetime" />
      </xsl:call-template>
</xsl:variable>
For OpenMRS version 1.9 and above, you no longer have the "View XSLT" link. You will instead use the "Manage Resources" link on the form schema screen as below:
- Click "Manage Resources"
- Click "Add Resource"
- For Datatype choose "Long Free Text"
- Click the "Continue" button
- For "Choose a UI Handler for this resource:", choose "File upload (for long text fields)"
- Click the "Continue" button
- For "Name", enter in this format: "formName.xFormXslt". For instance if the form is named "Basic Form" then enter: Basic Form.xFormXslt
- Download the following XSLT file
- For "Resource Value" browse to locate the XSLT file you have saved on your file system Then click the "Save" button
How to Label an XForm
If you have different versions of similar looking forms, sometimes you might want to print some text at the bottom of the xform page to tell the user what version and name of form they are looking at.
To do this, add a new label and set the value to be any text which will help you identify the form.
The label can be dragged from the Widget Properties panel and dropped on the design surface or you can right click on the designer surface and then select Label under the Add Control menu item. The value can be set using the label widget text property.
How to add a repeat section
Create a concept with the following properties:
Class: ConvSet
Is Set: Yes
Set Members: .......
Datatype: N/A
When you add this concept to the form schema fields, set the Max property value to -1, and then you will end up with a repeat section.
How to have multiple default values for a multi select field
If you have a multiple select field where you want more than one default value selected you should place all of the values you want selected separated by a space. For example: option1 option2 option3
How to include person properties or attributes
Create a form field of type Database element. You can leave the table and attribute empty. Make sure you that don't use any special characters such as (,),&, and others. Only letters and numbers, otherwise the value won't appear on the xform.
Set the default value like this:
$!{patient.getAttribute(personAttributeId).getValue()}
Where personAttributeId is the id of the attribute whose value you want to display.
If the attribute value is a concept id, you can display the concept name like below: (Starting from version 4.2.5)
$!{concept.getName($patient.getAttribute(personAttributeId).getValue())}
If the attribute value is a location id, you can display the location name like below: (Starting from version 4.3.2)
$!{location.getName($patient.getAttribute(personAttributeId).getValue())}
For properties you can see here the possibilities http://resources.openmrs.org/doc/org/openmrs/Person.html, so if you wanted age you would put
$!{patient.getAge()}
One special case is for the person_name.last_name2 because there is no person.getLastName2(), so it should be like this
$!{patient.getPersonName().getFamilyName2()}
How to edit person attributes or demographics
Table: person_address
Attribute: address1
Default Value: $!{patient.getPersonAddress().getAddress1()}
Table: person_attribute
Attribute: 3
Default Value: $!{patient.getAttribute(3)}
How to include past observations
Create a form field of type Database element. You can leave the table and attribute empty. Make sure you that don't use any special characters such as (,),&, and others. Only letters and numbers, otherwise the value won't appear on the xform.
Set the default value like this:
$!{obs.getValue(conceptId)}
where conceptId is the id of the concept whose value you want to display.
If the answer is also a concept the above will display the concept_id, if you want to display the name do the following
$!{obs.getValue(conceptId).getName()}
For instance to display the last WEIGHT (KG) whose concept id is 5089, the default value becomes:
$!{obs.getValue(5089)}
If you want the second last value, you can use:
$!{obs.getValue(2, 5089)}
If you want the third last value, you can use:
$!{obs.getValue(3, 5089)}
If you want the obs date and time you can use (as of XForms 4.0.9.9.4):
$!{obs.getObsDatetime(5089)}
To format the date to how you would like you can use any of the following and others:
$!{obs.getObsDatetime(5089, 'dd/MM/yyyy')}
$!{obs.getObsDatetime(5089, 'MM/dd/yyyy')}
$!{obs.getObsDatetime(5089, 'dd/MM/yy')}
$!{obs.getObsDatetime(5089, 'dd-MM-yy')}
How to display forms in different languages
- Ensure that the setting xforms.localeList has the locales which you want the forms to be displayed in, for example, en:English,es:Spanish
- Go to the Form Designer for the form you would like to change. You must have already created the form for one of the languages.
- In the Form Designer on the top right where it says Language, choose the language that you would like to translate to
- Click OK when it says that all changes will be discarded.
- Click on the text in the Design Surface tab and translate it. You will also need to change the text of the drop down options (for single select question types) in the "Form Fields" panel to the selected language.
- Save the form
- And now when you view the form in a patient's page it should change according to the locale.
Troubleshooting
Problem
After submitting forms, you do not see the encounters listed on the Encounters tab of the patient dashboard. This may happen for versions of the module which are lower than 3.6.1. Newer versions, by default, process the form immediately without queueing or delaying and therefore do not need to have these tasks running.
Solution
Make sure the following tasks are running:
- Process XForms Queue.
- Process Form Entry Queue.
- Process HL7.
You can access these tasks by using the "Administration" screen and selecting "Manage Scheduler". You start the tasks by ticking them and clicking the "Start" button.
Problem
When trying to fill a form, you get the error message: "No form layout found. Please first design and save the form."
Solution
That message means that the form has no saved widgets on the design surface. (Widgets define the layout of a form) Therefore to solve it, go to the form in the form designer, make sure you have some widgets on the design surface, and then save (by File Save menu, or Save icon on the tool bar.
Problem
When trying to open a form in the form designer, while using Chrome, you get the error message: "(TypeError): Property 'item' of object #<NodeList> is not a function"
Solution
That means you have a concept/formField named "ITEM". Just rename the form field to some other name.
Problem
When trying to submit a form, you get this error message: ca.uhn.hl7v2.HL7Exception: Invalid concept ID 'null' in hl7 message with uid: mLeJQZkCa7Ho8eqWThGR
Solution
On the form schema screen, edit the "OBS" section to ensure that its "Field Type" is "Concept", and then use the "Select" button below it to set its "Concept" field to "MEDICAL RECORD OBSERVATIONS"
General Recommendations from Building XForms
- If you want to have a listbox i.e. pulldown menu, the concept for the question must be of type coded. Then you will have to create concepts for each of the answers, place them as responses to the question concept within the concept dictionary in OpenMRS. Then when you go to create the XForm it'll appear as a listbox. The concepts for the answer will probably be of type N/A.
- In order to be able to submit an XForm (at least with version 3.9.7 a user must have the Provider privileges, as well as these View Users, Add HL7 Inbound Archive, Update HL7 Inbound Archive, Edit Encounters, Add Encounters. Otherwise you will get a Transaction rolled back because it has been marked as rollback-only error.
View Users
Add HL7 Inbound Archive
Update HL7 Inbound Archive
Purge HL7 inbound queue
View HL7
Add HL7 inbound exception
Delete HL7 inbound queue
Edit Encounters
Add Encounters
If your system does not have any of these privileges, just create them using the Add Privilege link under Manage Privileges on the Administration page.
Known Issues
- When using Bluetooth to connect to openmrs, any changes to form definitions are received only after restarting OpenMRS or the Bluetooth service.
Resources
- XForms Module
- XForms Module Patient Registration
- XForms Module Form Designer
- XForms Module External Applications Guide
- XForms Module Technical Overview
- XReports Module ReportDesigner Technical Overview
- XForms Module Release Notes
- Download Module
- GitHub project (source code)
- XForms was discussed on a May 9th University call. Watch xforms video
- XForms Newbies FAQs