XForms Module Form Designer
The form designer is composed of the following sections:
Menu Bar
Use this to access some of the designer actions. XForms Module Menu Bar
Tool bar
Use this to quickly access some of the designer actions. XForms Module Tool Bar
Form Fields
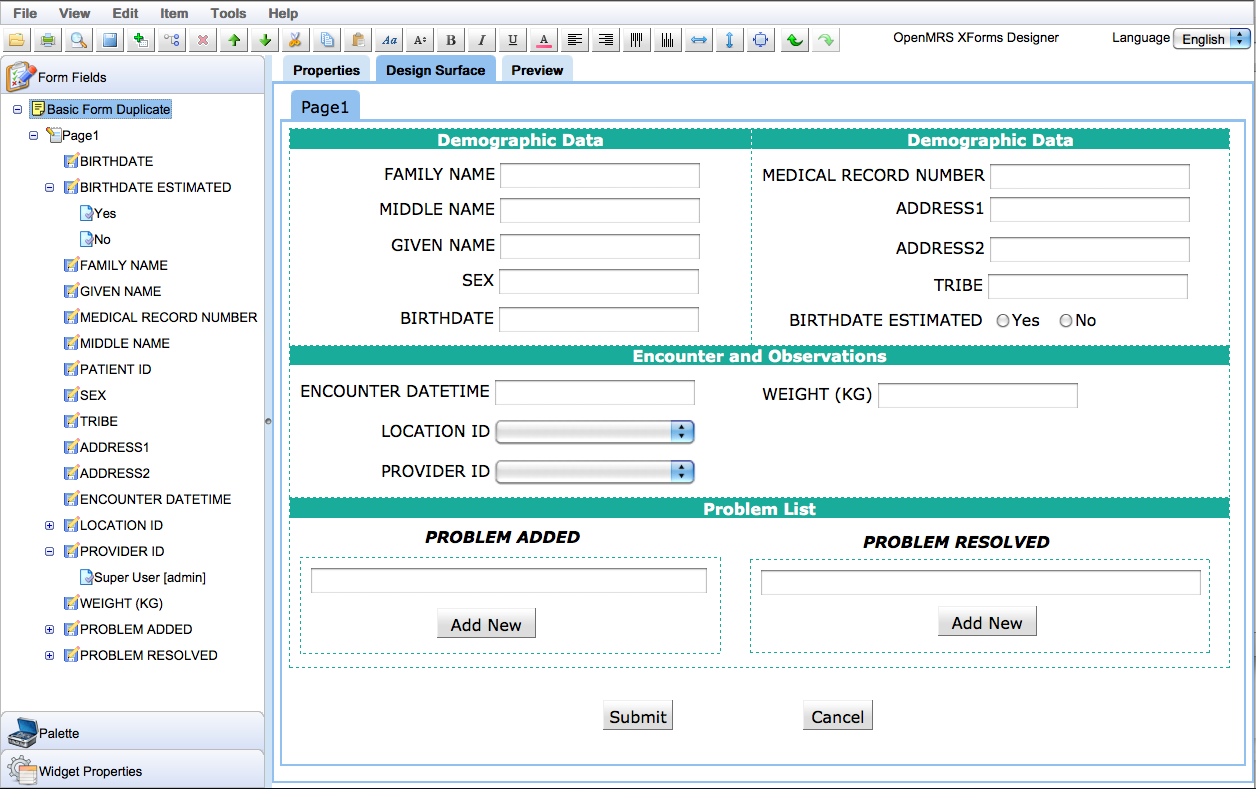
Lists a form structure with its pages and questions in a tree hierarchy. XForms Module Forms Pane
Palette Pane
Contains widgets which can be dragged and dropped on the design surface. XForms Module Palette Pane
Widget Properties Pane
Shows properties for the selected widget on the design surface. XForms Module Widget Properties Pane
Properties Tab
Shows properties for the selected item (page, question, or question option) in the Forms Pane. XForms Module Properties Tab
Xforms Xml Tab
Contains the xforms xml that the form designer produces.
Note: By default this Tab is disabled and invisible. To enable it please navigate to: Admin -> Maintenance -> Settings -> Xforms and rename "true" on the "Show Layout Xml Tab" field.
Design Surface Tab
It is on this surface that you can drop and drag widgets, resize, and more, to your desired structure. More about the design surface and short cuts can be found at XForms Module Design Surface
CSS Tab
Put here CSS to enable you customize the look and feel of your forms. For instance, you can use the css below to give all your text boxes a yellow back ground color.
.gwt-purcforms input.gwt-TextBox {
  background-color: yellow;
}
The CSS below removes the surrounding border (rectangle) when displaying a form for data entry.
.gwt-TabPanelBottom {
    border-style: none;
}
JavaScript Tab
To enable this tab, you need to set the value of the setting named "xforms.showJavaScriptTab" to "true". This is where you put JavaScript to do whatever the form designer does not do for you. This could be some complicated skip logic, validation logic, or anything else that you feel can be done in JavaScript. Each widget has a property called "ID", as you can see it from the widget properties tab, which you can assign a value and be able to reference the widget from JavaScript using functions like "document.getElementById("id")". The JavaScript is saved together with the form and will always be executed when running the form both in the preview mode and when doing the real form data entry.
For example, if you want to do some custom validations before a form can be submitted, you would write a something like this below:
document.getElementById('submit').onclick = function validate() {
  //do custom validations here.
  //and then call this function below if, as per the custom validations, the form is valid for submission.
  submitForm();
}
submitForm() is a built in function which does the standard xforms validations and then submits the form to the server if no errors are found on the form. The above code also assumes that you have a button whose ID value on the Widget Properties panel is: submit
For developers who do not want the page to refresh after form submission, ensure that you remove the "afterSubmitUrlSuffix" div.
Of course you could have any other value for the ID, you just need to know that whatever value you chose is the one to use as parameter in the getElementById() function. "validate" is just an example of the name of the function but it could as well be any other valid JavaScript function name.
Another example is when you want the index of the selected location to always match with the index of the selected provider, you would have something like this below:
document.getElementById('location').onchange = function selectProvider() {
  document.getElementById('provider').selectedIndex = document.getElementById('location').selectedIndex;
}
The above code assumes you have drop down lists (Combo boxes) for location and provider whose ID properties on the Widget properties panel are: location and provider respectively. "selectProvider" is just an example of the name of the function but it could as well be any other valid JavaScript function name.
Whenever you make changes to the JavaScript and you want to test the change in the preview tab of the form designer, refresh the preview by for instance right clicking on the preview surface and select "Refresh" from the menu that pops up.
Accessing radio buttons and check boxes requires indexing the first child node as: document.getElementById(ID).childNodes[0]
For instance toggling two check boxes with ids ID1 and ID2 to ensure that when one is checked, the other is disabled, and vices vasa, you would do something like below:
toggle('ID1', 'ID2');

function toggle(id1, id2){
    document.getElementById(id1).onchange = function () {
        document.getElementById(id2).childNodes[0].disabled = document.getElementById(id1).childNodes[0].checked;
        document.getElementById(id2).childNodes[0].checked = false;
    }

    document.getElementById(id2).onchange = function () {
        document.getElementById(id1).childNodes[0].disabled = document.getElementById(id2).childNodes[0].checked;
        document.getElementById(id1).childNodes[0].checked = false;
    }
}
Layout XML Tab
Contains the xml which stores the layout of widgets on the design surface. This is only useful for developers or advanced users who want to see the xml that the form designer uses to store the form layout.
Preview Tab
Shows form behavior as it will be at runtime. From here you can test all your validations, skip logic and more to ensure they behave as expected. After selecting the preview tab, if you make any changes to the form structure or widgets on the design surface, to have them reflected in the preview tab, you need to right click in the preview window and then select the Refresh menu item. You could accomplish the same by selected the Refresh item under the view menu on top of the form designer.
Model XML Tab
Shows what the submitted xml will look like after filling the form in preview mode. This is only useful for developers or advanced users who want to see the xml that the form designer sends to the server on submission.
Offline XForms Form Designer
Download FormDesigner.zip which allows to customize the form design offline, without connecting to the server.
Resources
- XForms Module
- XForms Module User Guide
- XForms Module Patient Registration
- XForms Module External Applications Guide
- XForms Module Technical Overview
- XReports Module ReportDesigner Technical Overview
- XForms Module Release Notes
- Download Module
- GitHub project (source code)
- XForms was discussed on a May 9th University call. Watch xforms video
- XForms Newbies FAQs