OpenMRS 2.1
This documentation refers to an older version of the OpenMRS reference application. You can find the latest at OpenMRS Reference Application 2.x Implementer Documentation
Overview
OpenMRS 2.1 is the latest release of our new Reference Application, a state of the art implementation of OpenMRS, which may serve as a solid base for new implementations. It is designed using the latest UI 2.x and App Framework, which make it easy to add new functionality as small apps in a similar fashion to mobile applications. The Reference Application comes with a number of apps out of the box. Currently we provide apps, which enable you to:
- register patients
- start and end visits
- list patients with active visits
- admit/transfer/discharge patients
- take clinical notes
- capture patient vitals
- display patient summary and visit history.
- capture allergies
- Enter forms from the patient dashboard
Try It Out!
Standalone
If you want to install the latest released version of the Reference Application yourself, you can download it as a standalone, which is a complete package with an embedded Tomcat and MySQL database. When you first start a standalone, you can pick one of 2 install options.
the starter implementation mode is a configured and ready to use Reference Application, without any patients in it
the demo mode includes randomly generated patients
You can get the standalone version from the OpenMRS downloads page.
If you are already running OpenMRS 2.0 Standalone you can follow the Step-by-step guide to upgrade Standalone OpenMRS 2.0 to OpenMRS 2.1.
Legacy OpenMRS vs. Reference Application
The Reference Application is built on top of the OpenMRS 1.10.0 Platform. You can still download and use the legacy application. See the download page. We will continue to provide support and release new versions of the legacy OpenMRS.
The Reference Application is a set of modules that are installed on the legacy OpenMRS. It means that when you install the Reference Application, you can still access all the features of the legacy application, however we keep them hidden from users by default.
Required Initial Configuration
For all features of the reference application to work well, you will need to make the configurations below:
- To register a patient, the logged in user needs to have an associated provider account, meaning no patient registration will be possible if there is no user that has a provider account and yes this includes super user. Go to System Administration - Advanced Administration - Manage Users - Add User to add a new user. Remember to assign them appropriate privileges. Next go to System Administration - Advanced Administration - Manage Providers - Add Provider and add a new provider for the previously created person.
Features
As mentioned previously the Reference Application is built of small apps. There are a couple of apps provided out of the box and we expect to improve them and increase their number over time. The apps that come with the Reference Application focus on basic functionality. They are designed and developed in a way that satisfies as many use cases as possible and also can be adjusted to specific needs. In this paragraph we will describe features that come with the Reference Application and their configuration options.
Location based login
When you first open up the Reference Application you will see a login screen.
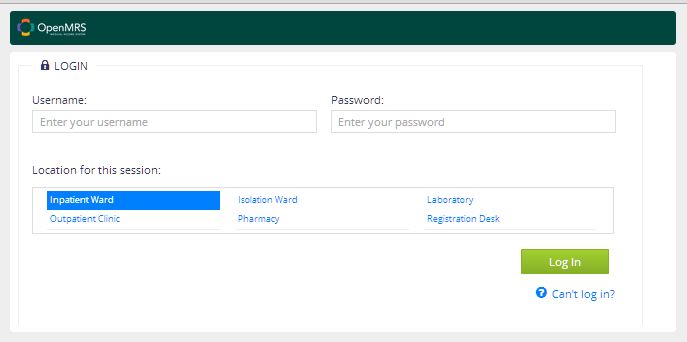
You can login as a system developer with full privileges by giving the default username admin and password Admin123. You also need to select Location for this session. Locations are configurable from Advanced Administration - Manage locations. In order for a location to appear on a login screen you need to open it up and select a checkbox next to the Login location tag.
You should change the system developer password by going to System Administration - Advanced Administration - Manage Users. Search for admin, pick it in results, change the password and hit Save.
Role based home page
You can see all apps that are available in your installation by logging in as a system developer and opening the home page.

Less privileged users do not see all apps, because they are hidden if they don't have privileges to use them. We have defined a set of application and organizational roles, which you can use, modify or create new as needed. Organizational roles inherit from application roles. Roles start from "Application:" or "Organizational:", e.g. "Application: Writes Clinical Notes" or "Organizational: Doctor". You can view all roles by signing in as an administrator and going to System Administration - Advanced Administration and Manage roles.
If you open a role you can see which privileges it has. In the Reference Application we assign API level privileges to all roles automatically and limit access by assigning UI level privileges. You can easily distinguish the two, because UI level privileges start from "Task:" or "App:". Task privileges relate to specific features available in apps, whereas App privileges limit access to whole apps.
If you have a starter implementation you must create users from System Administration - Advanced Administration - Manage Users and assign them organizational roles. In demo data we have created 3 users for you: doctor, nurse and clerk.
When you create users, you need to create providers as well, otherwise they will not be able to enter data. Go to System Administration - Advanced Administration - Manage Providers and bind a new provider with a previously created user.
Registration
The registration app is available under the Register a patient button from the home page. It is seen by users having the "Application: Registers patients" role.
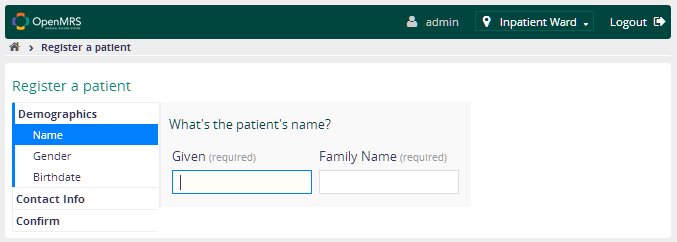
The registration form supports keyboard navigation. You can go to a next field by hitting the TAB or ENTER key. Going backwards is possible with SHIFT + TAB. You can also jump between sections like Name, Gender, etc. using the UP and DOWN arrows.
All fields are being validated and you cannot advance if you do not provide a correct input.
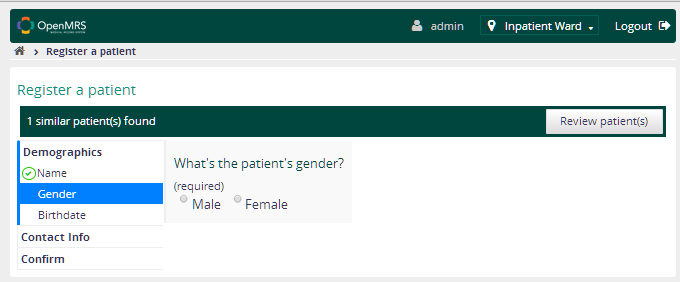
The registration app has an auto-complete feature for given and family names. It displays suggestions based on a selected algorithm. It also searches for similar patients based on the information you entered so that you can review them and avoid creating duplicates. As soon as a duplicate is found you will see a bar at the top that there are similar patients found and you can click the Review patient(s) button to see them.
If you want to change or add more fields to the form, you can go to System Administration - Advanced Administration - Settings - Layout and edit Address Template.
Patient search
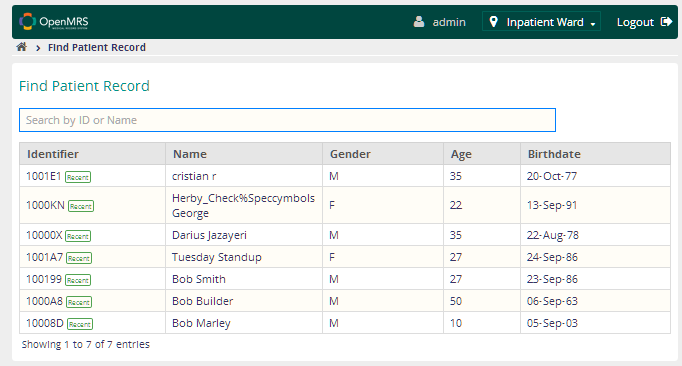
You can use the Find Patient Record app to display recently viewed patients or find any patient in a database by name or ID.
If the search field is empty, you see a listing of recently viewed patients. As soon as you start typing and enter at least the number of characters set as the value of the Min Search Characters global property on the settings page, you will see results changing live for what you entered. Note that when searching by patient identifier you need to enter the full patient identifier because partial searches only work when searching by patient name.
Patient Summary
Once you open up a patient you see a clinical summary.
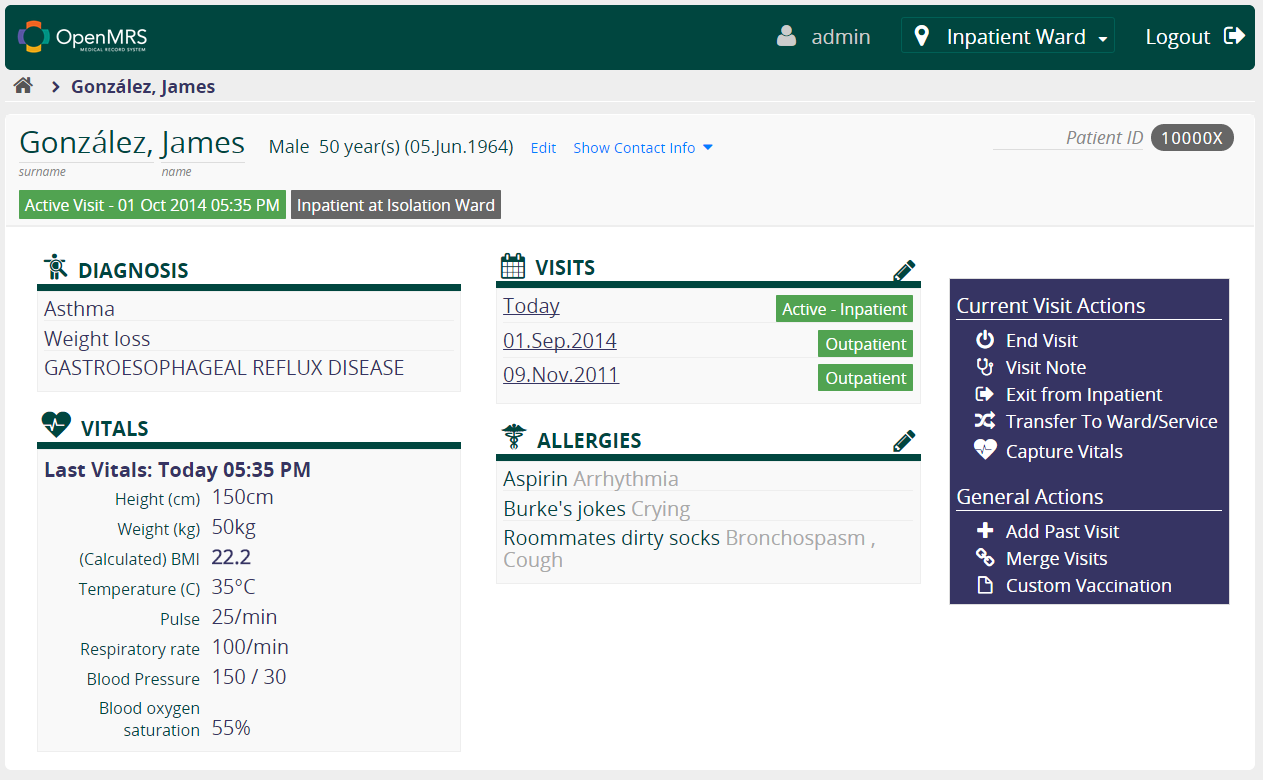
The header has basic demographic details, which you can edit by clicking the Edit button. There's also Show Contact Info, which expands a section with contact details when clicked. If a patient has an active visit you can see a green bar in the header saying when it started and also patient's current location.
Right below the header you can see boxes DIAGNOSIS, VITALS and VISITS. To the right you can find General Actions and Current Visit Actions if a patient has an active visit.
Diagnosis
Currently you can see there a list of diagnoses entered as visit notes from 3 years back with the most recent at the top. You can configure the period by going to System Administration - Advanced Administration - Settings - Coreapps and enter Recent Diagnosis Period in Days.
A diagnosis that was entered as free-text is displayed in quotes. Each kind of diagnosis is displayed only once. See also Visit Notes.
Vitals
The box shows the last captured vitals. See also Capture Vitals.
Visits
The box lists previous visits. It says if it was an outpatient or inpatient visit. You can click each visit to open up Visit details. Click the pencil next to visits to see them all, and edit them.
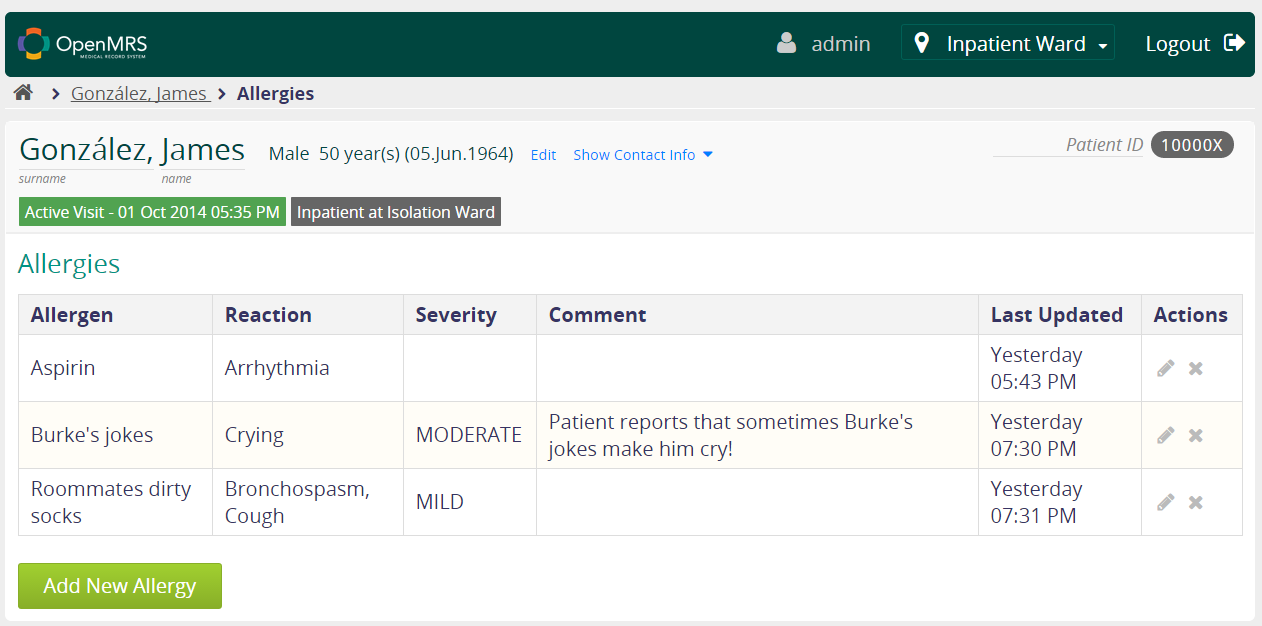
Allergies
This area lists known allergies, and the effect they have on the patient. Click the pencil next to allergies to add/edit allergies.
Actions
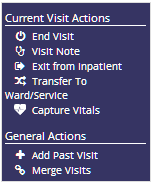
On the right you can find a box with actions. General Actions are:
- Start Visit - start a visit if there is no active visit yet
- Add Past Visit - enter a retrospective visit
- Merge Visits - merge past visits
Current Visit Actions are displayed if there is an active visit and they include:
- End visit - end a visit
- Visit Note - enter a visit note
- Admit to Inpatient / Exit from Inpatient - change a type of visit
- Transfer to Ward/Service - transfer to a defined location (displayed only when in an inpatient visit)
- Capture vitals - enter patient's vitals
Note: Some actions may not be visible based on privileges of the currently logged in user.
Note: You can now add custom forms in the actions section. See Manage Forms to add your own action items.
Patient Visits
It is accessible from the Visits box on Patient Summary. You can either open up a specific visit or click Show more info to display the latest visit.
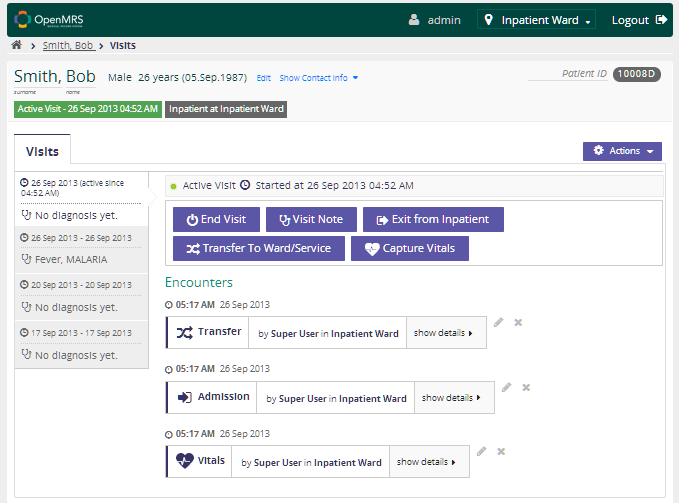
You can see it has the same patient header as Patient Summary. Right below on the left you can see a list of visits with date and diagnoses captured during a particular visit. The most recent visit is displayed at the top. You can click at any visit to see its details on the right. It has Visit Actions buttons if a visit is active and a list of encounters, which you can view by clicking show details. It is possible to edit them with the pencil icon or delete with the x icon.
Only encounters that are specifically configured as "editable" can be edited. This is how it's done for the built-in reference application forms. There is currently not a way to edit your own forms. In order to edit an encounter, you either need to have the privilege "Task: emr.patient.encounter.edit", or else have participated in the encounter.
All forms can be deleted. To delete, you need the privilege "Task: emr.patient.encounter.delete", or else to have participated.
"Participated" means that either you created the encounter, or else you are one of the providers of the encounter.
There's also Actions on the right where you can find general actions, which are the same as in Patient Summary.
Active Visits
You can see patients with active visits through the Active Visits app available from the home page.
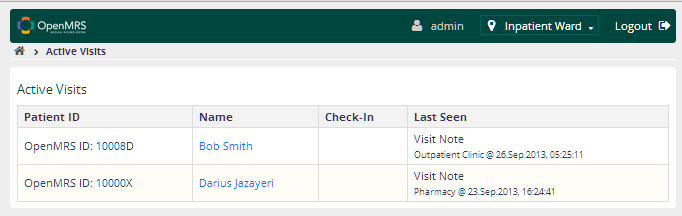
When you click on a name you will see that patient's summary.
Capture Vitals
It is accessible from both the home page via the Capture Vitals app or directly from Current Visit Actions on both Patient Summary and Patient Visits. The app is designated for a standalone capture vitals station. It allows you to quickly find a patient, enter vitals and continue repeating this process. The action available from Current Visits Actions allows you to capture vitals for the currently displayed patient and return to the summary.
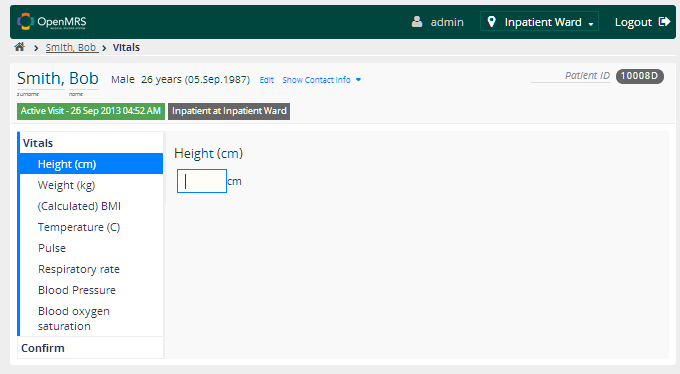
The form for capturing vitals has basic validation. It calculates BMI from Height and Weight. It supports keyboard navigation in the same way as the registration form.
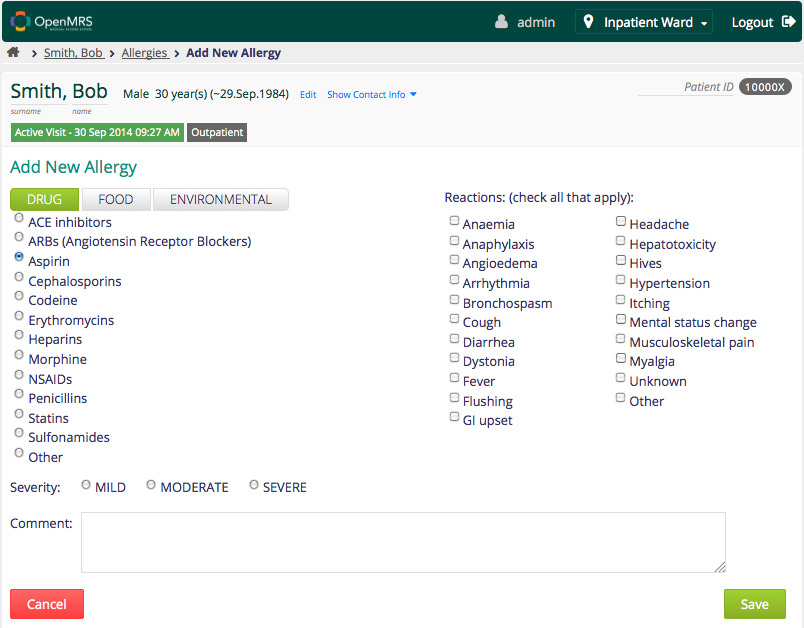
Capture Allergies
It is accessible from the Patient Dashboard, by clicking the pencil beside allergies. If there are any existing allergies, it shows them in the list. If the patient has no known allergies, this can be specified by clicking the green "No Known Allergies" button.
When you click to "Add New Allergy", it allows you to select the allergy type; drug, food or environmental. You can click the allergen, and then specify the reaction it causes and the severity. You can also add a comment if you like. After you click save,
Visit Notes
The form for entering visit notes is accessible from Patient Summary and Patient Visits. It is listed under Current Visits Actions.
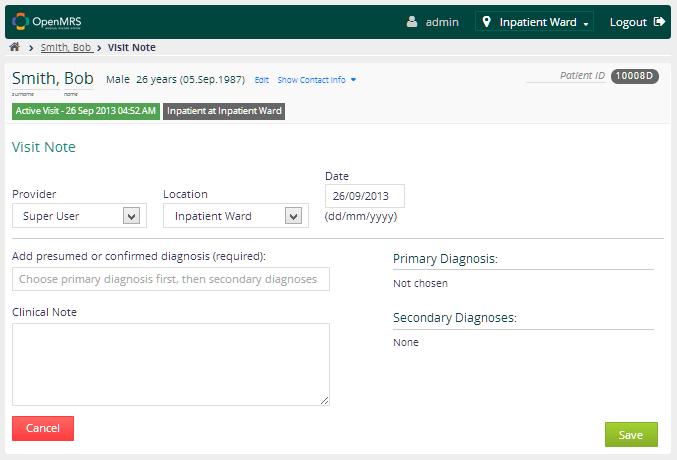
First you enter a primary diagnosis by starting to type in the Add presumed or confirmed diagnosis field. It has an auto-suggest feature which finds diagnosis concepts, but also has the Non-coded selection with the value you entered. You need to pick from the auto-suggest list to add the diagnosis, which then appears on the right under Primary Diagnosis. If you repeat these steps, your selections will appear under Secondary Diagnoses.
Diagnoses can be marked as primary or confirmed. They can be also deleted using the x icon next to them.
It is also possible to enter a free-text clinical note. When you are done you just need to click Save.
Admissions, Discharges and Transfers
A patient can be admitted, discharged or transferred from Patient Summary or Patient Visits under Current Visit Actions.
Locations can be configured from System Administration - Advanced Administration - Manage Locations. You need to have a location marked with the Visit location tag, which has children marked with the Admission location or Transfer location tags.
For an example look at the setup in the demo data. See Demo.
Configure Metadata
There is now a new App called Configure Metadata on the main apps screen. If you want to configure a custom form to appear in the new UI, this is where you go.
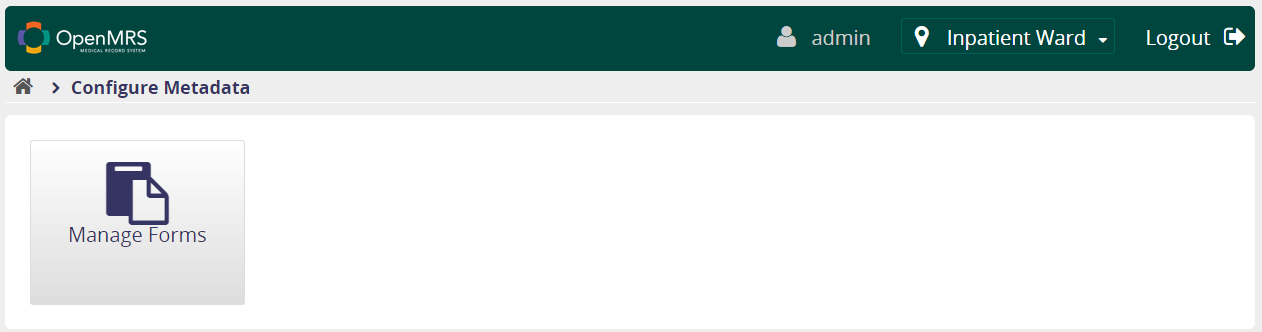
Manage Forms
Under the Configure Metadata screen, there is now a new app to "Manage Forms". This is a new feature in OpenMRS 2.1. It is now possible to add custom forms to the new user interface without any custom programming! When you initially enter Manage Forms, it shows you a list of forms that exist in the system. Obviously, before you can configure where a custom form will appear in the system, you must create the form. Both HTML and XForms are supported, but they must be created through the legacy user interface, under System Administration - Advanced Administration.
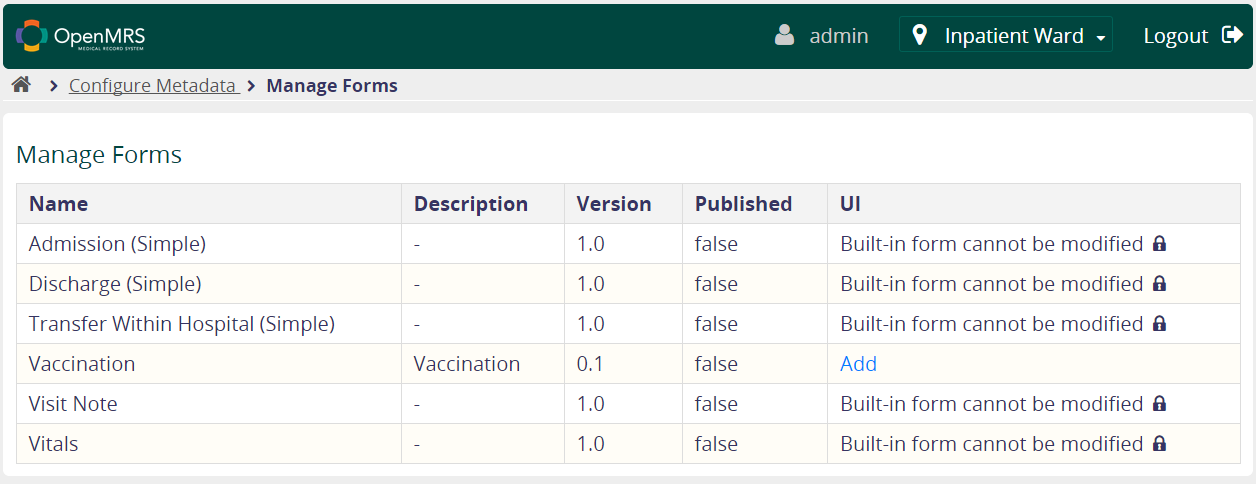
After you've created your custom form that you want to add to the new user interface / patient dashboard, you can click "Add" in the UI column next to the form name, as seen in the screenshot above. Clicking "Add" opens up the configuration screen for that form.
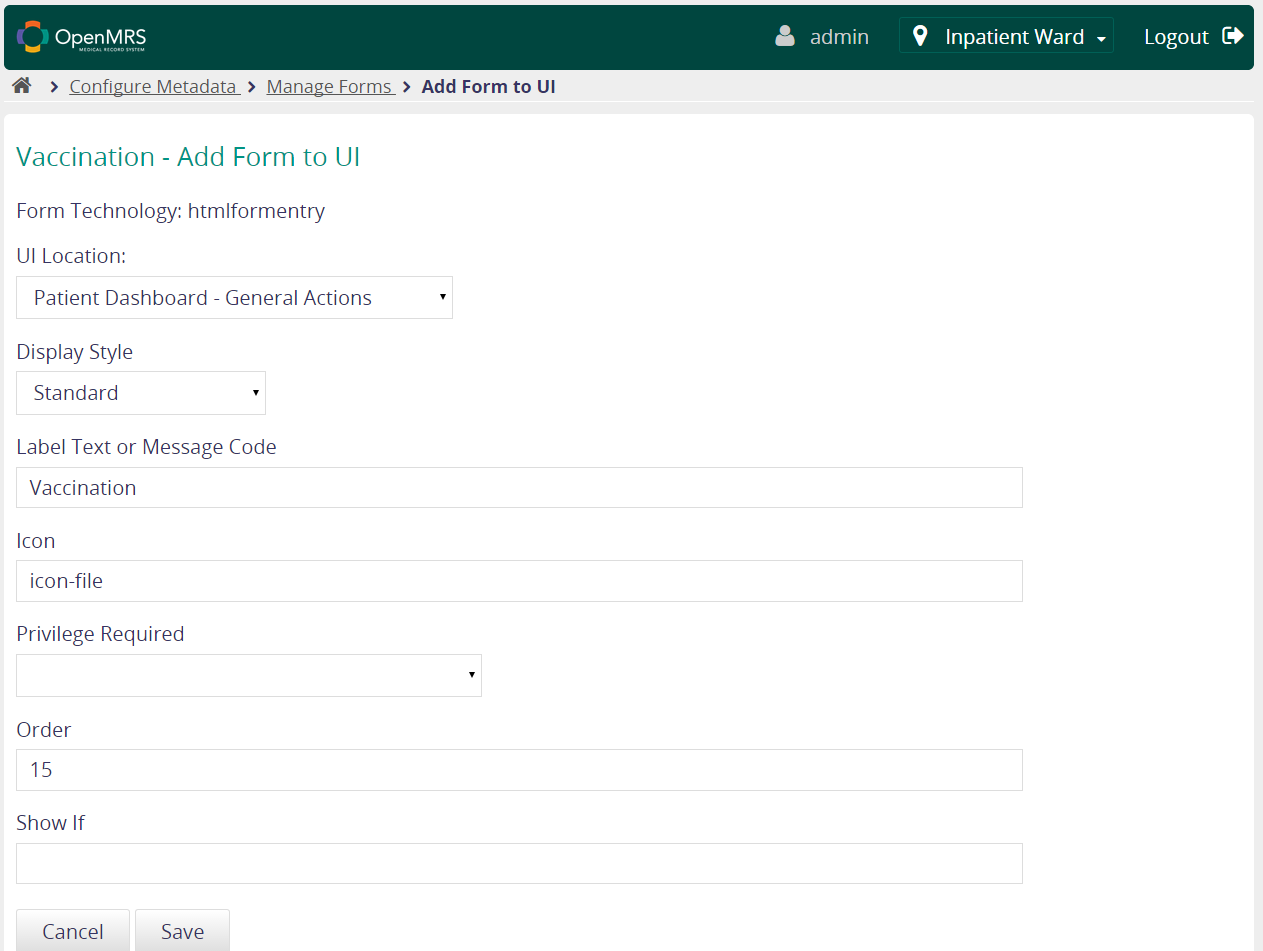
There is a rich user interface, as seen above, for configuring where and how your form will appear. Let's discuss these settings individually.
UI Location - This is where you want the form to appear. Is this a top level action (General Action), or a form that gets filled out as part of the current visit (Current Visit Actions)?
Display Style - Do you want the form to be rendered like a standard HTML form, or do you want the form to be rendered in simple view (like the OpenMRS 2.0 vitals form)?
Label Text or Message Code - What do you want this form to be called? It defaults to the form name, which is probably acceptable under most circumstances.
Icon - Do you want to use a custom icon? You can see possible icons and their names at http://devtest01.openmrs.org/openmrs/uicommons/icons.page.
Privilege Required - Do you want to limit who can fill out the form? You can specify a privilege the user's role must have to be able to see the form. Note: the privilege name must start with "App:" or "Task:"
Order - Do you want this form to appear in a specific position in the list of forms? This is a way to sort your forms manually. If you want this form to be first, you must use a negative number.
Show If - Do you want to display the form only if the patient has certain characteristics? Perhaps you would only want a maternal health form to be visible on the patient dashboard of a female patient. You would use something like "patient.person.gender=='F' && patient.person.birthdate < '2001-01-01T00:00:00.000+0000' && patient.person.dead==false". Or show if males with an active visit "visit.active && patient.person.gender=='M' ".
System Administration
Under the System Administration App, you will find system administration tools. This currently includes the Style Guide, especially useful to programmers, It also includes Advanced Administration which returns you from the new user interface to the legacy user interface. This is useful for configuring legacy settings and modules that don't yet have a user interface in the new UI; like Reporting and Facility Data Module for example. You also manage concepts and forms through this link.
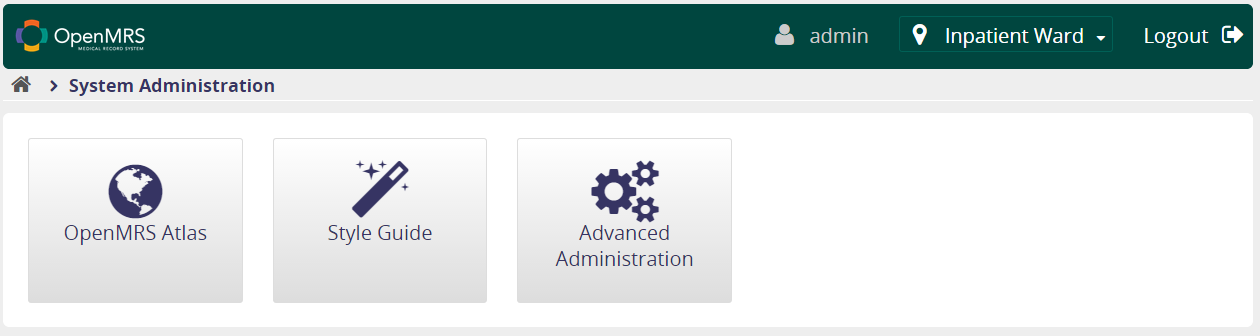
OpenMRS Atlas
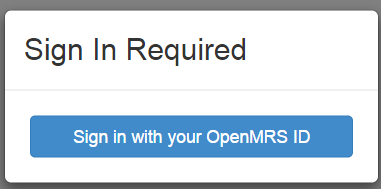
New to the OpenMRS 2.1 user interface is the OpenMRS Atlas configuration. When the implementation is first established, you must link ownership with an OpenMRS ID. Click “Sign in with your OpenMRS ID” and provide your OpenMRS ID and password. If your browser is already logged in to OpenMRS ID, it will use that account automatically when you click "Sign in".
The main map view is then displayed.
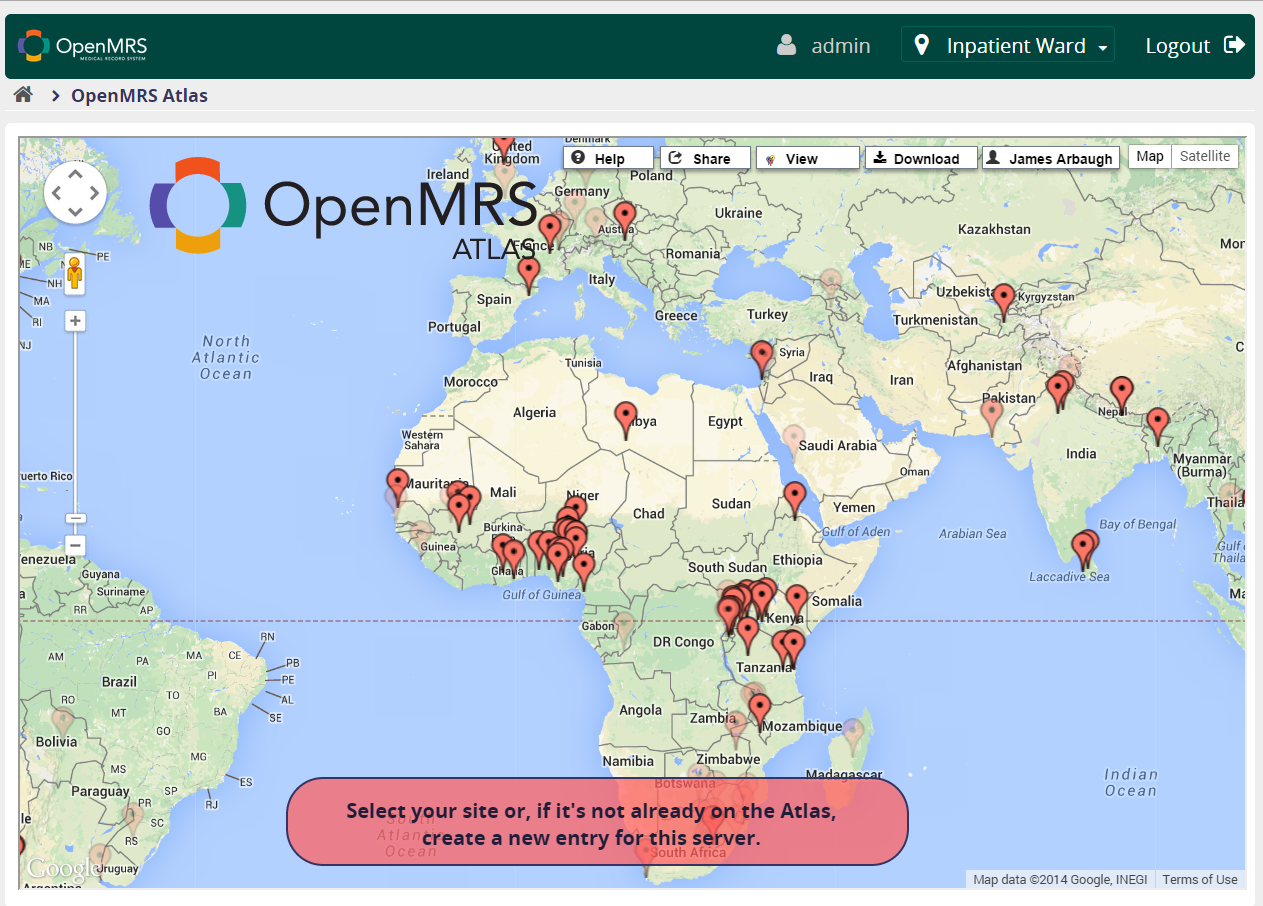
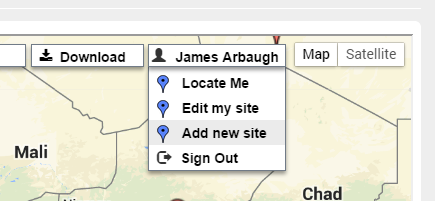
Select your existing site, or click the user menu with your name that appears. Choose “Add New Site”.
You can then drag your marker to the physical location of your site. Double-clicking on the site will allow you to view the details. Clicking the pencil icon will allow you to edit the details.
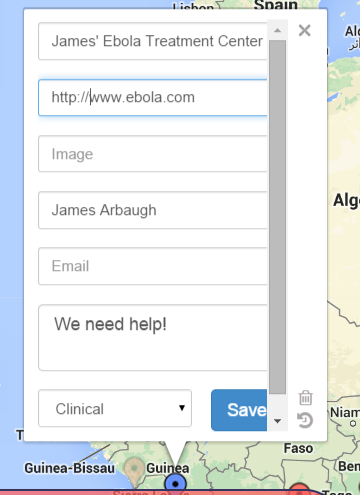
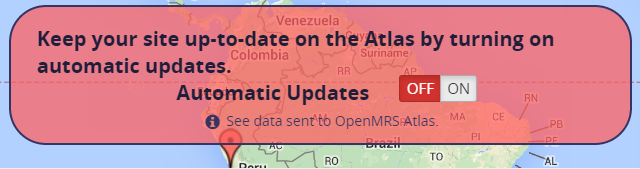
You can then choose to turn on Automatic Updates. This will allow the world to see the progress your uses are making with data entry; specifically the number of patients, encounters and observations you have entered into your system. Rest assured, no patient identifiable information is shared.
Invite your friends to visit https://atlas.openmrs.org to see everywhere that OpenMRS is in use around the world!
You can manage the Atlas after initial configuration under System Administration - OpenMRS Atlas.
Customization
New functionality can be added by creating apps which requires coding skills. It also means that you can only add new forms by creating apps. The provided apps are configurable to the extent mentioned in the features chapter.
...