MDR-TB Module User Guide
General Notes
This User Guide page is divided into two sections, Working with New Patients and Working with Existing Patients. Working with new patients walks through the steps for enrolling a new patient in the MDR-TB program. This includes entering demographic data and baseline clinical data. Working with Existing Patients covers how to view and update a patient's chart.
Note: For best results use Firefox or Chrome, not Internet Explorer
To access the MDR-TB module click on the ‘MDR-TB’ link in the header on the OpenMRS home page.
Working with new patients
1. Create the patient
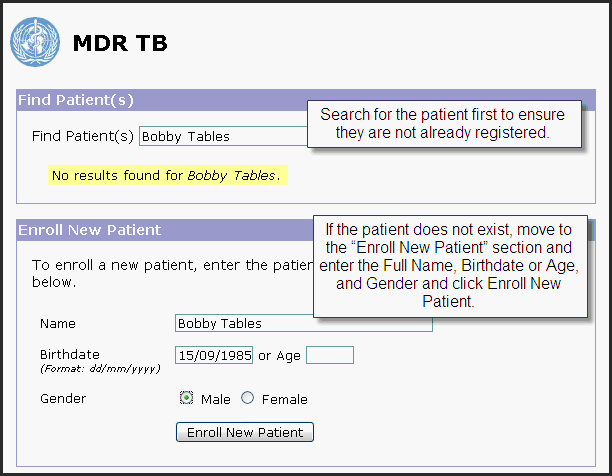
- On the MDR-TB home page, search for the patient’s name (and ID number, if available) in the “Find Patient(s)” field, to check if the patient already exists in the EMR.
- If the patient does not exist, move to the “Enroll New Patient” section and enter the Full Name, Birthdate or Age, and Gender and click Enroll New Patient.
- You may see an example of an existing patient in the EMR. If your patient matches this patient, select it. If not, click “I cannot find this patient”.
- On the Patient Details page, fill in additional patient details. .
- Click Save Patient
2. Enroll the patient in the MDR-TB program
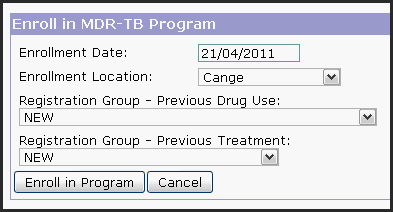
- Specify an enrollment date. The enrollment date should be the same as the patient’s initial encounter
- Specify an enrollment location.
- Specify a registration group according to previous drug use. The registration group should be specified based on the standard WHO definitions. See Appendix for definitions or see original WHO documentation.
- Specify a registration group according to previous treatment. The registration group should be specified based on the standard WHO definitions. See Appendix for definitions or see original WHO documentation.
- Click “Enroll in Program"
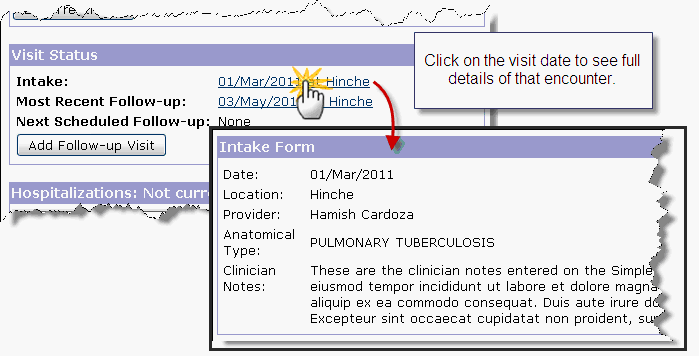
3. Enter details about the patient’s intake visit
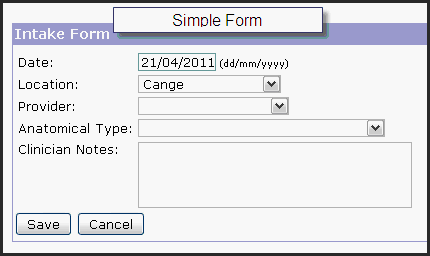
- Click “Simple Form” to enter the intake encounter’s date, location, provider, type of TB, and clinician notes.
- Fill in appropriate details and click “Save”.
- Note: Patients with both pulmonary and extrapulmonary TB should be classified as under Pulmonary.
- You have the option to use other HTML forms instead of the Simple Form. If configured, the other form(s) will be available here as a option.
4. Enter the complete treatment history for the patient (if any)
- Click “Edit Treatment” in the Treatment Status section
- Enter “Tuberculosis Treatment” for Type and enter start date. Click Submit

- Select type of treatment change: Standardized, Empiric, or Individualized.
- See Appendix for definitions or see original WHO documentation.
- See Appendix for definitions or see original WHO documentation.
- Choose a standard regimen OR an individual drug and click Add.

- Enter dose, unit, frequency per day, frequency per week, scheduled stop date, and instructions.
- Click Submit
- From the Treatment tab, click “Overview” to return to that part of the chart.
5. Enter details of all previous encounters (if any).
- Click "Add Follow-up Visit" button in the Visit Status section.
- Enter date, location, provider and clinician notes.
- Click Save
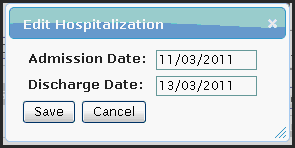
6. Enter dates of previous hospitalizations (if any)
- Click "Add Hospitalization" in the Hospitalizations section.
- Enter admission and discharge dates.
- Click "Save"
7. Enter any existing bacteriology result
- Refer to Lab Results section for detailed steps on entering bacteriology results.
Working with Existing Patients
Patients' charts are divided into six tabs: Overview, Chart, Visits, Treatment, Lab Results, and Patient Details.
Overview Tab
The “Overview” tab summarizes all relevant data for the patient. It is divided into seven sections: Program Status, Treatment Status, Visit Status, Hospitalizations, MDR-TB Diagnosis, Bacteriology Status, and HIV Status. Program status and hospitalizations are updated directly from the Overview tab. Treatments, visits and lab results are summarized on the Overview tab but are edited on their respective tabs.
1. Program Status
- Click “Close Program” to un-enroll the patient from the active, MDR-TB program. Note, when closing a program we will enter the completion date as well as the outcome. The outcome is determined, in part, by laboratory smear and culture results. Choose the proper outcome based on the standard WHO definitions. See Appendix for definitions
2. Treatment Status
- The Treatment Status section will display every distinct regimen the patient has taken. Based on the start/end dates, the treatment status of “Currently on treatment” or “Currently not on treatment” will display.

- See below for more details on how to edit treatment regimen data.
3. Visit Status
- The Visit Status section will display the date and location of the intake encounter, the most recent follow-up, and the next scheduled follow-up.
- Click on the visit date to see full details of that encounter.
4. Hospitalizations
- The Hospitalizations section will display all previous hospitalizations for the patient. Based on the discharge date, the status of "Currently hospitalized" or "Not Currently Hospitalized" will display.
- Click "Edit" to modify an existing record. i.e. Enter the discharge date.
- Click "Add Hospitalization" to add a new admission record.
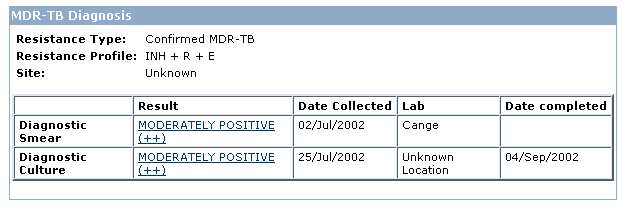
5. MDR-TB Diagnosis
- Resistance Type – The resistance type is calculated automatically based on the patient’s Drug Sensitivity Test results: Confirmed Mono-resistant TB, Confirmed Poly-resistant TB, Confirmed MDR-TB, or Extensive Drug Resistance. See Appendix for definitions or see original WHO documentation.
- Resistance Profile – The resistance profile will list all drugs that the patient tested resistant to at any point during the program.
- Site – This is taken from the documentation of the intake visit.
- Pulmonary – Tuberculosis involving only the lung parenchyma.
- Extrapulmonary – Tuberculosis of organs other than the lungs.
- Diagnostic Smear and Diagnostic Culture – In this section the first smear and culture on record during the program will display.
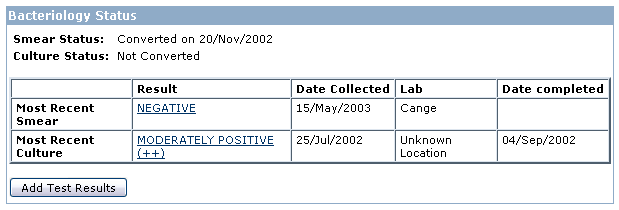
6. Bacteriology Status
- Smear Status and Culture Status
- The Bacteriology Status section will indicate if the patient's smear and culture have converted or not.
- Conversion is defined as two sets of consecutive negative smears or cultures, from samples at least 30 days apart (with no further positive results afterwards).
- Most Recent Smear and Most Recent Culture - Displays details on the most recent smear and culture for the patient.
7. HIV Status
- This section is in development at the time of writing.
Chart Tab
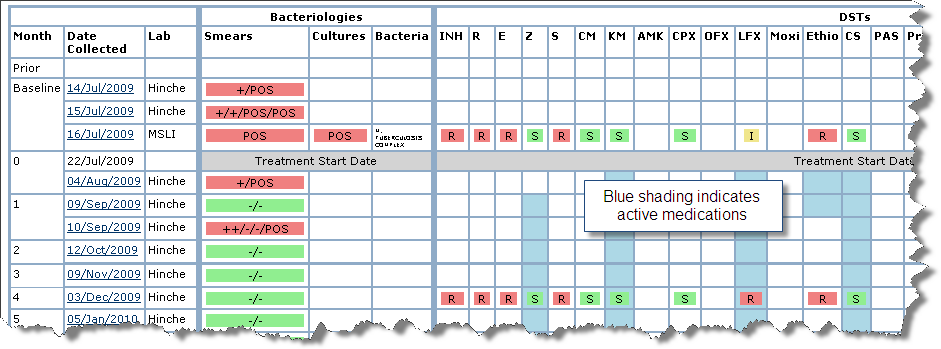
The "Chart" tab combines regimen history with lab results in a single graphical display.
- Lab results are displayed by collection date in ascending chronological order, oldest at the top, most recent at the bottom.
- Active medications are indicated by blue shading.
- DST Results are displayed as:
- S = Susceptible
- I = Intermediate
- R = Resistant
- Waiting for test results
- DST Contaminated
Visits Tab
The "Visits" tab lists the patient's intake visit, all follow-up visits, and all lab specimen collection dates.
- Click on any visit date, initial or follow-up, to see the details of that encounter.
- Clicking on the specimen collection date will take you to the Lab Results tab of the patient's chart.

Treatment Tab
The "Treatment" tab displays medication treatment information.
1. Viewing medication regimen information
- The Treatment tab categorizes medications into three groups: TB treatment, HIV treatment, and Other treatment.
- Basic medication details including the drug, the start date, and the stop date (when applicable) are displayed.
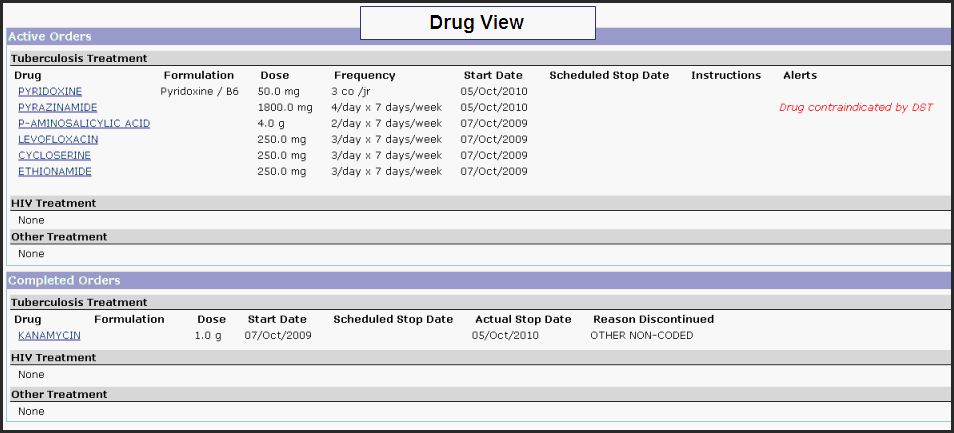
- Data on the treatment tab can be viewed in two ways: Regimen View and Drug View.
- Drug View - The Drug View presents a detailed list of active and completed drug orders. A user may edit an individual drug order by clicking the link on the drug name.
- Regimen View - The Regimen View offers a graphical look at medication history over time. Dates of treatment changes are displayed, along with columns for the drugs started on that date, the duration of that treatment, and the type of treatment (for MDR-TB, this is one of "Individualized", "Standardized" or "Empiric"). A user may edit a treatment change by clicking on the date.

- Drug View - The Drug View presents a detailed list of active and completed drug orders. A user may edit an individual drug order by clicking the link on the drug name.
2. Entering a new change to medication regimens
- On the Treatment tab, select the category of treatment (TB, HIV, or Other), select the date of the treatment change, and click Submit
- Note: HIV treatment information entered here will update the ART treatment dates and the current regimen field in the HIV Status section of the Overview tab.
- Note: HIV treatment information entered here will update the ART treatment dates and the current regimen field in the HIV Status section of the Overview tab.
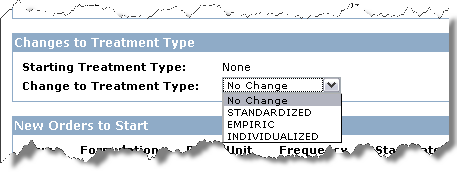
- The subsequent page will have at least two sections, Changes to Existing Orders and New Orders to Start. If you are editing a TB treatment there will be an additional section Changes to Treatment Type.
- Changes to Existing Orders – This section lists active medications. This is where we can stop an active drug/dose. Under Action click “Stop” and select a reason for stopping.

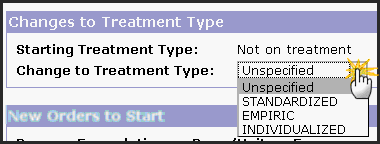
- Changes to Treatment Type – This section will appear for changes to TB treatments only.
- Standardized treatment: Treatment is based on DRS (drug resistance surveillance) data from representative patient populations. No individual history or DST is available/considered.
- Empirical treatment: The regimen is based on the patient’s previous history of antituberculosis treatment without individual DST information.
- Individualized treatment: The regimen is based on the patient’s previous history of antituberculosis treatment and individual DST results.
- New Orders to Start:
- Identify the drug(s)
- Choose an entry from the “Start a standard regimen” picklist to quickly add multiple drugs at once.
- Choose an individual drug from the “Start individual drugs” when needed.

- Enter additional details: dose, unit, frequency, scheduled stop date (if applicable), and instructions.

- Identify the drug(s)
- When all changes have been entered, click Submit at the bottom of the page.
- Changes to Existing Orders – This section lists active medications. This is where we can stop an active drug/dose. Under Action click “Stop” and select a reason for stopping.
3. Changing previously entered data
- If you need to correct a patient’s medication data, choose the appropriate treatment from the “Modify an existing treatment change” picklist and click Submit.

- Make the necessary corrections.
- Click Submit at the bottom of the page.
Lab Results Tab
The lab results tab contains detailed information on smear, culture, and drug sensitivity test (DST) results.
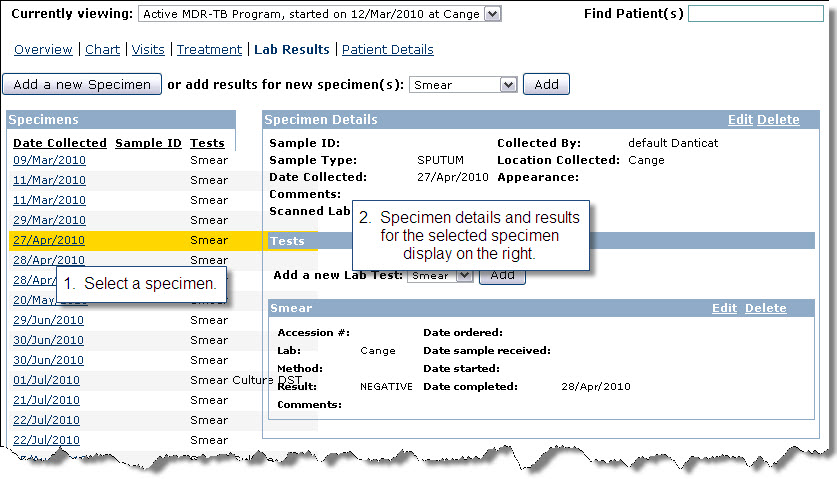
1. Viewing previously-entered results
- In the list of specimens/collection dates on the left, click on the date.
- The details for that particular specimen will display on the right.
2. Adding new results
The "Lab Results" section has four options for adding new lab results: Add a new Specimen, add a single smear result, add a set (3) of smear results, and add a new culture result. Choose the option that works best for the data you have to enter.
Adding new results with full specimen details
- This process will add a specimen to which we can add any combination of results: smears, cultures, and/or DSTs.
- Click "Add a new Specimen" button on the Lab Results tab.
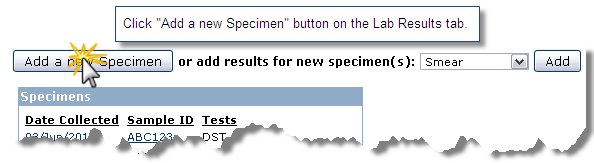
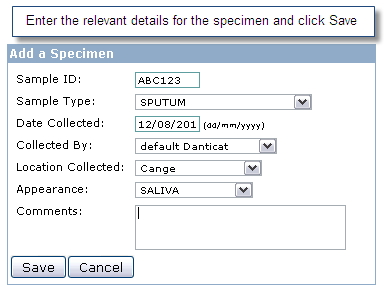
- Enter the relevant details for the specimen: sample ID, sample type, date collected, collected by, location collected, appearance, and comments. Click Save.
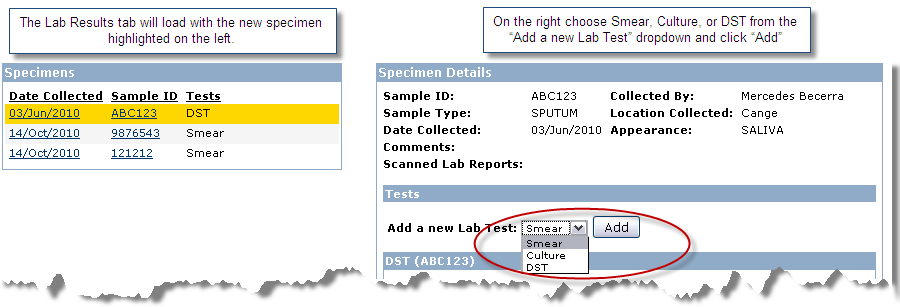
- The Lab Results tab will load with the new specimen highlighted on the left.
- On the right choose Smear, Culture, or DST from the “Add a new Lab Test” dropdown and click “Add”
- Enter details as appropriate and click Save.
- Repeat the previous two steps until all results have been entered for this specimen.
- Click "Add a new Specimen" button on the Lab Results tab.
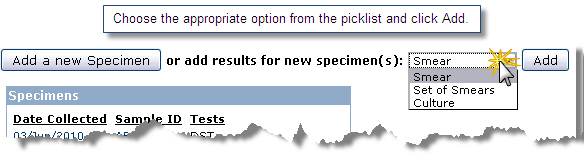
Add a single smear, a set of smears, or a culture result without entering the full set of specimen details.
- This is a quicker way to enter results if the full specimen details are not available or important.
- Choose the appropriate option from the picklist and click Add.
- Enter relevant details and click Save.
Patient Details Tab
The Patient Details tab lists basic demographic information for the patient.