Installation for Developers on Mac OS
How to clone, build and initialize OpenMRS
This section describes how to clone, build and initialize OpenMRS on Mac OSX.
Table of Contents
YouTube Video Setup Demonstration
https://www.youtube.com/watch?v=EtHZdEJLWS0
Dependencies
1. Java
Java is the core running environment that is used by OpenMRS. The latest download can be installed from http://www.oracle.com/technetwork/java/javase/downloads/ . The current version of Java that is support is version 8. The SDK (Software Development Kit) is required for the program to run in the developer’s environment.
2. Apache Maven
Maven is the application that is used in order to automate the building, installing and running of the Java Application. The tool is used to not only build and run the application, but also download and link all of the necessary dependencies that are required for the project to run. The latest version of the software can be downloaded at https://maven.apache.org/download.cgi .
The heart of the Maven application is a file that is called “pom.xml” which can be found in all OpenMRS modules. This xml file contains all of the information that Maven uses to build and run the project, as well as download the dependencies for the project. This includes the build order of various projects, various directories used in the build, and the plug-ins required. These xml files also declares the implementation for various different commands that can be run with Maven.
The basic commands that we will use are listed below. It is important to note, that in order to run Maven, you MUST be in the directory that the “pom.xml” file whose command you want to run is in.
Command | Description |
|---|---|
mvn clean | This command attempts to clean and remove the directories that are used during the Maven build. |
mvn install | This command builds the Java Application. This creates the directory, creates all necessary files, and downloads/installs all dependencies that are needed by the build. This command also runs all unit tests that are implemented in the project. |
mvn jetty:run | This command runs your Java Application. Once this command executes, it will constantly listen for program execution, and will allow the program to run. |
It is also important to note that Maven commands can be strung together in one. For example, a developer can use the command “mvn clean install” to both clean the Maven build, as well as install the build again.
3. MySQL
MySQL is the database product that OpenMRS uses for storage of all data in the application. MySQL can be downloaded from http://dev.mysql.com/downloads/mysql/. In order to download the product, you will need to register an account on the website, and log in.
In order to look at the databases, once OpenMRS is built and installed, you can use the following commands.
First, you will need to log in to MySQL. This can be done using the following command from the terminal application:
mysql –u root –p –h localhost
This will launch the MySQL command line tool. Once in this tool, there are a variety of commands that can be used. These can be found below:
Command | Description |
|---|---|
show databases; | This will show a list of all of the databases that are stored in MySQL. All of the databases for OpenMRS are stored in a database called “openmrs”. |
use openmrs; | This command will put MySQL in the perspective of the openmrs database. All commands from here will now be limited to this database. |
show tables; | This command will provide a list of all tables that are in the specified database. |
4. Git
Git is the source code management tool that OpenMRS uses for the development of the software. Git allows for many developers to work on the application at the same time, without having major conflicts. Git manages the changes to software over both short and long periods of time so developers can keep track of specific versions later. In order for a user to use git on their own machines, they must install it. The download link can be found at https://git-scm.com/downloads. Users should just download and install it for the machine that they are working on.
A repository is what git calls the housing for an entire project. This repository contains all code and other dependencies that the program needs to build and run. Git is a command-line tool that allows users to copy (clone) someone else’s repository to their own machine, add (commit) changes to the repository, and refresh (pull) their repository with the latest changes.
Below is an overview of the various commands that can be performed with git. It is important to note that in order to use most of the commands, you MUST be in the root directory that contains the clone of the git repository. This directory will contain a .git folder.
Command | Description |
|---|---|
git clone gitUrl [folderUrl] | This command clones a specific repository to the user’s machine. The gitUrl is the URL to which the repository is stored on a server. This could be on GitHub or some other hosted site. The folderUrl is an optional parameter that allows the user to specify the folder to copy the repository to. By default, if the parameter is not given, the repository is cloned to the current directory. |
git status | This command allows the user to view changes to files in the current directory. If you make a change to a file, it will be displayed in a list here. Otherwise, this will return that there are no uncommitted changes. |
git add fileName | This command adds a previously unknown file to git. You need to use this if you create a new file in the solution. |
git commit [-m “Message”] | This command adds all current repository changes to the LOCAL repository. This allows for code to be retrieve from the LOCAL machine later, though it does not send the changes to the repository on the server. Optionally, a user can submit a message detailing any changes that were made. |
git push | This command pushes committed changes to the server. In order for this command to work, the changes in the repository must have been committed using the above command. |
The code for OpenMRS’ modules can be found at https://github.com/openmrs. GitHub is a git-based website that allows you to view the code of various applications, download that code to your machine, and store your own code on the cloud.
Cloning the OpenMRS Code
Cloning Using Eclipse (Optional)
Eclipse is one environment that you can use to develop using OpenMRS. Eclipse is an IDE for building Java applications. The download for Eclipse can be found here: https://www.eclipse.org/downloads/packages/eclipse-ide-java-ee-developers/mars1.
Follow the Steps below to get your code built into Eclipse:
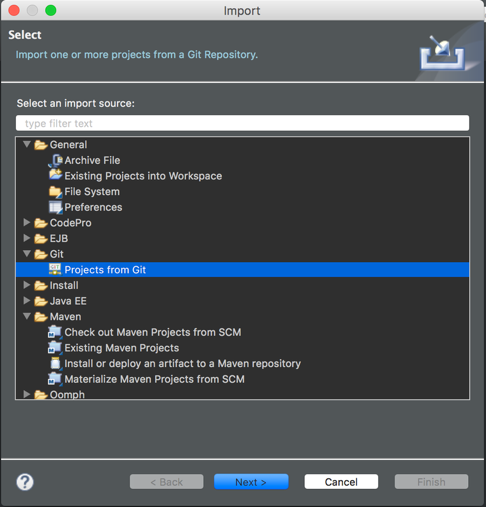
1.First thing you want to do is go to File->Import

2. Next, you are going to want to go to git -> projects from git
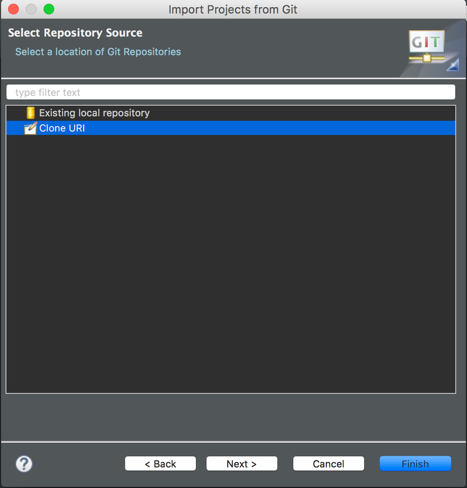
3. Next, you are going to want to clone a uri (since the code is hosted on Github).
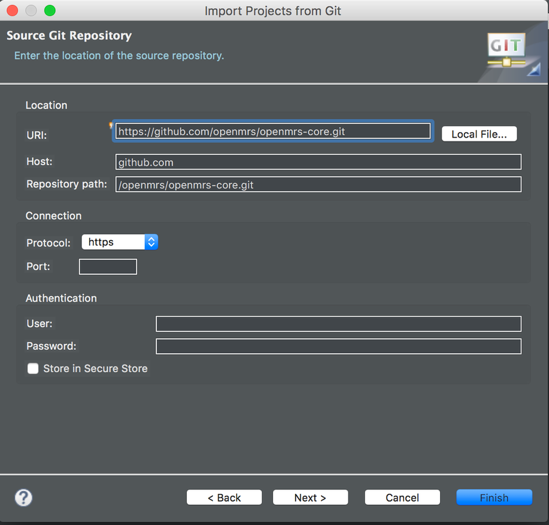
4. Fill in the URI field with the URL: https://github.com/openmrs.openmrs-core.git
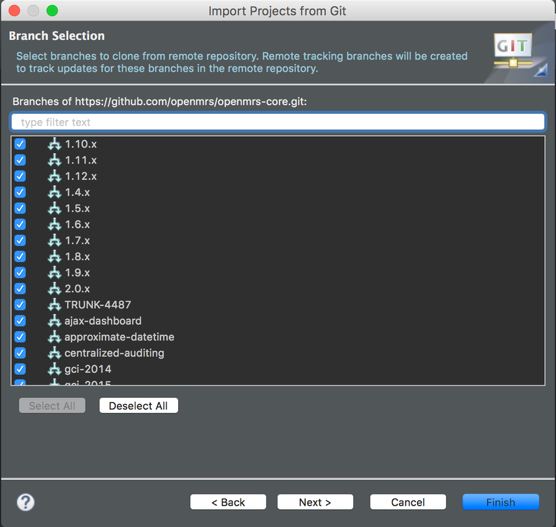
5. Make sure all branches are checked.
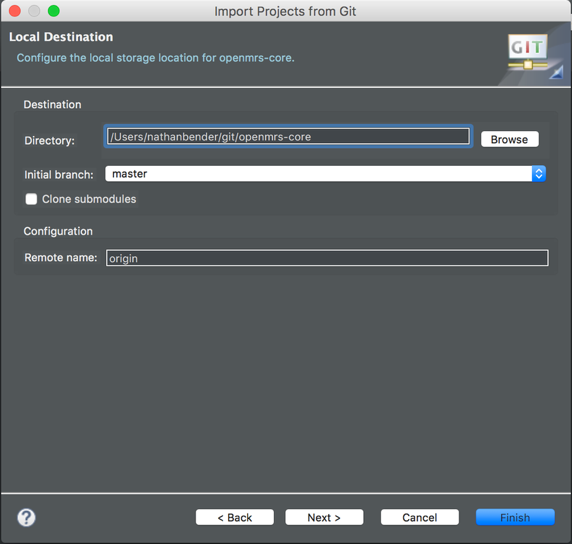
6. Choose a location to store the code. The default is a “User/git/openmrs-core”
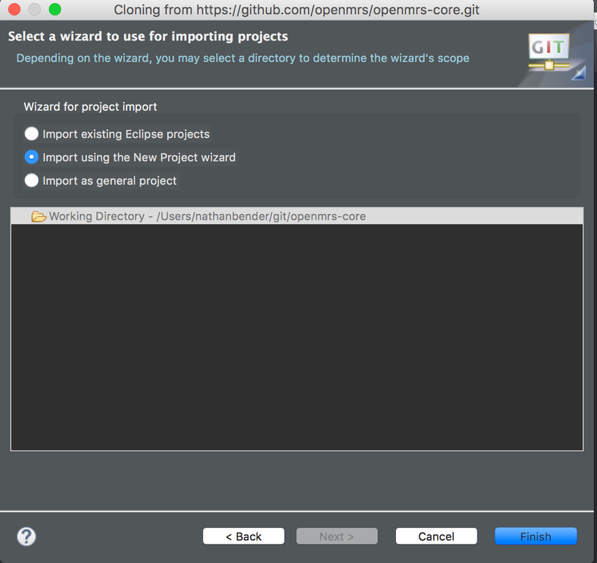
7. Wait for all of the code to be downloaded. Then, you should see a screen prompting you to import using a project wizard. Hit “Cancel”. Your code has been pulled to your machine.
8. Once again go to import a project.
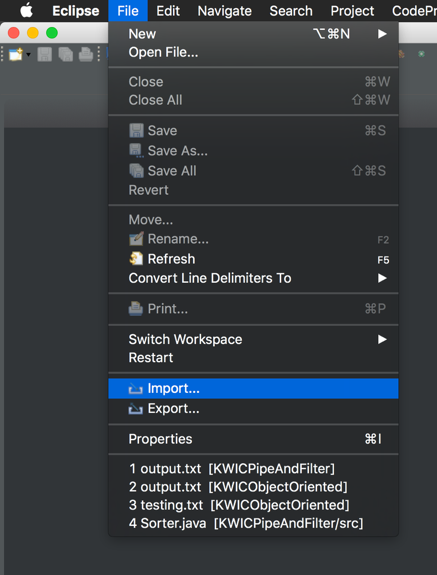
9. Select Maven -> Existing Maven Projects

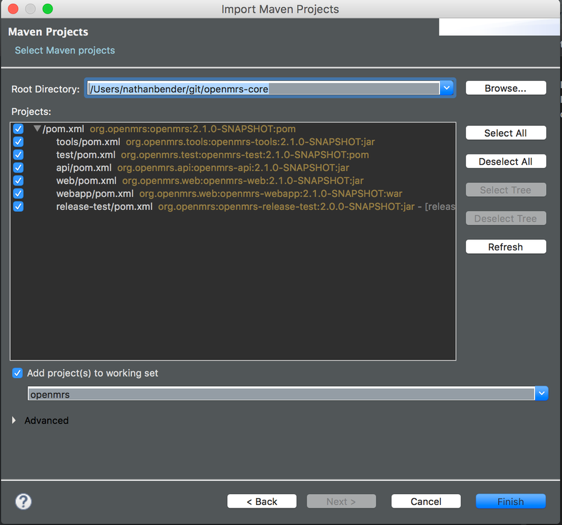
10. Hit “Browse” and navigate to the location that your code has been pulled into. Select highlight the folder called “openmrs-core” and hit “Open”.
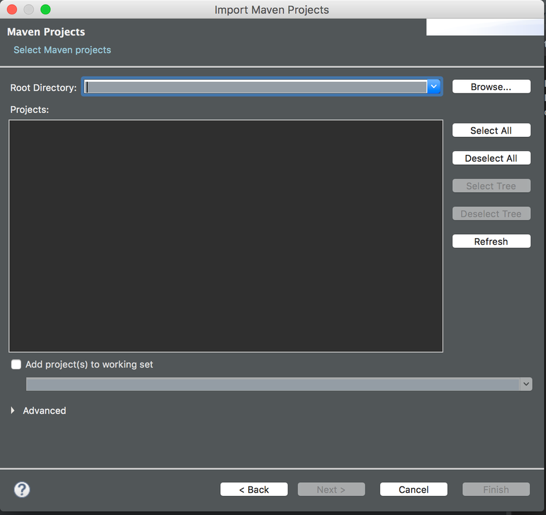
11. Once you navigate to the directory, you should then see a list of projects in the projects box. Your screen should look like the one below. Once you have this, hit “Finish”. Your openmrs project should then appear in the project explorer.
Cloning Using Command Line
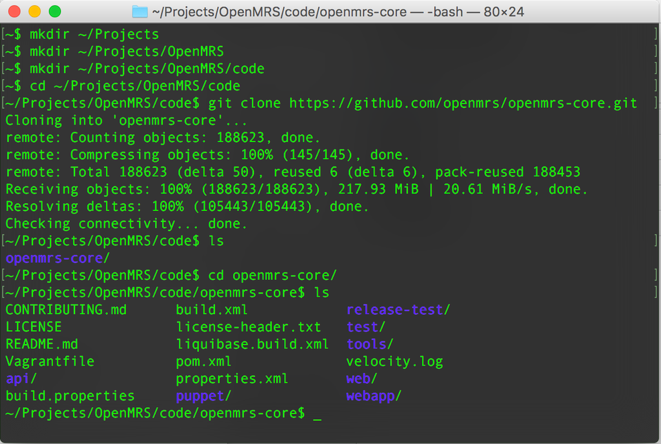
If you do not want to use Eclipse, you can just use the command line to pull in the code. Follow the commands below to import the code. The code should be imported from the URL https://github.com/openmrs/openmrs-core.git.
~ $ mkdir ~/Projects/OpenMRS
~ $ mkdir ~/Projects/OpenMRS/code
~ $ cd ~/Projects/OpenMRS/code/
~/Projects/OpenMRS/code $ git clone https://github.com/openmrs/openmrs-core.git
Building OpenMRS
Now, open a terminal window and navigate to the openmrs-core/ folder that was created by the git clone or through Eclipse.
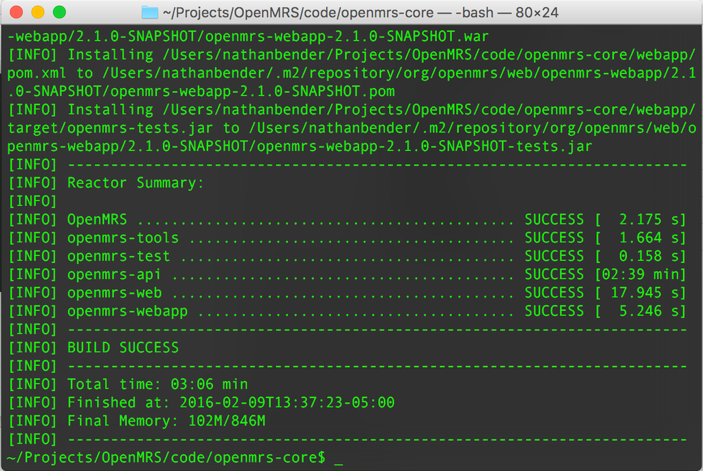
~/Projects/OpenMRS/code $ cd ./openmrs-core
~/Projects/OpenMRS/code/openmrs-core $ mvn clean install
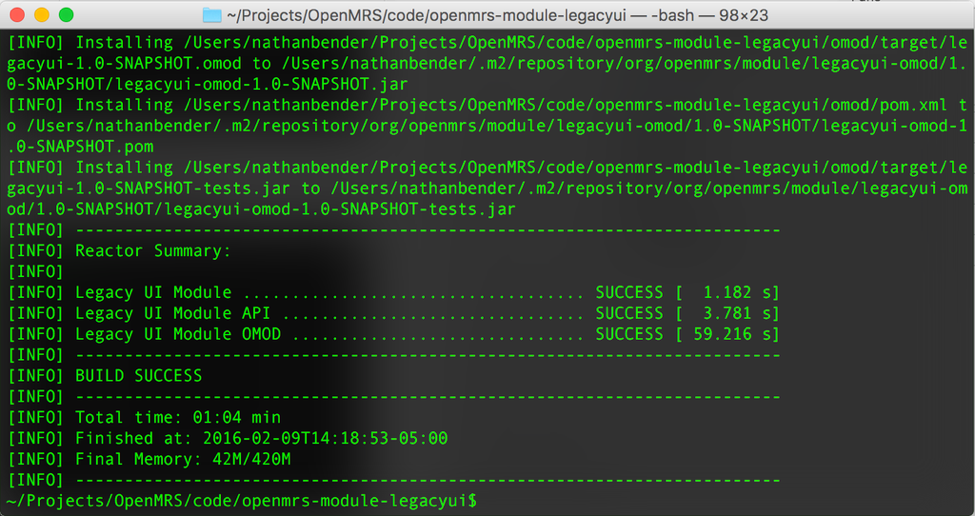
The build may take a few minutes, especially on the first run. Maven needs to download and install all of the dependencies needed by the project. If the build is successful, you should see a screen like below. Make sure that all components of the project have the message SUCCESS.
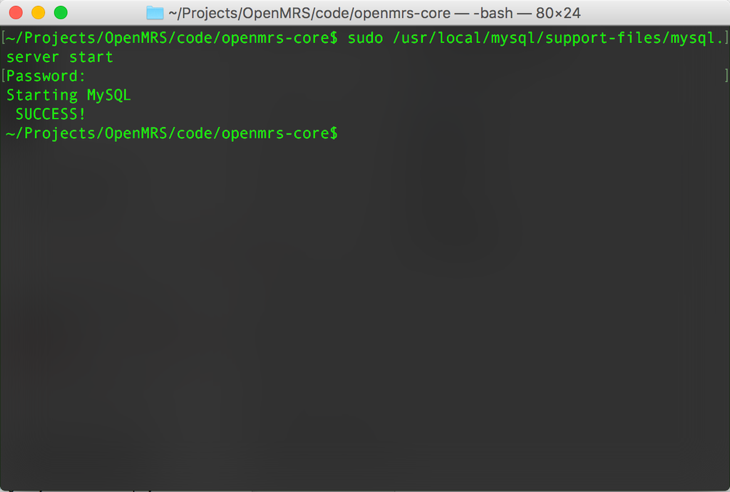
After the build has successfully finished, start the MySQL server (unless it is already up and running). You need to know the password for the MySQL root user as it is requested for the initialization of the OpenMRS application.
~/Projects/OpenMRS/code/openmrs-core(master) $ sudo /usr/local/mysql/support-files/mysql.server start
Next, cd into the webapp subfolder and start the OpenMRS web application. This can be done using the command mvn jetty:run. With Maven's default settings, the web server ran out of memory so I have increased the memory settings. Make sure there are no errors when running this command.
export MAVEN_OPTS="$MAVEN_OPTS -Xms1024m -Xmx2048m -XX:PermSize=512m -XX:MaxPermSize=1024m"
~/Projects/OpenMRS/code/openmrs-core(master) $ cd ./webapp/
~/Projects/OpenMRS/code/openmrs-core/webapp(master) $ mvn jetty:run

When being started for the first time, OpenMRS needs to be initialised. The application figures out whether it has been initialised or not, so when you open a browser and access http://localhost:8080/openmrs/index.htm, you are redirected to http://localhost:8080/openmrs/initialsetup.
You should see a screen like the one below:
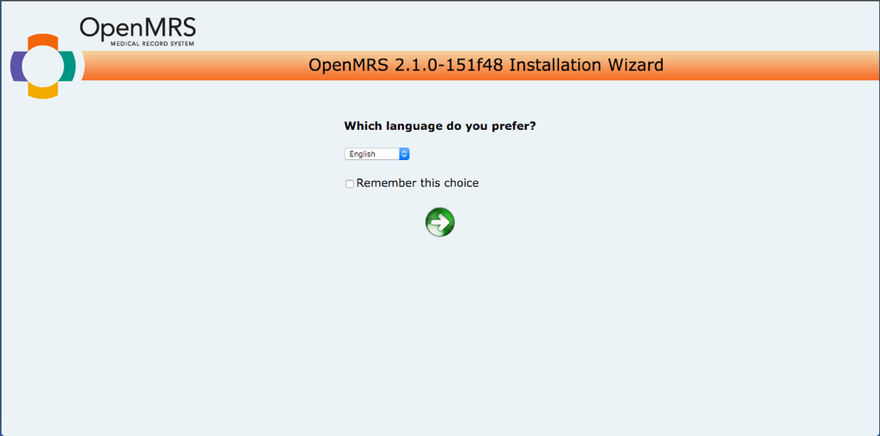
Select the language you wish to use and hit the green arrow. For now, just select the “Simple” installation and hit the green right arrow. Here, you should see a box asking for a password. This is the password for your mySQL. This is the same password that you used to start the SQL server earlier. The last question asks whether you want demo data in your database. You can either choose yes or no here. Once you are finished, hit the green right arrow. The next screen asks you to verify the settings for the installation of OpenMRS. Hit the green right arrow when you are finished.
It may take a few minutes to set up the databases. Once it is finished your screen should look like the one below:

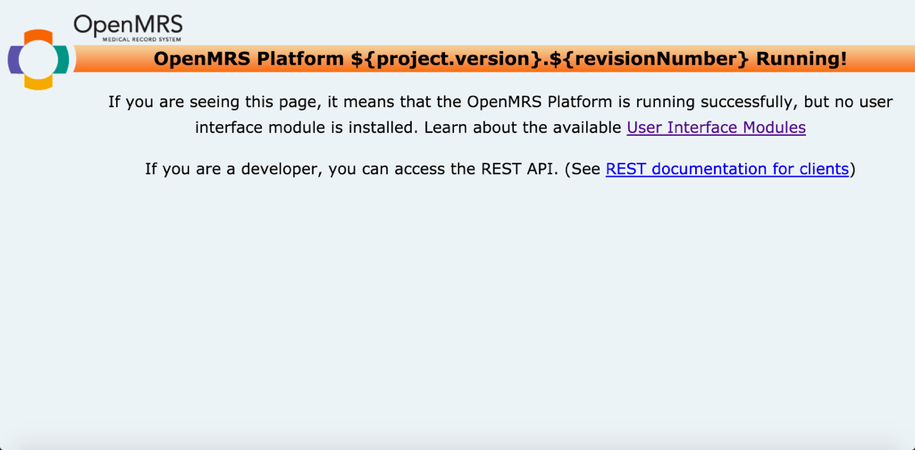
Once you see this screen, once again visit the URL http://localhost:8080/openmrs/index.htm. You should see a message explaining that you do not have a UI framework installed. This is due to the fact that the API (which you just installed) has been separated from the UI, and you do not yet have a UI framework installed. Your screen should look similar to the one below.
Cloning a UI Framework
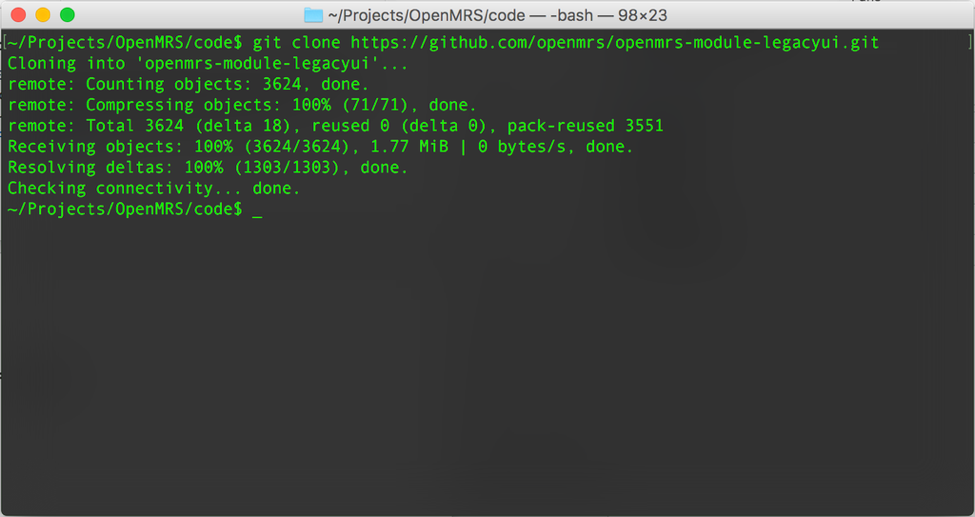
Once again, you can either use the Eclipse way of cloning the repository, or using the command line. Follow the same steps that were used above. There are a variety of different UI frameworks that can be used, but for this tutorial, we will just be using the legacy UI, which can be found at https://github.com/openmrs/openmrs-module-legacyui.
First, we want to make sure that the previous maven command that we ran has been stopped. We need to cancel the “mvn jetty:run” command that was executed earlier. You can either use ctrl-c to cancel the execution or close the terminal window.
First, cd into the new folder that was created openmrs-module-legacyui.
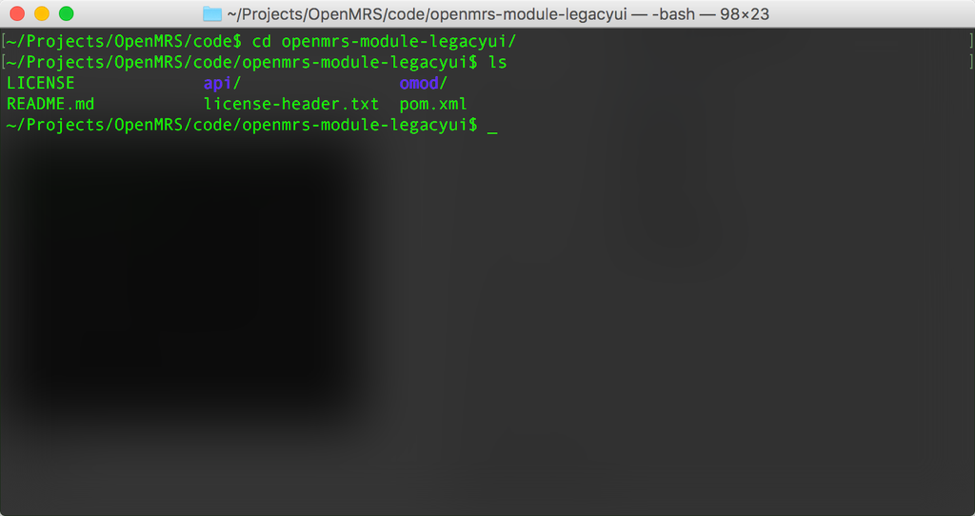
Once in this folder, we want to build the UI framework. This can be done the same way that we did for the core code. Use the command mvn clean install while inside the UI folder. Once again, this may take a few minutes to install dependencies and run the tests. This should be quicker than the API, however, since these modules are much smaller than the API. Make sure that all of the projects have the status SUCCESS.
Next, we need to fetch the UI Framework file that was generated by maven, and place it in our OpenMRS directory.
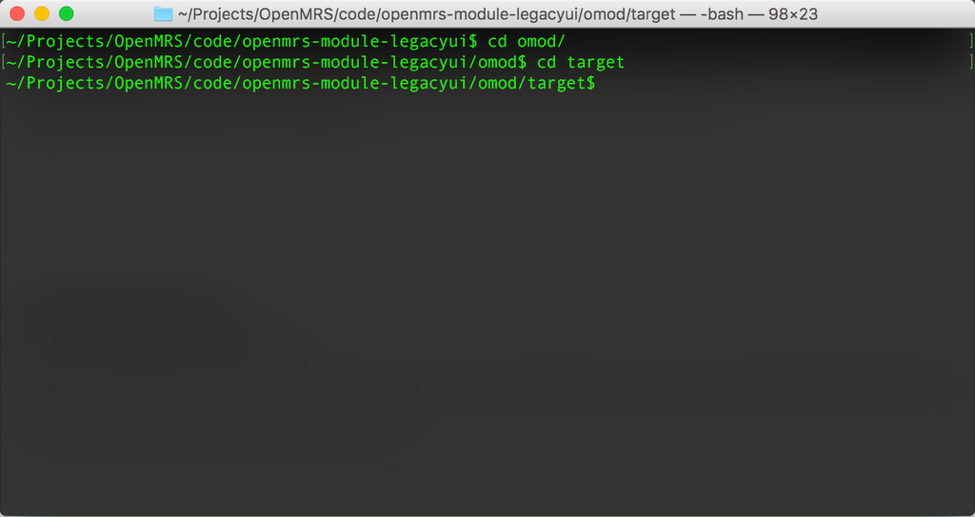
We want to cd into the folder omod then cd into the folder target.
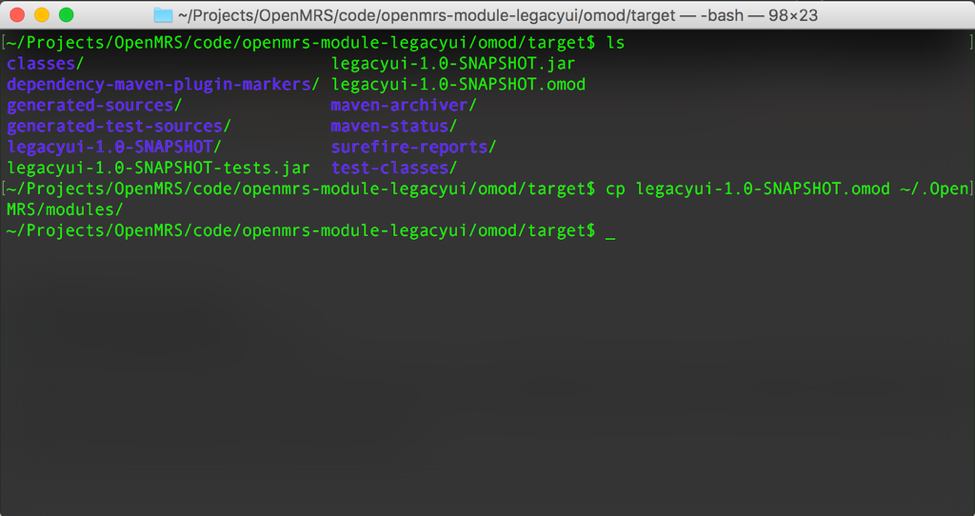
Once here, you should see a file called legacyui-{version}-SNAPSHOT.omod. You need to copy this to your OpenMRS folder in your user folder. You can do this using the command cp legacyui-{version}-SNAPSHOT.omod ~/.OpenMRS/modules/
cp legacyui-{your_version}-SNAPSHOT.omod ~/.OpenMRS/modules/
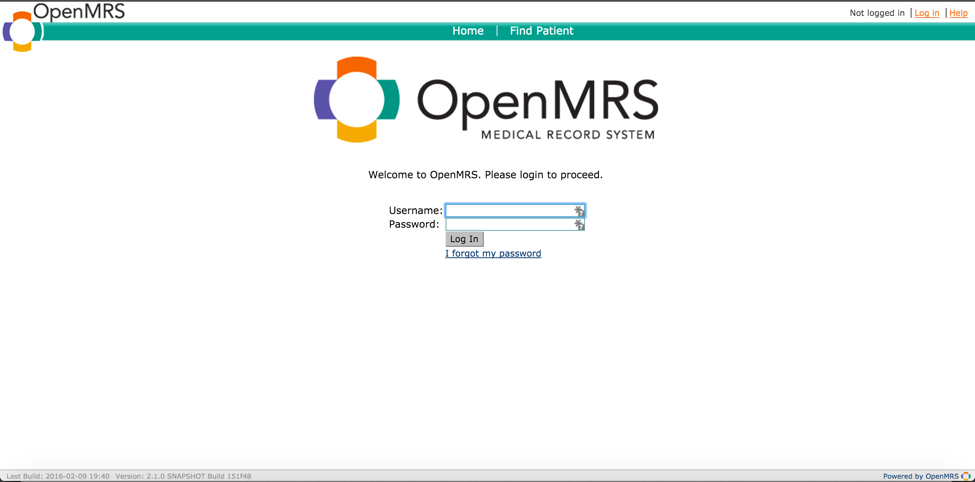
Now, cd back into the openmrs-core/webapp folder that we were in before. Run the core application again using the command mvn jetty:run. Then visit the URL http://localhost:8080/openmrs/index.htm. You should now see a login page where you can log into the system.
Common Problems
During the initialisation of the openmrs core (after running mvn jetty:run) I ran into a bootstrapping problem. The details are described further below, for the impatient amongst us I continue with the solution I have used to get around the problem. Before initialising OpenMRS, I disconnected from my LAN (or WLAN) so that no IP address was assigned to my machine. Once the initialisation has successfully finished, you are presented with the OpenMRS login page. At this stage you can reconnect to your LAN or WLAN.
Two new kids on the block
The initialisation creates two things on your machine: a database and a ~/.OpenMRS folder underneath your profile.
You can use the MySQL command line tool to have a look at the new OpenMRS database.
~ $ mysql -u root -p -h localhost
Enter password:
Welcome to the MySQL monitor.  Commands end with ; or \g.
Your MySQL connection id is 1
Server version: 5.5.27 MySQL Community Server (GPL)

Copyright (c) 2000, 2011, Oracle and/or its affiliates. All rights reserved.

Oracle is a registered trademark of Oracle Corporation and/or its
affiliates. Other names may be trademarks of their respective
owners.

Type 'help;' or '\h' for help. Type '\c' to clear the current input statement.

mysql> show databases;
+--------------------+
| Database           |
+--------------------+
| information_schema |
| mysql              |
| openmrs            |
| performance_schema |
| test               |
+--------------------+
5 rows in set (0.00 sec)

mysql> use openmrs;
Reading table information for completion of table and column names
You can turn off this feature to get a quicker startup with -A

Database changed
mysql> show tables;
+--------------------------------+
| Tables_in_openmrs              |
+--------------------------------+
| active_list                    |
| active_list_allergy            |
| active_list_problem            |
| active_list_type               |
| clob_datatype_storage          |
| cohort                         |
| cohort_member                  |
| concept                        |
| concept_answer                 |
| concept_class                  |
| concept_complex                |
| concept_datatype               |
| concept_description            |
| concept_map_type               |
| concept_name                   |
|
The ~/.OpenMRS folder contains a file called openmrs-runtime.properties. It is generated during the initialisation of the application and contains settings for the application, in particular settings used when connecting to the database. Once OpenMRS has created its database, it accesses MySQL with the username and password as specified in the openmrs-runtime.properties file.
#Auto generated by OpenMRS initialization wizard
#Mon Dec 31 19:03:04 CET 2012
encryption.vector=XsqmRbzJMwVkqEhKrDaP6Q==
connection.url=jdbc:mysql://localhost:3306/openmrs?autoReconnect=true&sessionVariables=storage_engine=InnoDB&useUnicode=true&characterEncoding=UTF-8
module.allow_web_admin=true
connection.username=openmrs_user
auto_update_database=false
encryption.key=1+xzXRP7dO2Tp8rKkAB11A==
connection.password=9xgOa|awkggy
In this file, I have changed the connection url to refer to 127.0.0.1 instead of localhost. This is related to the fact that MySQL treats localhost in a special way. More on this in the next paragraph, this is how my openmrs-runtime.properties file looked after the change.
#Auto generated by OpenMRS initialization wizard
#Mon Dec 31 19:03:04 CET 2012
encryption.vector=XsqmRbzJMwVkqEhKrDaP6Q==
connection.url=jdbc:mysql://127.0.0.1:3306/openmrs?autoReconnect=true&sessionVariables=storage_engine=InnoDB&useUnicode=true&characterEncoding=UTF-8
module.allow_web_admin=true
connection.username=openmrs_user
auto_update_database=false
encryption.key=1+xzXRP7dO2Tp8rKkAB11A==
connection.password=9xgOa|awkggy
What is behind the bootstrapping problem?
As pointed out by section 4.2.2. Connecting to the MySQL Server of the MySQL documentation, MySQL programs attempt to connect to the local server by using a Unix socket file for connections to localhost. In the case of OpenMRS, this results in the following exception:
Caused by: java.sql.SQLException: Access denied for user 'openmrs_user'@'192.168.3.3' (using password: YES)
       at com.mysql.jdbc.SQLError.createSQLException(SQLError.java:1055)
       at com.mysql.jdbc.SQLError.createSQLException(SQLError.java:956)
       at com.mysql.jdbc.MysqlIO.checkErrorPacket(MysqlIO.java:3536)
       at com.mysql.jdbc.MysqlIO.checkErrorPacket(MysqlIO.java:3468)
       at com.mysql.jdbc.MysqlIO.checkErrorPacket(MysqlIO.java:917)
       at com.mysql.jdbc.MysqlIO.secureAuth411(MysqlIO.java:3974)
       at com.mysql.jdbc.MysqlIO.doHandshake(MysqlIO.java:1282)
       at com.mysql.jdbc.ConnectionImpl.createNewIO(ConnectionImpl.java:2292) 	... 59 more
When OpenMRS is initialised, the application creates a new user for OpenMRS in MySQL's user table:
mysql> use mysql;
Reading table information for completion of table and column names
You can turn off this feature to get a quicker startup with -A

Database changed
mysql> select host, user from user;
+--------------------------------------+--------------+
| host                                 | user         |
+--------------------------------------+--------------+
| 127.0.0.1                            | root         |
| 192.168.%                            | root         |
| ::1                                  | root         |
| bluelabel.corporate.thoughtworks.com |              |
| bluelabel.corporate.thoughtworks.com | root         |
| localhost                            |              |
| localhost                            | forum        |
| localhost                            | openmrs_user |
| localhost                            | root         |
+--------------------------------------+--------------+
9 rows in set (0.00 sec)
The new user is only created for the host localhost and not for the current IP address of the machine. However, due to MySQL's handling of 'localhost', the OpenMRS web application does not try to connect to its database as 'openmrs_use'@'localhost' but as 'openmrs_user'@'192.168.3.3'. MySQL's user table does not contain a respective combination of user and host which results in access being denied.
I have experienced this in two scenarios: during the initialisation of OpenMRS and when re-starting OpenMRS after it had successfully been initialised. The first scenario is what I have described as a bootstrapping problem above, it can be avoided by going offline during the initialisation. The second scenario is solved by changing 'localhost' to 127.0.0.1' in the openmrs-runtime.properties file.
Re-running the initialisation
Before re-running the initialisation, I tidy up three things.
First, remove the OpenMRS database and the user openmrs_user.
Re-running the initialization
Before re-running the initialization, I tidy up three things.
First, remove the OpenMRS database and the user openmrs_user.
~/Projects/OpenMRS/code/openmrs-core(master) $ mysql -u root -p -h localhost
Enter password:

mysql> drop database openmrs;
Query OK, 100 rows affected (0.56 sec)

mysql> use mysql;
Database changed

mysql> delete from user where user='openmrs_user';
Query OK, 1 row affected (0.01 sec)

mysql> flush privileges;
Query OK, 0 rows affected (0.00 sec)
Next, I remove the OpenMRS folder underneath my user.
~ $ rm -rf ~/.OpenMRS
Done and dusted, OpenMRS can be re-initialised now.