Install and Configure Eclipse For OpenMRS Development
OpenMRS code follows a specific format. To set up Eclipse properly, so that your code can be formatted automatically, follow the instructions below.
Download and Install Eclipse
- Download Eclipse from http://www.eclipse.org/downloads/.
We recommend the Eclipse IDE for Java EE Developers. - Install Eclipse on your system.
Clone openmrs-core
To configure code format in Eclipse, you will need xml files in the openmrs-core repository.
To get these files, follow these steps:
- Sign in to your Github account.
- Go to: https://github.com/openmrs/openmrs-core, fork the repository.
Run the following command on your computer:
$ git clone https://github.com/{your_github_id}/openmrs-coreThe openmrs-core folder with all its files will be cloned to your local directory.
Configure Eclipse
Configure Java Code Format for OpenMRS
In order for Eclipse to format the code, you will need to import the OpenMRSFormatter.xml. This file is located in the OpenMRS core, which you should clone if you haven't already.
- Open Eclipse, select Window > Preferences.
- In the search box, enter formatter, then select Java > Code Style > Formatter.
- In the right pane, select Import.
An Import Profile dialog displays. - In the dialog, browse to: openmrs-core/tools/src/main/resources/eclipse, and select OpenMRSFormatter.xml.
- Select Open.
The OpenMRS Formatter shows as the Active profile. See the picture below: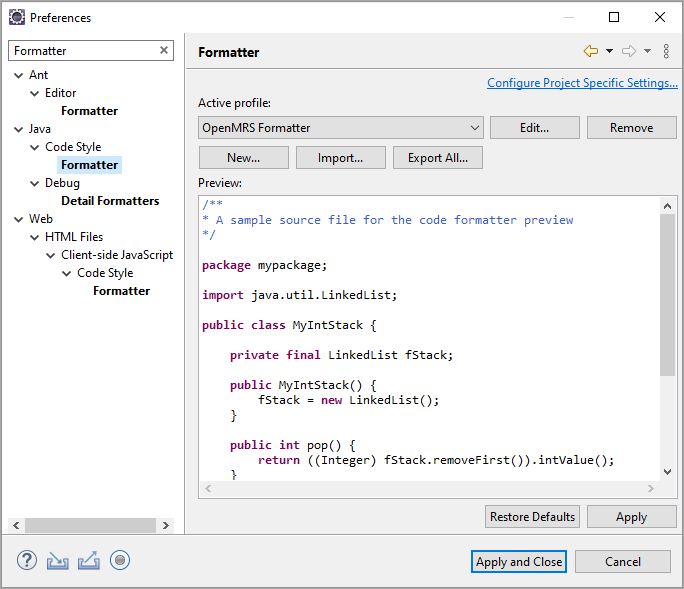
- Select Apply and Close.
Now you can let Eclipse format any java class with the shortcut:
Ctrl+Shift+F (Command+Shift+F on Mac)
Configure Java Import Order
In order for Eclipse to order the java imports according to the OpenMRS style and remove unused imports do the following:
- Select Window > Preferences. In the search box enter organize imports.
- Select Java > Code Style > Organize Imports.
The result is as following: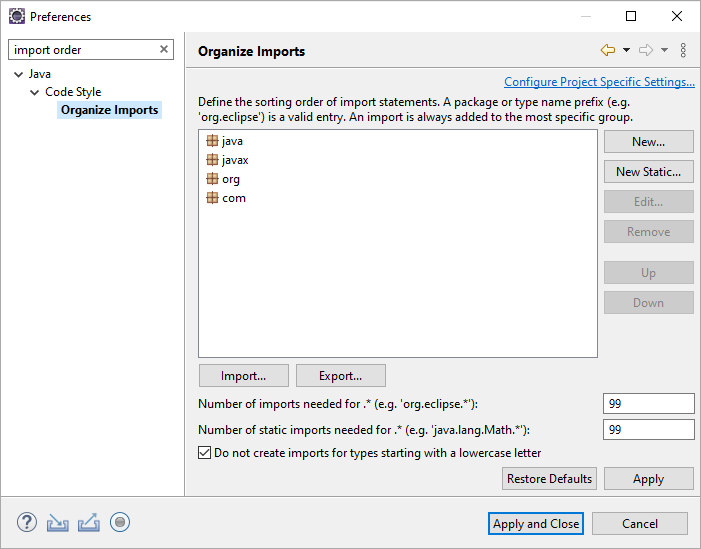
- Make sure the order of the import groups is as what you see above (java, javax, org, com).
It is the Eclipse default, so you might not have to change anything. - Check both Number of imports needed for * and Number of static imports needed for * are set to 99.
The numbers need to be high enough so that Eclipse will not replace your imports with the so called "star imports" using *. 99 is the default value for Eclipse and is usually high enough. - Select the Do not create imports for types starting with a lowercase letter checkbox.
- Select Apply and Close.
Now you can let Eclipse format and remove unused imports with the shortcut:
Ctrl+Shift+O (Command+Shift+O on Mac)
Configure XML Code Format
The OpenMRSFormatter.xml only handles the Java formatting (limitation of Eclipse). You also need to configure the XML Editor.
- Select Window > Preferences.
- In the search box enter XML editor.
- Select XML > XML Files > Editor.
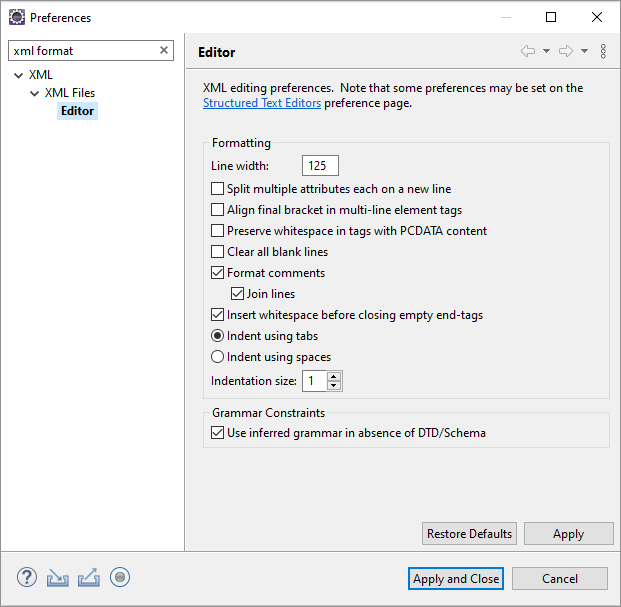
- Set the Line width to 125.
The maximum line length for XML is equal to the one we set for Java files. For Java this is ensured by the Checkstyle - LineLength. Please update this setting if the same setting in the openmrs-core/checkstyle.xml file changes. - Select Apply and Close.
Configure Save Actions
Eclipse provides the "Save Actions" function, which can format the code automatically according to your formatter settings when you save your file ! To configure Save Actions, follow these steps:
- Select Window > Preferences.
- In the search box, enter save actions.
- Select Java > Editor > Save Actions.
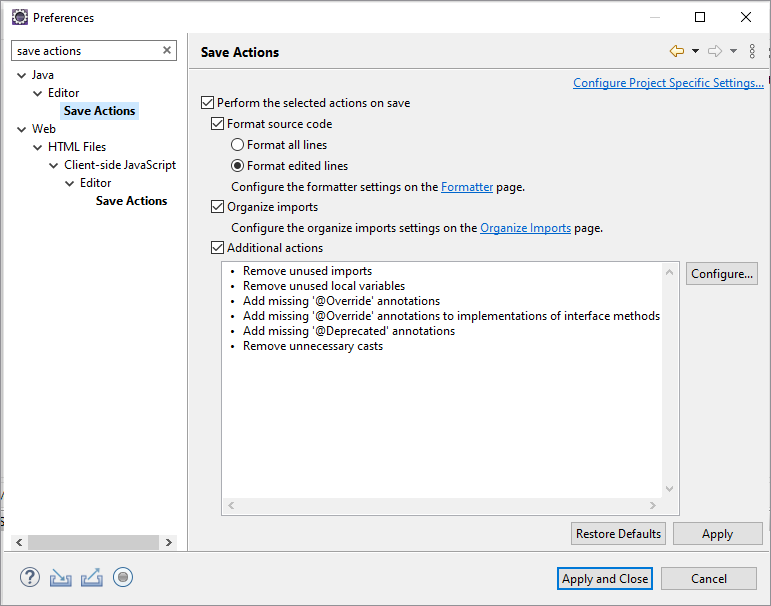
- Select radio buttons and checkboxes to match the image above.
- Select Configure.
The Additional Save Actions dialog displays. - Select the Missing Code tab, select ALL the checkboxes and select OK.
- Select the Unnecessary Code tab, and select the checkboxes as the picture below:
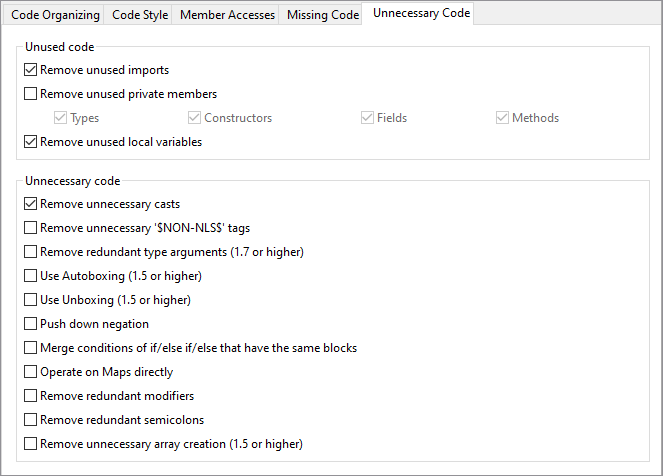
- Make sure that NOTHING is selected in the Code Organizing, Code Style, and Member Accesses tabs. Select OK to close each tab.
- Select Apply and Close.
Now when you change a class and save it, Eclipse will format the code for you according to your formatter settings and organize the imports according to the import settings.
Import OpenMRS Code Templates
To save you some typing so that you can focus on solving problems, we put together a few code snippets/templates. Once you import them, you can type short keywords, and the Eclipse context menu will suggest the appropriate template. After you select a template, you can adjust the snippet to your use case. To import the OpenMRS templates, follow these steps:
- Select Window > Preferences.
- In the search box, enter templates.
- Select Java > Editor > Templates.
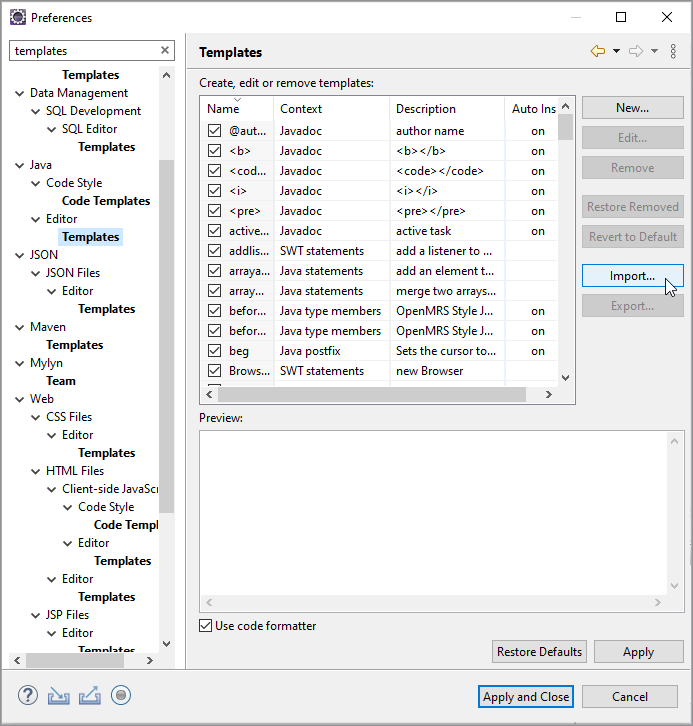
- Select Import.
The Import Templates dialog displays. - Browse to openmrs-core/tools/src/main/resources/eclipse/templates.xml, and select Open.
- Select Apply and Close.
Show Print Margin
If you want to see whether your lines are longer than what you configured in the formatter you can let Eclipse show you the Print Margin.
- Select Window > Preferences.
- In the search box, enter: print margin.
- Select General > Editors > Text Editors.
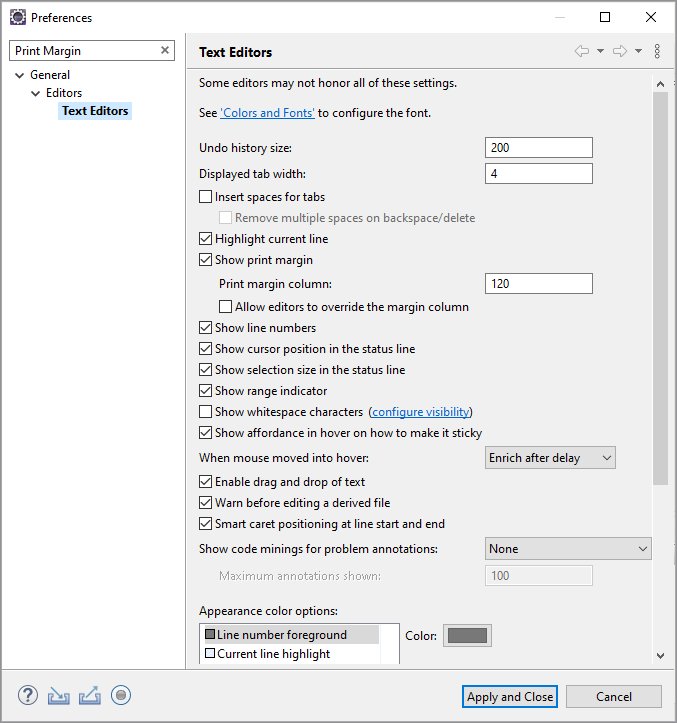
- Select the Show Print Margin checkbox and set the margin to the maximum line length that is defined in the checkstyle config under LineLength.
Configure Maven Settings
Open pom.xml as xml not in GUI
If you do not like Eclipse to open the pom.xml files in the GUI style window, you can disable this feature..
- Select Window > Preferences.
- In the search box, enter maven (Or search for User Interface).
- Select Maven > User Interface.
- Select the Open XML page in the POM editor by default check box.
- Select Apply and Close.
Download Source Code and JavaDocs
To get a better understanding of Java libraries, it’s useful to see the source code of libraries and to see the JavaDocs.To achieve this in Eclipse, you need to enable Maven to download the source code and JavaDocs.
- Select Window > Preferences.
- In the search box, enter maven.
- Select Download Artifact Sources and Download Artifact JavaDoc.

- Select Apply and Close.
Now you’ve completed the setup for Eclipse.
To learn more about Eclipse go to: How to Set Up and Use Eclipse.