HTML Form Entry JavaScript Reference
Javascript function reference
Javascript overview
You've always been allowed to write Javascript in an HTML form but since version 1.6.8 we provide some built-in Javascript helper functionality.
- Any time you specify an 'id' attribute on an obs tag (for example: <obs id="weight" .../>) you have access to the displayed fields (in this example: weight.value, weight.date, weight.error and weight.accessionNumber). Note: if the additional fields, like date and accessionNumber are not displayed on the form, you get an error if you try to setValue. They must be displayed on the form by adding showDate="true" and/or showAccessionNumber="true" to the <obs> tag. This is to be fixed in HTML-555.
- Since version 1.9.0, any time you specify an 'id' attribute in an encounterDate, encounterLocation or encounterProvider tag (for example: <encounterDate id="encounterDate" .../>, <encounterLocation id="encounterLocation"/> or <encounterProvider id="encounterProvider"/> you have access to the displayed fields (in this example: encounterDate.value, encounterDate.error, encounterLocation.value, encounterLocation.error, encounterProvider.value and encounterProvider.error)
- Since version 1.9.4, you can specify an 'id' attribute in a relationship tag (for example: <relationship id="relationship" .../> and access the value of an existing relationship using this id and the name of the relationship type (-use camel-case if the name has more than one word).
Example: relationship.mother.value, relationship.accompagnateurLeader.value, relationship .guardianNonParent.value
To access the value of a new relationship, use "newRelationship" for the name of the relationship type.
Example: relationship.newRelationship.value
Also note that attempting to use a less than (<) symbol within javascript will result in an error when saving the form, because the < symbol will be interpreted as the beginning of a tag. Use:
<
to represent a less than symbol within your javascript.
Also note that jQuery should be available within an HTML Form context via both the variables "jq" (preferred) and "$j".
getField(idAndProperty)
Used to get a JQuery handle to a field, so you can attach event listeners to it.
- argument: idAndProperty the field you want to get (for example "weight.value")
returns: a JQuery selector for the field you requested
Example for obs (since: 1.6.8):jQuery(function() { getField('weight.value').change(function() { window.alert('Weight is now ' + getValue('weight.value')) }); });Example for encounter details (since: 1.9.0):
jQuery(function() {
         getField('encounterDate.value').change(function() {
         window.alert('Encounter date is ' + getValue('encounterDate.value'))
         });
});

jQuery(function() {
         getField('encounterLocation.value').change(function() {
         window.alert('Location is ' + getValue('encounterLocation.value'))
         });
});

jQuery(function() {
         getField('encounterProvider.value').change(function() {
         window.alert('Provider is ' + getValue('encounterProvider.value'))
         });
});
getValue(idAndProperty)
Gets the value of a field.
- argument: idAndProperty the field you want to get (for example "weight.value")
returns: the value of the specified field
Example for obs (since: 1.6.8):jQuery(function() { window.alert('You entered ' + getValue('weight.value') + 'kg as the weight'); });Example for encounter details (since: 1.9.0):
jQuery(function() {
         window.alert('Encounter date is ' + getValue('encounterDate.value')
           + '.\nEncounter date error is ' + getValue('encounterDate.error')
             + '.\nEncounter location is ' + getValue('encounterLocation.value')
       + '.\nEncounter location error is ' + getValue('encounterLocation.error')
                       + '.\nProvider is ' + getValue('encounterProvider.value')
                 + '.\nProvider error is ' + getValue('encounterProvider.error'))
});
setValue(idAndProperty)
Sets the value of a field
- argument: idAndProperty the field you want to set the value of (for example "weight.value")
value: the value you want to set
Example for obs (since: 1.6.8):jQuery(function() { setValue('weight.value', 74); setValue('scheduledVisit.value', true); setValue('howTravelClinic.value', 456); // 456 is a concept id that's a legal answer to this question });Example for encounter details (since: 1.9.0):
jQuery(function() {
     setValue('encounterDate.value', "2012-01-01"); // 2012-01-01 is a valid date
     setValue('encounterDate.error', "*Some Encounter dateError*");
     setValue('encounterLocation.value', 15); // 15 is a location id
     setValue('encounterLocation.error', "*Some Location Error*");
     setValue('encounterProvider.value', 146552); // 146552 is a provider id
     setValue('encounterProvider.error', "*Some Provider Error*");
});
Note that if setValue() method is used with an Autocomplete widget, the display value will not be updated, as the setValue method only updates the hidden value of Autocomplete widget. However once the form is saved and submitted, it will save the values correctly.
Note that the setValue('<id>.error', "<message>") examples shown above will result in the error messages being shown in the standard error message area.
Defining javascript functions to call before form validation and submission
Since version 1.8.0, it is possible to define javascript functions within a form that will be called before form validation and form submission. Two new array variables have been added to an HTML form: beforeValidation and beforeSubmit. These arrays are empty by default, but form developers can define functions within a form and add them to these arrays. All functions added to the beforeValidation array will be called before form validation, and all functions added to beforeSubmit will be called before form submission. These functions should return a boolean result: if a function returns false, no further functions are called, and the validation or submission is cancelled.
Example:
<includeIf velocityTest="$patient.gender == 'M'">
<BR>This patient is a male.</BR>
<obs conceptId="5090" id="height" labelText="Height:"/>
<script type="text/javascript">
beforeSubmit.push(function() {
    var val = getValue('height.value');
    if (val == null || val == '') {
        getField('height.error').html('Required for males').show();
        return false;
    }
    return true;
});
</script>
</includeIf>
Additional jquery examples
If you want areas to "grey out" based on checking a radio button or checkbox, review this additional documentation for explanation and examples.
Problems
Yes/no Answers
There are key problems in many if not most htmlforms involving the distinction between radio buttons and checkboxes. Radio buttons can be used in openMRS when there is a concept with several coded answers to choose from. However, sometimes the concept is 'symptom present' or 'symptom absent' with coded answers for a series of symptoms. The question being asked on the form may be 'does the patient present with a cough?' with the answers 'yes' or 'no.' But, from the system's prospective, it is really two questions: 'Is a cough present?' and 'Is a cough absent?'
Irrelevant Form Sections
Sometimes, on a paper form clinicians record many details about one specific question. A clinician might want to know 'Does the patient present with a cough?' and then 'How long has the cough persisted?' and 'How serious is the cough?' When the form is rendered as an htmlform, there is a possibility that a user will enter impossible data by accident. It is possible for a series of responses to indicate that the patient had 'no cough that persisted for 3 weeks and was extremely serious.'
Both of these problems could theoretically be solved with standard Javascript. One can give inputs IDs and then generate complex rules. Unfortunately, we don't actually write the input tag in openMRS, we use the obs tag. The obs tag translates into one hidden input and one actual input when it is rendered as HTML. Simple Javascript has no method of handling this problem.
Toggle Sections of the Form Using Add and Remove Buttons
When using the repeat tag, the form appears cleaner to users if they can only see one set of the template. This makes the form easier to work and easier to read. However, there is not an option to display a variable number of repeats. One quick fix to this is to code in a maximum number of repeats that you might need or have time to address in one visit (we use 10 problems, for example). Then, you can use jQuery to Add and Remove fields set by default to be hidden. This solution could be applied to other places where toggling content between hidden or shown would be useful in the form in order to provide a more intuitive environment for the users by only displaying relevant parts of the form.
Solutions
Yes/No Answers and Irrelevant Form Sections
The Javascript
Using the JQuery library while making slight modifications to the markup we can achieve simple solutions to both these problems. The following script can be copied toward the top of your htmlform.
<script type="text/javascript">
if(jQuery){
 jQuery(document).ready(function(){
 	if ( $j.browser.msie ) {
 		$j(":checkbox").click(function(){
			 $j(this).change();
	 });
 }
 $j(".enableDisable").each(function(){
	 var group = $j(this);
	 function disableFn(){
		 group.children("#disabled").fadeTo(250,0.33);
		 group.children("#disabled").find(":checkbox").attr("checked",false); //uncheck
		 group.children("#disabled").find("input[type$='text']").val("");
		 group.children("#disabled").find("input").attr("disabled",true);  //disable
	 }
 function enableFn(){
	 group.children("#disabled").fadeTo(250,1);
	 group.children("#disabled").find("input").attr("disabled",false);
 }
 disableFn();
 $j(this).children("#trigger").find(":checkbox:first").change(function(){
	 var checked = $j(this).attr("checked");
	 if(checked == true){
		  enableFn();
	 }else{
 		 disableFn();
	 }
 });
});


 $j(".checkboxGroup").each(function(){
	 var group = $j(this);
	 var uncheckAll = function(){
		 group.find("input[type$='checkbox']").attr("checked",false);
		 group.find("input[type$='checkbox']").change();
	 }
	 var uncheckRadioAndAll = function(){
	 group.find("#checkboxAll,#checkboxRadio").find("input[type$='checkbox']").attr("checked",false);
	 group.find("#checkboxAll,#checkboxRadio").find("input[type$='checkbox']").change();
 }


 group.find("#checkboxAll").find("input").click(
	 /*  This was tricky... A number of things needed to happen
 		Basically, This is supposed to treat a group of inputs as if
	 	were all one big checkbox. It is designed so that a checkbox
		 can be next to an input, and the user clicks the input, the
	 	checkbox checks as well. But, when the user clicks the checkbox,
		 the browser marks the checkbox as checked. Therefore, when we check
		 if the checkbox is already checked, it always respondes true...
		 We needed to have 2 cases: when the clicking action is on the first checkbox
		 and when the action is on any other.  */
 	function(){
		 var flip;
		 var checked = $j(this).siblings(":checkbox:first").attr("checked");
		 if($j(this).attr("name") == $j(this).parents("#checkboxAll:first").find(":checkbox:first").attr("name")){
			 checked = $j(this).attr("checked");
			 flip = checked;
		 }else{
			 flip = !checked;
		 }
		 if($j(this).attr("type") == "text") if(flip == false) flip = !flip; // this is so the user doesn't go to check the checkbox, then uncheck it when they hit the input.
		 uncheckAll();
		 $j(this).parents("#checkboxAll:first").find(":checkbox").attr("checked",flip);
		 $j(this).parents("#checkboxAll:first").find(":checkbox").change();
	 }
 );


 group.find("#checkboxRadio").find("input[type$='checkbox']").click(function(){
	 uncheckAll();
	 $j(this).siblings("input[type$='checkbox']").attr("checked",false);
	 $j(this).attr("checked",true);
	 $j(this).change();
 });

 group.find("#checkboxCheckbox").click(
	 function(){
		 uncheckRadioAndAll();
	 }
 );
 });
 });
}
</script>
First, JQuery is included. Next, the script checks to see if JQuery is loaded properly. If so, it proceeds. This means that if there is problem with JQuery, the script will do nothing, and the form will render as it would with no scripting.
The Markup
In order for the Javascript to work correctly, it needs to know where to look for input tags. If you want to employ a rule, you must wrap your obs tags in another tag with a series of classes and IDs.
checkboxGroup
This function is arguably hard to understand. It makes much more sense once you see an example. When the javascript encounters an element with a class of 'checkboxGroup' it looks inside for child elements with the following IDs: 'checkboxCheckbox, checkboxAll, checkboxRadio.' Each child element can contain one or more checkboxes in them. When a checkbox in one of the child elements is checked, the checkboxes in each of the other child elements are unchecked. Additionally, based on which ID the child element has, a different behavior is achieved inside the child element. For checkboxCheckbox, more than one checkbox inside the child element is allowed to be checked. In checkboxAll, every checkbox in the child element is checked or unchecked. In checkboxRadio, the checkboxes have the function of radio buttons, and only one is allowed to be checked at a time.
Now for an example:
In the physical examination of a form, there is a line for lungs. The possible answers are 'normal,' 'absent,' 'noisy,' and 'crackly.' The rule we need to express: 'normal can be selected OR ANY of the others but not both. Any of the abnormal sounds can be checked, even more than one, but they cannot be checked at the same time as normal. Here is the code:
<tr>
				<td align="right">lungs:</td>
				<td class="checkboxGroup">
					<span id="checkboxAll"><obs conceptId="3238" answerConceptId="3236"
						answerLabel="normal" style="checkbox" /></span>
					<span id="checkboxCheckbox"><obs conceptId="3238" answerConceptId="5622"
						answerLabel="dull/absent" style="checkbox" />
					<obs conceptId="3238" answerConceptId="5209"
						answerLabel="noisy" style="checkbox" />
					<obs conceptId="3238" answerConceptId="3239"
						answerLabel="crackles" style="checkbox" /></span>
				</td>
			</tr>
The following images demonstrate the possible selections:
 None
None
 Normal
 NOT normal, two selections.
enableDisable
When the script comes across an element with the class 'enableDisable,' it looks for the two child elements with the following IDs: 'trigger', 'disabled.' The first (and preferably only) checkbox in the trigger element will toggle the status of the inputs and style of everything in the 'disabled' element. This means, for the question 'Does the patent have a cough,' 'yes' can be a trigger for more detailed questions to apear. The two solutions can be combined in the following code example and corresponding images.
<tr>
				<td align="right">Toux:</td>
				<td class="checkboxGroup">
					<obsgroup groupingConceptId="1292">
						<span id="checkboxAll"><obs conceptId="1734" answerConceptId="107"
							answerLabel="non" /></span>
						<span id="checkboxCheckbox" class="enableDisable">
							<span id="trigger"><obs conceptId="1293" answerConceptId="107" answerLabel="oui" /></span>
							<span id="disabled">
								durée:
								<obs conceptId="2160" />
								semaine
								<obs conceptId="2240" />
								mois
								<obs conceptId="1293" answerConceptId="2128"
									answerLabel="seche" />
								<obs conceptId="1293" answerConceptId="970"
									answerLabel="hemoptysie" />
								<obs conceptId="1293" answerConceptId="5957"
									answerLabel="productive" />
								,
								<obs conceptId="2130" labelText="aspect" />
								<obs conceptId="1293" answerConceptId="5960"
									answerLabel="dyspnee" />
							</span>
						</span>
					</obsgroup>
				</td>
			</tr>


Note: The use of the span tag is not advised for this feature because it is not supported evenly across all browsers. Specifically, certain versions of internet explorer will not fade transparencies on span elements. The div tag with additional CSS is the preferred method. Td and tr tags are also fine candidates.
Toggle Sections of the Form Using Add and Remove Buttons
The Javascript
One solution to this problem is similar to the solution provided for irrelevant form sections. While this works as a quick fix, a better solution could expand on this code to make it more dynamic as currently you have to define the fields that are displayed by default or only show either the add or the remove button. These pre-defined custom <repeat> sets are determined by listing the id's for the addEntry and removeEntry button's plus the toggleContainer div. Below you can see that the first Remove button and final Add button are removed for each group of repeats (we used 10 repeats). the toggleContainer for the first repeat of each section is shown by default, but all others are hidden.
The other important note is that this script requires all of the Add and Remove buttons to have unique id numbers preceding the id name. The format we use is idnumber-idname to uniquely define each button or div container. This is because the id is converted to an int using the parseFloat() function, which obtains an int from the first part of a string and discards the following text. We assign each render in the entire form with a sequential id number. For example, if we have one repeat for Problem's Added, and another repeat for Problem's Resolved for a basic SOAP Adult Return Note, with 10 maximum renders available in each section, then our first ten renders for Problem's Added would be given id's 1-10 and our next ten renders within the Problems Resolved repeat section would be given id's 11-20, the next 10 renders later in the form would be 21-30 and so on.
<script type="text/javascript">
	if(jQuery){
	  $j(document).ready(function(){
		  $j('#1-removeEntry').remove();
		  $j('#10-addEntry').remove();
		  $j('#1-toggleContainer').show();

		  $j('#11-removeEntry').remove();
		  $j('#20-addEntry').remove();
		  $j('#11-toggleContainer').show();
		});


	  $j(document).ready(function(){
	  $j('button.addEntry').live("click", function(){
	  var correctedAddButtonId = parseFloat(this.id) + 1;
	  var contentAddId = "#" + correctedAddButtonId + "-toggleContainer";
	  $j(contentAddId).toggle(true);
	  $j('#' + this.id).toggle(false); $j('#' + parseFloat(this.id) + '-removeEntry').toggle(false);
	  return false;});
	});

	 $j(document).ready(function(){
	  $j('button.removeEntry').live("click", function(){
	  var correctedRemoveButtonId = parseFloat(this.id) - 1;
	  var contentAddId = "#" + parseFloat(this.id) + "-toggleContainer";
	  $j(contentAddId).toggle(false);
	  $j( ':input:not(:button)', contentAddId).val([]);
	  $j('#' + correctedRemoveButtonId + '-addEntry').toggle(true); $j('#' + correctedRemoveButtonId + '-removeEntry').toggle(true);

	  return false;});

	});
}
	</script>
NOTE : the above code can only run on the legacy ui. To run the above code in the new ui (ui framework) , replace the Jquery "$j" identifer with the alias" jq" and "$j(document).ready(function()" with " jq(function()" eg
jq(function(){
jq('button.removeEntry').click(function(){
var correctedRemoveButtonId = parseFloat(this.id) - 1;
var contentAddId = "#" + parseFloat(this.id) + "-toggleContainer";
jq(contentAddId).toggle(false);
jq( ':input:not(:button)', contentAddId).val([]);
jq('#' + correctedRemoveButtonId + '-addEntry').toggle(true);
jq('#' + correctedRemoveButtonId + '-removeEntry').toggle(true);

return false;
});
The Markup
For now we will explain the markup with an example and perhaps expand on this in the future.
number-name
Note that the convention number-name is used for id attributes for the container divs and the addEntry and removeEntry class buttons. This is important for the script as mentioned in the javascript section. To make this dynamic we define {n| similarly to the way you would define {concept| within a render tag using n="the unique sequential number of the render on the page".
<section headerLabel="5. Assessment (as Problem List)">
		<table>
			<obsgroup groupingConceptId="1284">
				<tr>
					<th>Age: <lookup expression="patient.age"/>y.o., Gender: <lookup expression="patient.gender" codePrefix="Patient.gender."/>, with new problems including:</th>
				</tr>
				<tr><td>
				<repeat>
					<template>
						<div id="{n}-toggleContainer" style="display:none;">
							<table>
								<tr>
									<td>
										<obs conceptId="6042" answerClasses="{concept}" style="autocomplete" labelText="Problem Added:"/>
									</td>
									<td><button id="{n}-addEntry" class="addEntry">Add</button><button id="{n}-removeEntry" class="removeEntry">Remove</button></td>
								</tr>
							</table>
						</div>
					</template>
					<render n="1" concept="Diagnosis"/>
					<render n="2" concept="Diagnosis"/>
					<render n="3" concept="Diagnosis"/>
					<render n="4" concept="Diagnosis"/>
					<render n="5" concept="Diagnosis"/>
					<render n="6" concept="Diagnosis"/>
					<render n="7" concept="Diagnosis"/>
					<render n="8" concept="Diagnosis"/>
					<render n="9" concept="Diagnosis"/>
					<render n="10" concept="Diagnosis"/>
				</repeat>
				</td></tr>
				<tr><th>with resolved problems including:</th></tr>
				<tr><td>
				<repeat>
					<template>
						<div id="{n}-toggleContainer" style="display:none;">
							<table>
								<tr>
									<td><obs conceptId="6097" answerClasses="{concept}" style="autocomplete" labelText="Problem Resolved:"/></td>
									<td><button id="{n}-addEntry" class="addEntry">Add</button><button id="{n}-removeEntry" class="removeEntry">Remove</button></td>
								</tr>
							</table>
						</div>
					</template>

					<render n="11" concept="Diagnosis"/>
					<render n="12" concept="Diagnosis"/>
					<render n="13" concept="Diagnosis"/>
					<render n="14" concept="Diagnosis"/>
					<render n="15" concept="Diagnosis"/>
					<render n="16" concept="Diagnosis"/>
					<render n="17" concept="Diagnosis"/>
					<render n="18" concept="Diagnosis"/>
					<render n="19" concept="Diagnosis"/>
					<render n="20" concept="Diagnosis"/>
				</repeat>
				</td></tr>
			</obsgroup>
		</table>
	</section>
Example
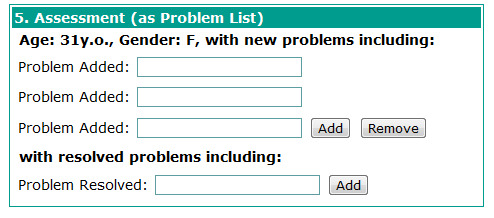
As you can see, the form only displays the add and remove buttons next the the current rendered template and travels as you move through the list of available renders.
Discussion/Issues
When viewing a saved form only the first toggleContainers are displayed by default. All toggleContainers that have values should be displayed by default. This is currently under revision and any suggestions are welcome!