Google Maps Image Viewer Module
Background
As images (chest x-rays, photographs of rashes, etc.) are loaded into OpenMRS, we will need tools to allow users to view and manipulate these images. We would like a clinician to be able to bring up one of the images in OpenMRS and easily manipulate the image to view details and potentially annotate the image. For example, a radiologist could bring up a patient's chest x-ray, zoom in to part of the image and adjust the image contrast to diagnose tuberculosis, and then add their impression to the database e.g., add an arrow to the image along with a comment like "this is consistent with tuberculosis."

Specifics
The Google Maps Image Viewer module is based on Bmckown's Complex Obs Support system. The complex obs system handles storage and loading of image files. The Google Maps Image Viewer provides an alternative to the default image hander for viewing and editing images.
The image viewer is implemented as an OpenMRS module and AJAX-based web application using the Google Maps API. This API is well suited for zooming and navigating through very large images while keeping bandwidth usage to a minimum.
Features
An intuitive user interface based on Google Maps enables easy navigation of large images. Zooming and panning works just like in Google Maps. The browser progressively downloads portions of the image (image tiles) as needed. Annotations are overlaid on the image, these can easily be read, edited, moved or deleted. It is also possible to choose not to display annotations.
The image viewer works with JPEG, GIF, PNG and possibly also BMP image files. Very large images can be used, it has been tested with a 12500x8750 pixel color image, which is 328 MB when decoded. Note that the fully decoded image will have to be stored in memory, so a large Java heap space is required.
Usage notes
Getting the module
Deploying the module
- Make sure you are running the complex obs version of OpenMRS
- Deploy the module in the normal way
- Go to the Google Maps API page and get a developer key. This is free, but a Google account is required. Each key is valid for only one domain, so a new key must be obtained if the OpenMRS deployment is moved. More details about the developer key can be found here: http://code.google.com/apis/maps/faq.html#keysystem
- Save the developer key in the OpenMRS global property mapsimageviewer.googleMapsDevKey. This may be done using the Manage Settings (formerly Global Properties from platform 1.8 downwards) page.
- If using very large images, the image viewer will use a lot of memory. Please make sure that Java has a large heap space, refer to the wiki page on Troubleshooting Memory Errors.
Using the image viewer
- Create a new concept:
- set Class to GoogleImageViewer,
- set Datatype to Complex,
- set Handler to AnnotatedImageHandler
- Add a new Observation and set Concept to the new concept created above.
- Browse and upload an image.
- Save the observation.
- Click on the Value link or "View current complex value in a new window"
- The new image would be displayed using the Google Maps Image Viewer
- Click and drag the image or use the arrow buttons in the top left corner to pan and navigate.
- Use the vertical slider in the top left corner or the mouse scroll wheel to zoom in and out.
- The current zoom level is shown in the top right corner. Clicking that text changes the zoom level to 100%.
- If the image has annotations, they are shown as red markers on the image. Click a marker to read the text.
- Markers can be moved, edited or deleted. To place a new marker, double-click the desired location.
- The bottom right corner contains a thumbnail view of the image. To hide it, click the small button with an arrow.
Optional configuration
The image viewer stores recently used images in memory on the server to speed up loading. The number of images to store can be set in the global property gmapsimageviewer.bufferSize. The Default is 2. When this setting has been changed, the module (or the server) will have to be restarted for the changes to take effect.
When scaling images, nearest neighbor scaling is used by default. This algorithm is fast, but does not provide the best image quality. Bilinear and bicubic scaling may be used instead, this can be set in the global property gmapsimageviewer.scalingQuality. Note that bilinear and bicubic scaling puts quite a bit more load on the server CPU.
Implementation details
Google Maps API
The Google Maps API lets developers embed the JavaScript-based Google Maps client into any website. The API also provides a number of utilities for manipulating the maps and configuring the map viewer. Part of the API allows the creation of custom map overlays and other types of overlays (markers, polylines and polygons).
A map for the Google Maps client is split into 256x256-pixel image tiles. The map can be displayed at several zoom levels, so different sets of image tiles are used for each zoom level. The JavaScript client figures out by itself which tiles it needs, and downloads only those. As the user navigates the map by using the pan/zoom controls, new image tiles are continually downloaded.
Legal issues
The Google Maps API Terms of Service are potentially too restrictive, depending on how the clauses are interpreted. We have, however, gotten assurances from Google that the API can be used in this project.
The Google Maps API as an image viewer
The Google Maps Image Viewer module shows a medical image file as a map overlay in the map viewer. Annotations are shown as markers. Storing the full sets of image tiles for each zoom level is impractical, so the image tiles are instead generated from the original image on each request. This is handled by a servlet.
<div> 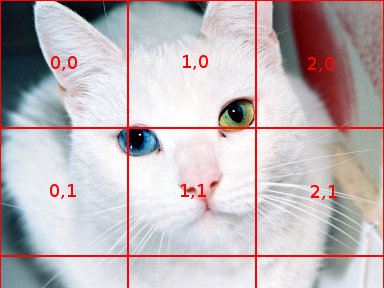
The picture above shows how a large image file is split into smaller image tiles. The numbers show the x,y coordinates for each tile. The tiles also have a third coordinate: The zoom level. This image is shown at zoom level 2.</div>
<div> 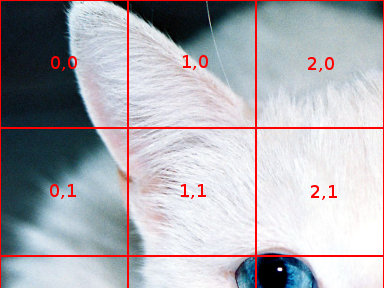
This picture shows how new tiles are created for zoom level 3. Each zoom level displays the image twice as high and twice as wide as the previous level. Four image tiles in this picture covers the same area as one tile in the previous picture.</div>
Project plan
Start date: 1 June (GSoC 'Phase I')
Midterm date: 14 July
By this date, the basics should be ready: A working image viewer that loads images from the database. Annotation should also be ready.
*Second half (GSoC 'Phase II') *
- Generally improve the annotation system.
- Create an AnnotatedImageHandler, which will handle storage and retrieval of both images and their annotations.
- Look into more standard XML formats for storing image metadata and annotations, if they exist.
- Complete the module to the point where other developers can easily try it out on their own, and post that to the openmrs module repository.
- Collect input from other developers and prioritize changes/features based on that.
Final due date: 18 August
The future
Some things that may be added in the future.
- Rotating clockwise and counter-clockwise
- Flipping the image vertically and horizontally
- Option for opening two images side by side, synchronized zooming and scrolling when showing two images
- Adjusting contrast and brightness, or windowing/leveling, whichever seems most relevant
- Other image adjustments
- Decoding DICOM image files
How to extend functionality
Image transformation
Many image transformation types can be defined using the AffineTransform class in the Java API. These include translations, scales, flips, rotations, and shears. The image processing in this module is performed in the class ImageTileServlet, and is defined like so:
<code lang="java5">
BufferedImage bufferedImageTile = new BufferedImage(IMAGE_TILE_SIZE, IMAGE_TILE_SIZE, colorFormat);
Graphics2D graphics = bufferedImageTile.createGraphics();
AffineTransform transform = new AffineTransform();
transform.translate(-IMAGE_TILE_SIZE * x, -IMAGE_TILE_SIZE * y);
transform.scale(scaleMultiplier, scaleMultiplier);
graphics.drawImage(image, new AffineTransformOp(transform, interpolationType), 0, 0);
graphics.dispose();
</code>
The defined AffineTransform performs two operations: Translate and scale. Additional image transformations may be added to the existing AffineTransform instance, please refer to the Java API documentation.
AffineTransform operations only manipulate the pixel coordinate space. In order to modify the pixels themselves, the class RescaleOp (also in the Java API) may be used. Example:
<code lang="java5">
RescaleOp rescale = new RescaleOp(scaleFactor, offset, null);
rescale.filter(sourceImage, destinationImage);
</code>
The class name may be misleading: RescaleOp does not rescale the image in size. Its function is to rescale or offset the value of each pixel, i.e. modifying the colour value. The scaleFactor argument specifies a "contrast" adjustment, and the offset argument specifies a "brightness" adjustment. Again, please refer to the Java API.
Webapp controls
New controls in the webapp may be required in order to manipulate settings for new features, the Google Maps API contains facilities to support this. Please refer to the documentation, especially the section on custom controls. The webapp is defined in the file imageViewerWindow.jsp.
If implementing additional image manipulation features, you may want to control these by passing additional HTTP GET parameters to the ImageTileServlet. This can be done in the function CustomGetTileUrl(a, b). This function contains a URL template that the webapp uses to generate URLs for each image tile.
</body></html>