Common Lab Test Module
Overview
This is a simple module, which can be used to create and customise forms to manage patients' laboratory test orders, samples and results.
Features
The module provides RESTful API and legacy OpenMRS interface, it provides:
- Administrative forms to create new Lab tests and define their set of results.
- Separate tab on patient's dashboard to create Lab test orders
- Collect and manage specimen samples (if required) to process
- Enter test results
- Attach scanned/documented reference files for test results
Module Structure
The module is structured according to OpenMRS conventions found here.
API
src/main/java/org.openmrs.module.commonlabtest.api.impl/CommonLabTestServiceImpl implements CommonLabTestService which extends OpenmrsService.
The unit tests can be found in
src/test/java/org.openmrs.module.commonlabtest package
src/test/resources/CommonLabTestService-initialData.xml contains the test data
OMOD
src/main/java/org.openmrs.module.commonlabtest.web.controller/... contains all Controllers for web app
src/main/java/org.openmrs.module.commonlabtest.web.resource/... contains all REST controllers
src/main/webapp/... contains the JSP files and related resources
Data Model
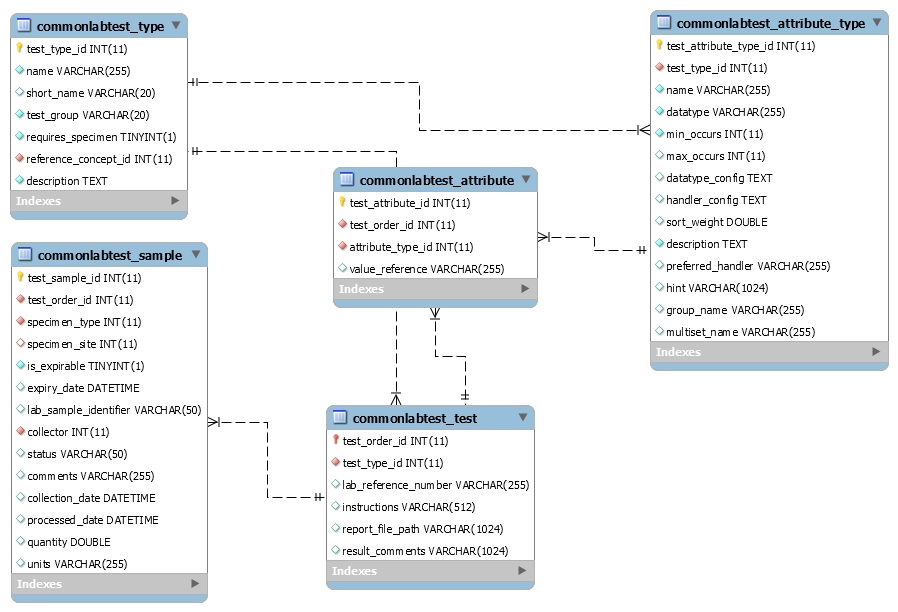
The LabTestType maps to commonlabtest_type, where all lab test types are stored, for example CD4 test, CBC test, Ultrasound test.
LabTestAttributeType maps to commonlabtest_attribute_type; against each LabTestType object a set of LabTestAttributeType is meant to be created, each representing an observation which will be captured when entering results. For example, for CBC test, some LabTestAttributeType can be RBC count, WBC count, Haemoglobin and Platelets.
A LabTest object maps to commonlabtest_test extends OpenMRS object, each patient lab test is referred by this object. This object contains a mandatory Order object, which is abstract OpenMRS object used for Lab tests and Drug orders.
LabTestSample object, which maps to commonlabtest_sample table, contains specimen samples (if the associated LabTestType requires a sample to process a test).
Test results for LabTest object are stored in LabTestAttribute (extends BaseAttribute abstract class) objects, which map to commonlabtest_attribute. An important thing to note here is that an attribute's value might be open-text, numeric, concept, drug, or even a location. The value_reference column contains the reference of the actual value. The Service API returns the associated object, while the RESTful API returns the reference value only.
The best documentation for developers is test cases. Check out the examples in unit tests for complete details. ![]()
Setup
The module requires OpenMRS version 2.0.x or higher and Legacy UI module as prerequisite.
On installing the module, some data is created in the database:
- Privileges: Add/Edit/Delete/View CommonLabTest Metadata, CommonLabTest Orders and CommonLabTest results
- A concept (if one does not exist) named UNKNOWN LAB TEST TYPE (uuid b095450e-9ad0-11e8-844c-448a5b471032)
- Default LabTestType: Unknown Test Type (uuid ee9b140e-9a29-11e8-a296-40b034c3cfee)
Global Properties
Following are the global properties that are created on installing the module:
commonlabtest.fileExtensions refers to the types of files that can be saved as attachments.
commonlabtest.fileDirectory refers to the directory that holds the uploaded attachments (located in OpenMRS application directory as .../complex_obs/commonLabTestFiles).
commonlabtest.specimenTypeConceptUuid = 162476AAAAAAAAAAAAAAAAAAAAAAAAAAAAAA refers to the different types of samples, for example plasma etc.
commonlabtest.specimenSiteConceptUuid = 159959AAAAAAAAAAAAAAAAAAAAAAAAAAAAAA refers to the source of collected sample, for example pulmonary tissue etc.
commonlabtest.testunitsConceptUuid = 5db4f53e-6218-4ae0-ae4e-5e0343b5d30 refers to the units in which sample can be quantified.
Global Properties
Please note if the global properties are not set up then errors may be encountered while using module. Therefore, setting up global properties is a required step (ideally should be automatically done during installation of module).
Usage
This section describes
- how to configure metadata
- basic workflow of module from requesting an order to filling test results
- sample management
Configuring Metadata
Apart from configuring global properties, there are two types of metadata objects that should be created before using Common Lab Module. Those are Lab Test Types and Lab Test Attribute Types as explained in detail below.
Lab Test Types
Lab Test Types refer to the type of tests for which the orders can be requested, for example CXR, AFB Smear etc. On main Administration page under the heading of Common Lab Test, Manage Test Types redirects to the page that manages information related to all the test types.
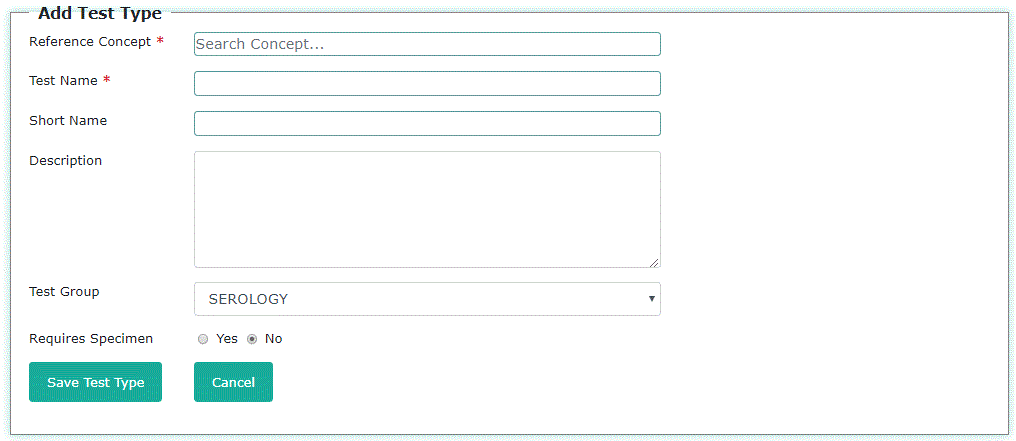
On Add Test Type page, each Test Type is linked with a reference concept for example, CXR Test type should have a reference concept object (concept name does not necessarily need to match, it can be CHEST X-RAY or CXR etc.). Test Group refers to the the group to which this test belongs. Group is an enum list containing test groups like Serology, Cardiology, Ophthalmology, Bacteriology, Biochemistry, Blood_Bank, Cytology, Hematology, Immunology, Microbiology, Radiology, Sonology, Urinalysis and Other. Last question Requires Specimen denotes that test type either requires or doesn't require specimen to produce results. Manage Test types is updated after test type is created successfully.

Lab Test Attribute Types
Lab Test Attribute types basically serve as the questions that constitute the details of a Lab Test Result. Values against these Test Attribute Types are saved while submitting Test Results. These attribute types can be created from the option Manage Attribute Types on Administration page.
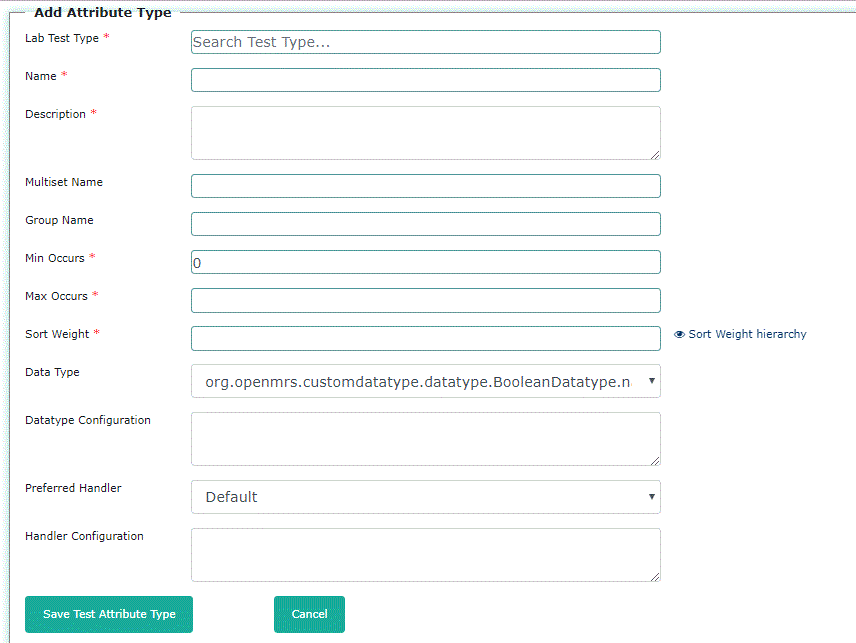
On Add Attribute Type page, there are multiple fields that are described below:
- Lab Test Type: Attribute Types are created against Lab Tests therefore, this field refers to the test type to which the new attribute type belongs.
- Name: It holds the name assigned to the Attribute type.
- Description: Any additional information/description is filled in this field.
- Multiset Name: If the question asked in the test can have multiple answers, then for each answer an attribute type is created. But all of these answer Attribute Types should have same Multiset Name. Please see the example below.
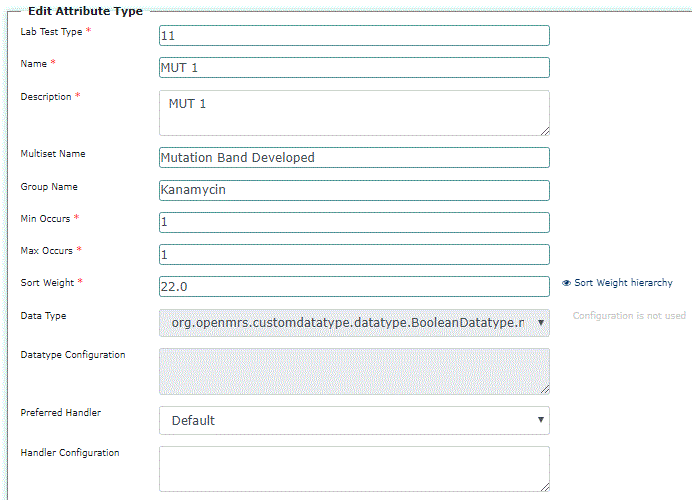
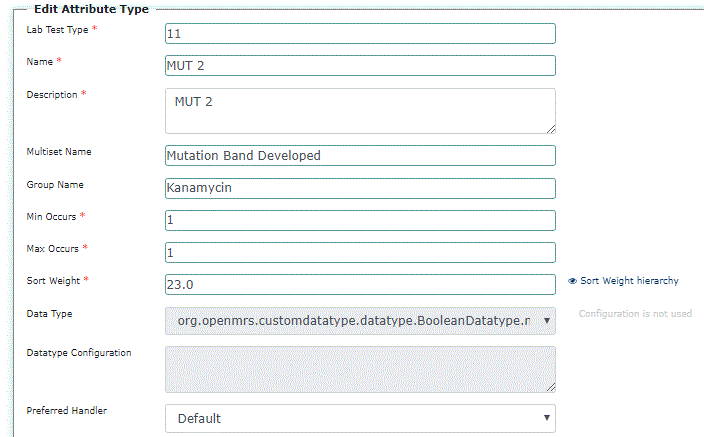
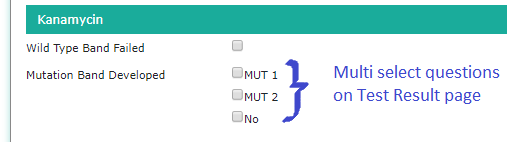
- Group Name: Group name refers to group of questions listed under a single heading. Like in above example, Kanamycin contains a group of questions (Wild Type Band Failed and Mutation Band Developed). Therefore, they are listed under single heading Kanamycin.
- Min Occurs: It refers to the minimum occurrence of an attribute type in a test result.
- Max Occurs:It refers to the maximum occurrence of an attribute type in a test result.
- Sort Weight: It refers to the sequence number in which attribute types (question) will appear in test result form.
- Data Type: It refers to the datatype assigned to attribute type. These are the supported data types: Boolean, Long Free Text, Float, Concept, Regex Validated Text, Free Text, Date. Concept datatype is assigned to attribute types that are closed ended questions for example, question for confirmation of cough has Yes, No, Unknown, Refused options as answers. Therefore, such attribute type will be created with Datatype Concept.
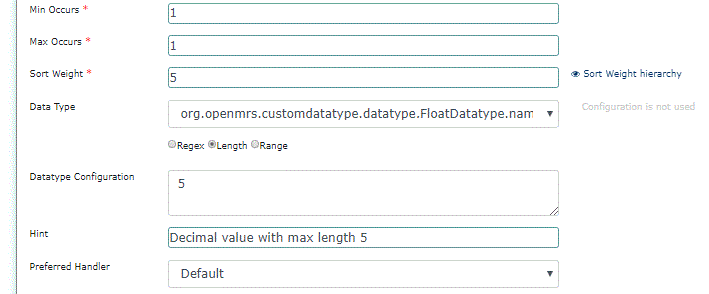
- Datatype Configuration: In case of an attribute type with Concept datatype, concept ID should be mentioned in the datatype configuration field. In case of Text, Regex Validated Text, Float values, DataType configuration can be used to mention Length or Regex or Range. Please see example below.
- Hint: It is used to mentioned any additional info. For example, if only numeric value is allowed in float datatype then hint can be filled as "Numeric value with max length 2". It will appear with the question on the Test Result form.
- Preferred Handler: Should be kept as Default.
- Handler Configuration: Should be left as blank.
Workflow
On installing module, there is a new tab Lab Tests created on patient dashboard. In Lab Tests tab, there are two options available (Add Test Order & Add Test Request).

Add Test Order refers to single Test order request whereas Add Test Request can be used for creating multiple Test order requests at a time. Additionally, in this tab there is a list of Test Orders requested for that patient. Add Test Order directs to the following page.
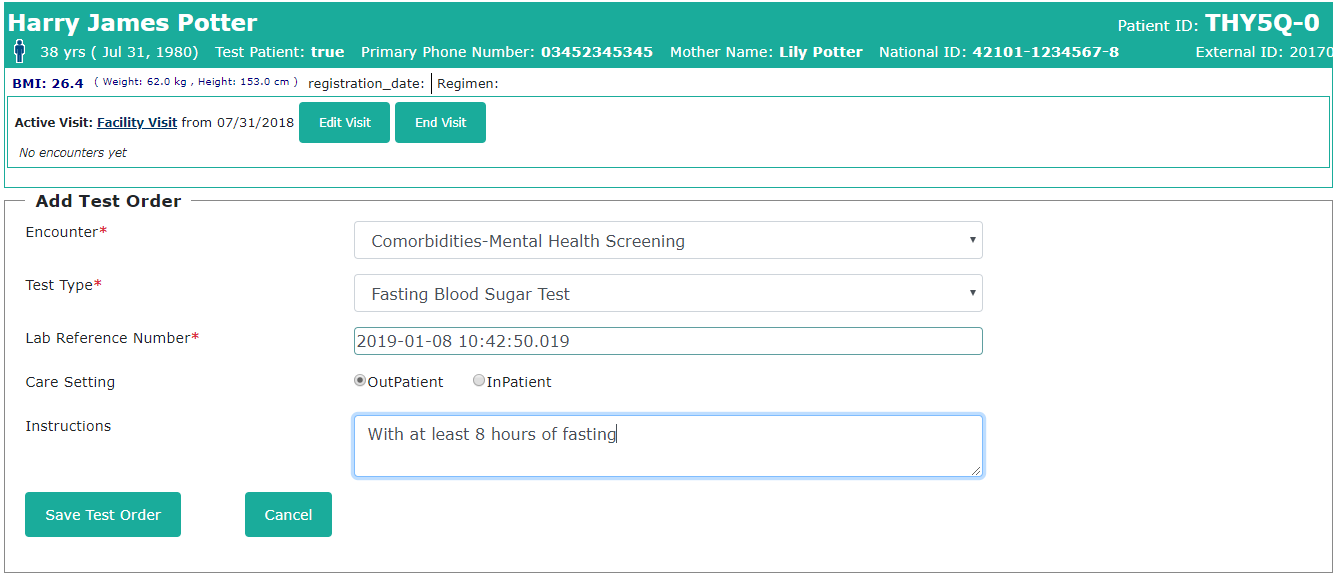
Above screenshot represents the form to create Test Orders.
- There is an encounter linked with each test order therefore, the order date (date_activated) is set to the encounter date.
- Test Type field refers to the kind of test for which order is being requested.
- Lab Reference Number is auto generated timestamp which basically serves as Lab ID (it can be edited later and can be replaced with exact Lab ID, if available).
- Whereas care setting denotes the type of patient indicating whether the patient is hospitalised (In-Patient) or simply an Out-Patient.
- Instructions is a self-explanatory field.
After the test order is successfully created, the List Test Order is updated in Lab Tests tab as it can be seen below.
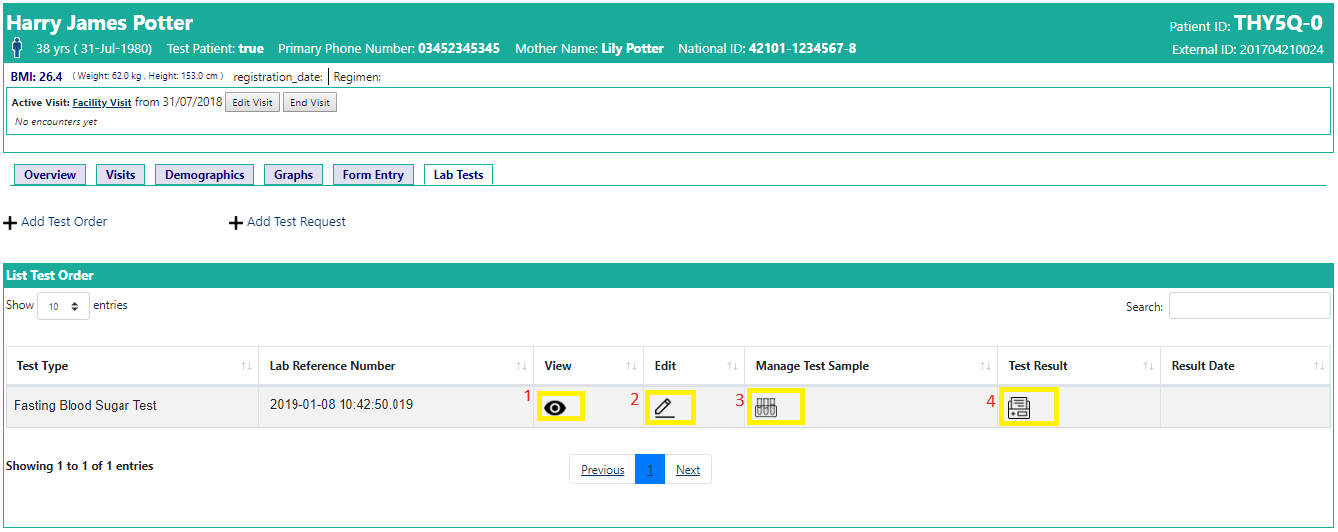
The list of Test Order contains following options:
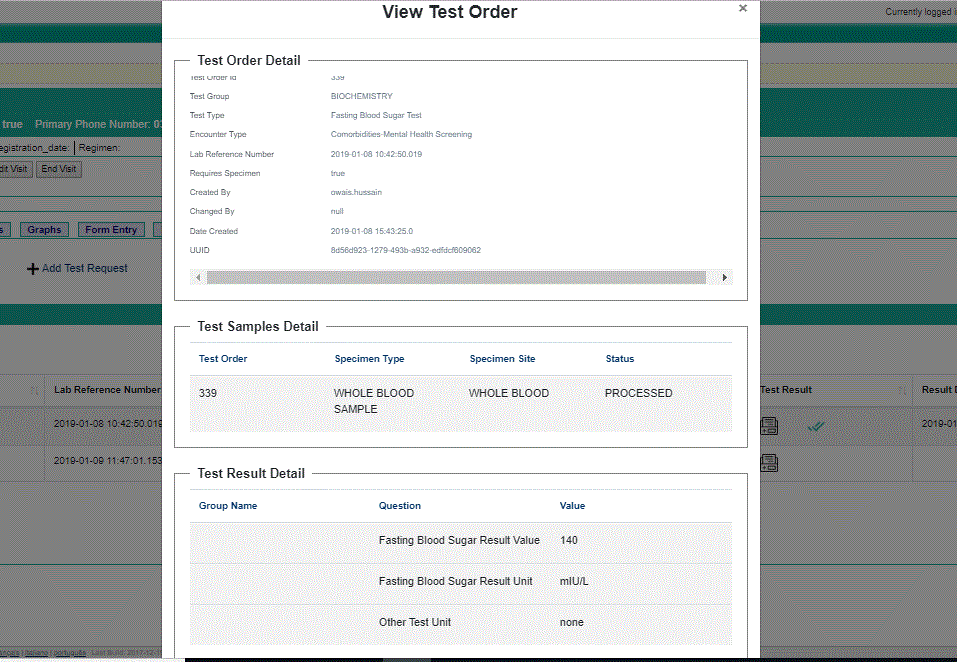
- View button opens up a modal dialog which contains all the details related to the test order from order to results phase. It has three sections Test Order Detail, Test Samples Detail, Test Result Detail. Initially, these sections are empty, but as soon the as the data is saved, it is displayed in the relevant section as seen in the screenshot below.
- Edit button opens up the Add Test Order page in an edit mode therefore, already saved information related to Lab Test Order cab be changed. When Add Test Order page is opened in Edit mode, it also displays an option to void Test Order.

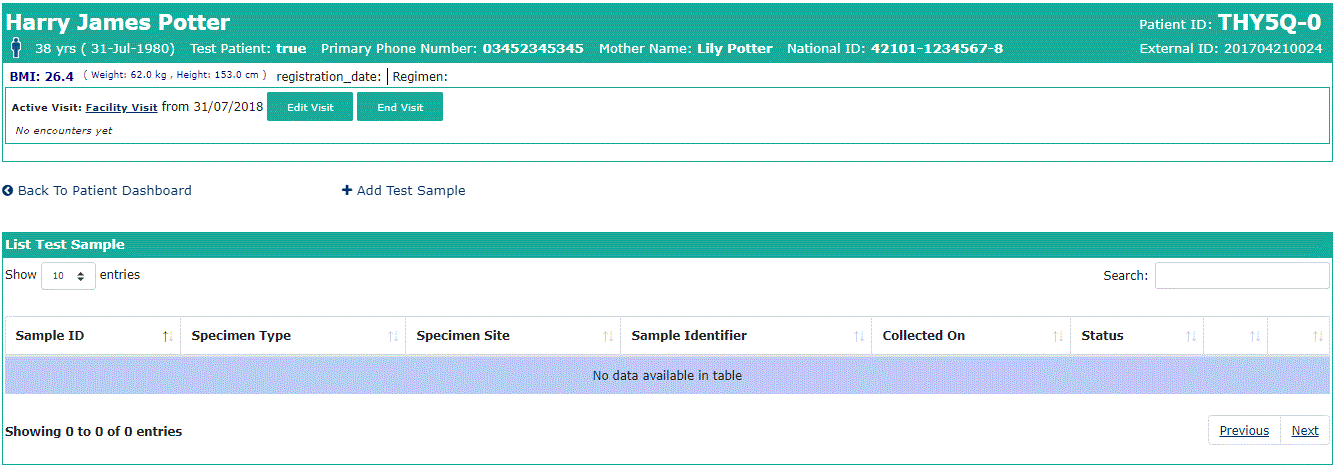
- Manage Test Sample button redirects to the page that contains Sample information for each test order. (Not all test orders require sample, this is discussed in configuring metadata section under Lab Test Types heading). There is a list of samples available on this page which contain a field named Status. Status indicates the current state of the sample. Initially when Add Test Sample form is filled, the newly collected sample has a status as COLLECTED. This sample can be REJECTED for any reason like it may have expired or contaminated but if it is ready for the test to be conducted then its status is changed to ACCEPTED. After the Test Results are entered, its status is changed to final state as PROCESSED.
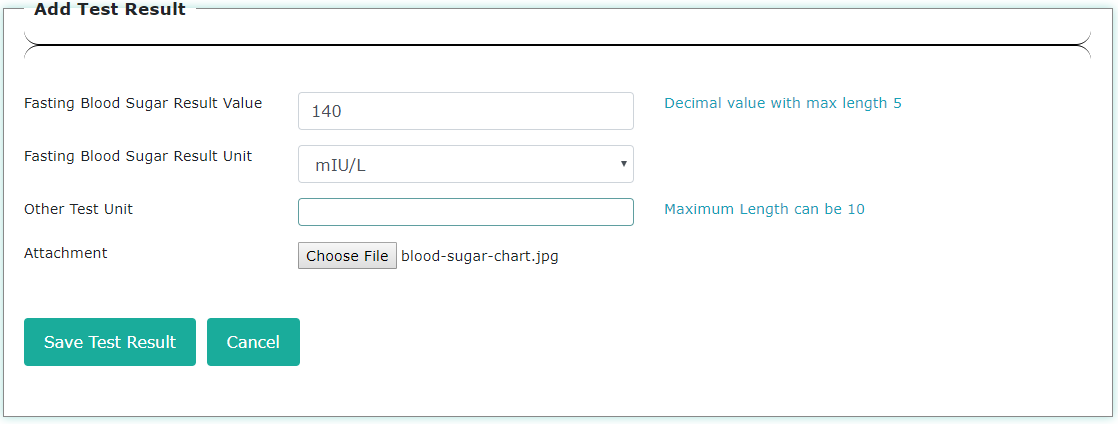
- Test Result button redirects to Add Test Result page. After the results are entered, the status of the sample is changed to PROCESSED, and in case of voiding the result, the sample status changes back to COLLECTED again respectively. Once the results are entered, result page opens up in edit mode and also displays an option to void test result. The below screenshot displays the Add Test Result page.
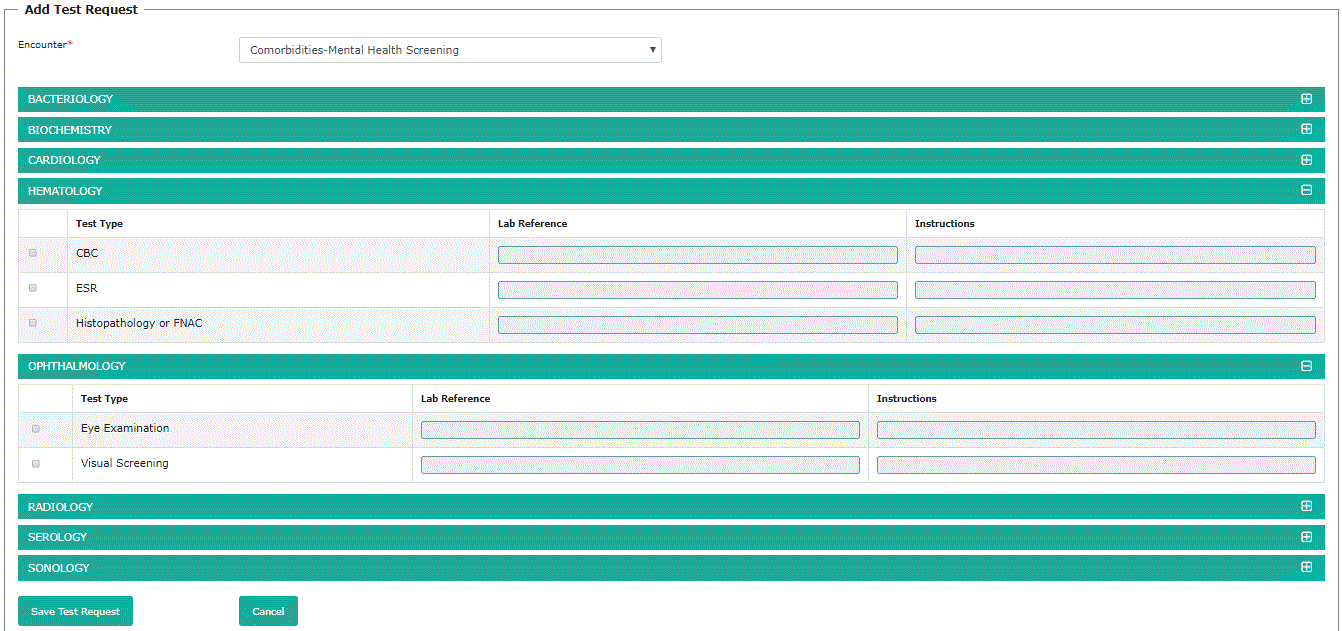
Following form can be used for generating multiple Test Order requests. It displays all Test Types in their respective Test Groups which are initially closed sections. On clicking the plus icon, the section opens up and on selecting the corresponding checkbox, Lab Reference number is filled with auto generated timestamp.
Sample Management
On Manage Lab Test Sample page, there is a link to Add Test Sample page. It has four required fields Specimen Type, Specimen Site, Sample Identifier and Collection Date. Like Lab Reference Number, sample identifier is an auto-generated time stamp which can be edited and replaced with the actual Sample ID, if available.

After the test sample is successfully added, the list on the Manage Test Sample page is updated and the newly entered sample is set to COLLECTED status. Sample status is an enum with four possibilities i.e. COLLECTED, ACCEPTED, REJECTED, PROCESSED. Please note that there is an option to reject sample as well in case if sample is contaminated or expired. REJECTED samples are not acceptable for conducting tests, therefore in case of a rejected sample, a new sample has to be submitted. Results can be entered only after sample status is changed to ACCEPTED, and after successful submission of test results. sample status changes to PROCESSED status.

Voiding Data
- If a Lab Test Type is deleted, its referred data like Lab Test Orders and Attribute Types are linked to UNKNOWN Test Type.
- If a Lab Test Type is deleted (purged), its referred data like Lab Test Orders are also deleted (purged). It can be done by calling method deleteLabTestType(LabTestType labTestType, boolean cascade) and passing cascade as TRUE.
- If a Lab Test Attribute Type is deleted (purged), all attributes that were saved against this Attribute Type are also purged.
- If a Lab Test is voided, its subsequent linked data like Test Samples and Test Results (attributes) are also voided.
- If a Lab Result is voided completely (all attributes), then the sample linked to this result is changed back from PROCESSED to COLLECTED status again.
Downloads
http://modules.openmrs.org/...
Source Code
https://github.com/openmrs/openmrs-module-commonlabtest
About
This module was developed by Owais Hussain Tahira Niazi Muhammad Ahmed Memon and Shujaat Ali from Interactive Health Solutions.