Clinical Summary Module
No longer supported
Please note the the Clinical Summary Module is no longer being supported and doesn't work with the latest releases of OpenMRS. As a work-around you can see How to create a Patient Clinical Summary using Reporting Module.
The clinical summary module has undergone significant changes that have not yet been documented. This page needs to be updated.
Overview
Each summary is a velocity template script. The script, as it works now, spits out an xml document. The xml document is parsed with the associated xslt.
The default xslt converts the xml to fop for pdf generation.
As of version 2.3, printing is handled by an external application. When an encounter form is submitted, clinical summaries are automatically generated to a location in the file system. Printing is performed manually. Printing does not do the actual printing, but sends the generated clinical summary .pdf to a separate location in the file system for printing.
Setup
Versions prior to 2.3 require The Printing Module.
Download the module and install it in OpenMRS.
Go to the administration screen and click "Manage Clinical Summaries". There are two summaries provided by default: Basic Summary and the current AMPATH clinical summary. The AMPATH clincial summary makes some assumptions about concepts and encounters being used that are specific to the AMPATH program. The basic summary is as generic as possible.
Usage
The Manage screen for clinical summaries allows you to change both the summary xml code and the way that xml is translated. Currently you must translate the xml into Apache FOP for pdf generation.
The xml code is generated using velocity scripting tags. The functions available are found in the summary functions class. This class extends the data export functions class and has access to all of those methods as well.
Generating Clinical Summaries Automatically
Clinical Summaries are generated on the Clinical Summary Print Queue automatically after filling out an encounter form. The process is outlined in the steps below.
- Find/Create Patient
- Type in a name and select a patient. The page should redirect to the Patient Dashboard.
- Click on the "Forms" tab.
- Select one of the following forms that were created at Setup. Current supported forms are: Ampath Adult Return Visit Form and Ampath Adult Initial Visit Form.
- At the Pop-up window, select Open with Microsoft Office InfoPath. Click OK.
- Fill out at least part of the form. Required fields on page one of Return Visit Form are: Date, Location, Name. Required fields on page two of Return Visit Form are: Add New Problem, Remove Problem From List, Select Provider.
- Submit the form and wait a few minutes.
- Go to Administration --> Clinical Summary Module --> "View Clinical Summary Queue" and look for the Clincal Summary on the queue.
- If on the InfoPath form (step 5) you selected to have lab tests done, then the STATUS will be WAITING_ON_LABS. If you did not select tests the STATUS will be PENDING.
- Printing is done manually. Nothing should automatically be sent to the printer. You will have to make selections on the "View Clinical Summary Queue" page and then click Print Selected Summaries.
Printing Clinical Summaries
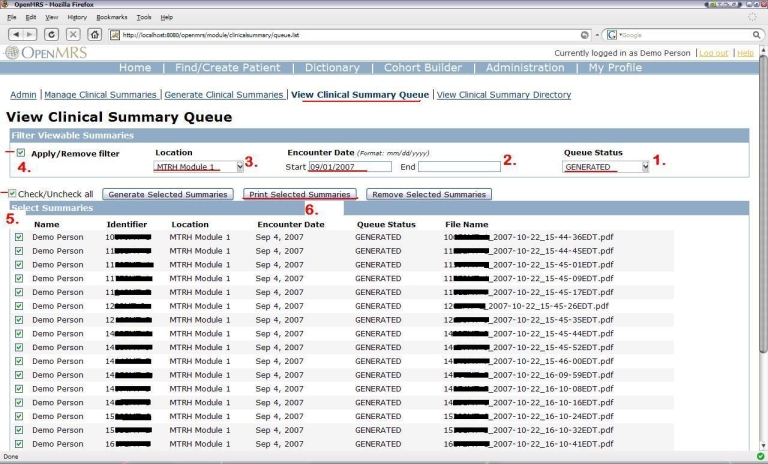
Go to Administration --> Clinical Summary Module --> View Clinical Summary Queue
- In Filter Viewable Summaries section, select GENERATED for the Queue Status
- Optionally select a start and end date for Encounter Date
- Select a Location
- Check Apply/Remove Filter to apply the filter
- Check Check/Uncheck all to select all summaries; or just check individual summaries to print
- Press the Print Selected Summaries button. When printing is done, the page will refresh.
Resources
Global Properties
Printing Logic Class
clinicalsummary.printLogicClass must be filled in as a global property. Currently, the only available value is "org.openmrs.module.clinicalsummary.AMPATHClinicalSummaryPrintingLogic".
File System Directories
- clinicalsummary.queueItemGenerateDir defaults to ${OpenMRS Application Data Directory}/clinicalsummary/generated
- clinicalsummary.queueItemPrintDir defaults to ${OpenMRS Application Data Directory}/clinicalsummary/to_print
- These can be overwritten to anywhere on the file system.
How Tomcat recognizes a Network Directory
In our case, we want to generate and print clinical summaries to a mapped drive on another computer. Instead of the default above, we fill in //REMOTE-COMPUTER/amrs/clinicalsummary/generated for the global property. In order to map the network drive for Windows:
- Create a user in Windows that will run Tomcat. Maybe "TomcatUser".
- In the Windows services, set Tomcat Service to Log On as this account: TomcatUser
- Access the remote computer (maybe "REMOTE-COMPUTER") and set TomcatUser as a user on that computer. Set desired privileges.
- Create a shared directory. In our case we created a folder "C:/amrs". Right click and set properties to C:/amrs so that it is shared. Make sure TomcatUser has privilege to access the folder.
- On the server, where Tomcat is running under the user TomcatUser, log in as TomcatUser. Create a mapping to the hard drive of REMOTE-COMPUTER. Since TomcatUser is also a user on REMOTE-COMPUTER, authentication should not be a problem (as long as the passwords are the same). In our case we mapped \\REMOTE-COMPUTER\c$ (Alternatively, \\123.45.6.789\c$) to the Z: drive.
- At a convenient moment, restart Tomcat.
- In the global properties for file system directories do not use Z:/amrs/clinicalsummary/generated because Tomcat will not recognize it. Instead use //REMOTE-COMPUTER/amrs/clinicalsummary/generated for the global property.
Workflow
Clinical Summary Queue Item
A1. Form is submitted. (AMPATH printing logic acts on adult initial or adult return)
A2. Create Clinical Summary Queue Item.
A3. If Obs contains lab request, go to W1. Else go to G1.
A4. If User chooses, go to U1. Else end.
U1. User looks at View Clinical Summary Queue page.
U2. User chooses A4, U3, U6, or U10.
U3. User selects queue item and presses "Generate Selected Summaries".
U4. Get posted queue items. Go to G1.
U5. Go to U1.
U6. User selects queue item and presses "Print Selected Summaries".
U7. Get posted queue items. If item status=WAITING_ON_LABS, go to G1.
U8. Go to P1.
U9. Go to U1.
U10. User selects queue item and presses "Remove Selected Summaries".
U11. Get posted queue items. Go to R1.
U12. Go to U1.
W1. Set status=WAITING_ON_LABS.
W2. Save to database.
W3. Return.
G1. If status==null or status!=WAITING_ON_LABS, Set status=GENERATED.
G2. Set fileName={patientIdentifier}_{currentDateAndTime}.pdf
G3. Generate the Clinical Summary to the file system.
G4. Save the clinical summary queue item to the database.
G5. Return.
P1. Get fileName and path.
P2. Move ClinicalSummary PDF from "generated" directory to "to_print" directory of the file system
P3. Remove Clinical Summary Queue Item from the database.
P4. Return.
R1. If fileName!=null, remove File from file system.
R2. Remove clinical summary queue item from database.
R3. Return.