Administering Users
Roles and Privileges
See: Controlling User Access___Roles and Privileges
Privileges define what can or cannot be done in the system (view information, edit information, add information, etc).
Roles group Privileges into manageable sets.
Roles can inherit all the Privileges from another Role.
OpenMRS comes with special predefined Roles that can't be deleted.
- Anonymous - Privileges for people who don't sign-in to OpenMRS, usually very restricted and view-only
- Authenticated - Privileges for anybody that signs-in to OpenMRS, common to all users
- Provider - the basic medical provider Role, can be used to build more specialized medical provider roles (physicians, nurses, medical students, etc)
- System Developer - has access to everything in OpenMRS, be very careful in protecting the System Developer password
The best practice for creating and managing Roles is to create Roles based on job function and have Roles inherit common Privileges from more restricted Roles.
For example, you set up the default Authenticated role to be able to view all patient information on the system. You create a new role called Data Entry Clerk that can edit patient information. You let the Data Entry Clerk role inherit the privileges from the Authenticated role. The Data Entry Clerk role can now view what information is available to the Authenticated role with the additional editing privileges assigned to the Data Entry Clerk role. If you change the privileges of the Authenticated role, you also change the privileges of the Data Entry Clerk role since the Data Entry clerk role has inherited privileges from the Authenticated role. You could then create a Data Entry Manager role that inherits privileges from the Data Entry Clerk and then assign additional privileges to the Data Entry Manager.
Role | Inherited Roles | New Privileges | Inherited Privileges |
|---|---|---|---|
Authenticated | none | View | none |
Data Entry Clerk | Authenticated | Edit | View |
Data Entry Manager | Data Entry Clerk | Create patients | Edit + View |
Adding a User
01) To add a user, log into OpenMRS as an administrator and click on the "Administration" menu:
![]()
02) From there, you will see see a list of options. Click on "Manage Users"
03) Click on "Add User" 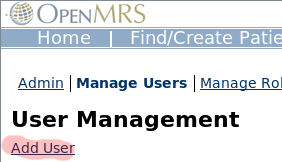
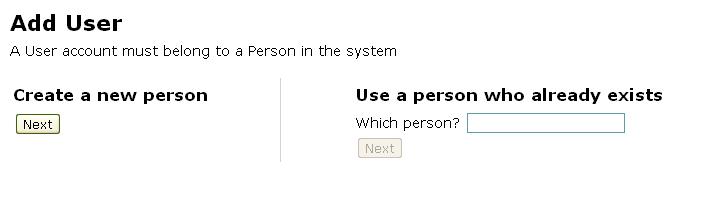
04) Click on the "Next" button under "Create a new person"

05) Type in the name of the person and the person's gender
06) Set up a username and password for the person
The password has to be at least 8 characters long
The password has to have uppercase, lowercase, and at least one number
07) Select a Role for the person
08) Click on "Save User" button to add the person
Resetting User Passwords
If a user is locked out, it is possible to reset their password using the "Edit User" administration site. However, if said user is actually the administrator, you may have to reset things manually.
- Use the I forgot my password link in the OpenMRS web application to reset your password
- If user cannot remember the answer to the secret question then:
- Go into the "users" table in the database and set the "secret_answer" column in plain text to a known value
- Take Managing User Lockout into consideration.
Managing User Lockout
Starting with 1.5, authorization controls were added:
- Users are locked out of OpenMRS for 5 minutes after 7 incorrect password attempts.
- Number of attempts and last attempted time are stored as a user property. The Edit User administration page will allow you to edit the current user's properties. (Alternatively, you can clear the rows in the user_property table for that user. Since OpenMRS v1.10 the number of allowed failed login attempts can be set using the security.allowedFailedLoginsBeforeLockout setting (formerly global property from platform 1.8 downwards) found under Settings->Security section of the web application
- IP addresses are locked out after 10 username/password attempts.
- The number of attempts per IP are left in memory on the server in the LoginServlet. Restart OpenMRS to clear this variable.
At least the second one is configurable as a global properties: security.loginAttemptsAllowedPerIP