Adding custom fragments to Manage Account dashboard
Manage Accounts dashboard contains these following features,
- View all the list of persons registered in the system as a table in the home page.
- Add New Account page to add new users or providers.
- View Account page to view the all information about the user or provide(can edit the information also).
As the default, the common fields which are annexed with the Add New Account page are (* - required)
- Person Details - Family Name*, Given Name*, and Gender*
- User Account Details - Username*, privilege level*, password, and Capabilities
- Provider details - Identifier*, Provider Role*
In addition to those common fields, We can add some custom fragments to this sections
- Person Details - Add/Edit custom fields, View Custom fields
- User Account Details - Add/Edit custom fields, View Custom fields
Requirments
You should have the Admin UI module version 1.2.4 or later to get this feature available.
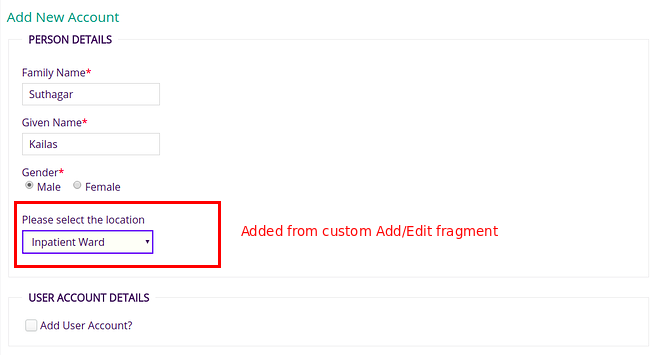
Person Details - Add/Edit custom fields
You need to follow these guidelines to create an extension with all required properties to add the custom fragment to the Add/Edit section of the person details.
- create a JSON into your omod → module → resources → app → customAddEditPersonInfoName.json
Copy this JSON content into that file, and edit the values for your needs
Add/Edit person info - custom fragment extension.json{ "id": "${project.parent.groupId}.${project.parent.artifactId}.userAccount.personAttributeEditLocation", "extensionPointId": "userAccount.personAttributeEditFragment", "extensionParams": { "title" : "Location", "type": "personAttribute", "label": "Select Location", "formFieldName": "personLocationId", "uuid": "8b5c95ef-103c-41bc-9f24-368b8f77e070", "provider": "${project.parent.artifactId}", "fragment": "manageAccount/addLocation" } }- Do not change the "extensionPointId": "userAccount.personAttributeEditFragment", if you need to add this fragment to Add/Edit Person section.
If the "type" is "personAttribute", then replace the "uuid" property with the respected personAttributeType which should added into the person Attribute (you need to create this personAttibuteType before adding this). If not, then no need to add the "uuid" property here.
If the "type" is Person attribute, then it will be automatically updated during the usual save/update though the dashboard. If the custom field type is not person attribute, then the custom fragment should handle those.
- Update the other properties as usual way of creating the extensions for OpenMRS.
Required extension properties : id, extensionPointId, type, formfieldName, provider, fragment, uuid(if only type is personAttribute), label(if only you want to use it through the fragment config), title(if only you want to use it through the fragment config)
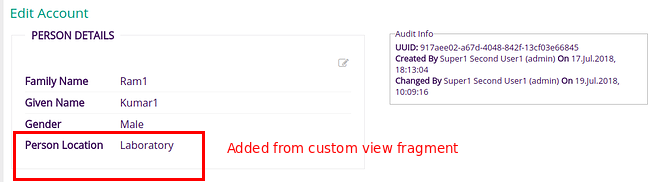
Person Details - View custom fields
It will be used to add the custom fragments to view the additional information in the person details section. Please follow these guidelines to create an extension with all required properties,
- create a JSON into your omod → module → resources → app → customViewPersonInfoName.json
Copy this JSON content into that file, and edit the values for your needs
View person info - custom fragment extension.json{ "id": "${project.parent.groupId}.${project.parent.artifactId}.userAccount.personAttributeViewLocation", "extensionPointId": "userAccount.personAttributeViewFragment", "extensionParams": { "label": "Location", "type": "personAttribute", "provider": "${project.parent.artifactId}", "fragment": "manageAccount/viewLocation" } }- Do not change the "extensionPointId": "userAccount.personAttributeViewFragment", if you need to add this fragment to View Person section.
If the type is Person attribute, then it will be automatically fetched the value and add that value to the "initialValue" property of the fragment Configuration. You can use this value to get the actual objects from your view fragments (i.e : Convert to location object)
- Update the other properties as usual way of creating the extensions for OpenMRS.
Required extension properties : id, extensionPointId, type, provider, fragment, label(if only you want to use it through the fragment config)
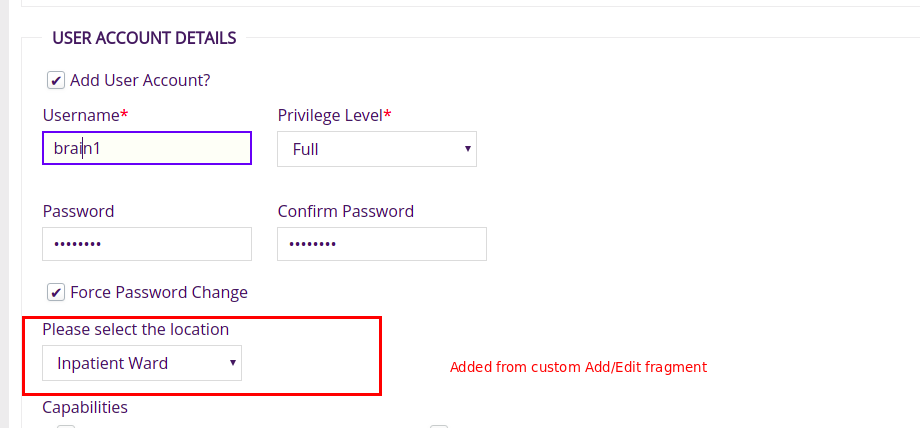
User Account Details - Add/Edit custom fields
You need to follow these guidelines to create an extension with all required properties to add the custom fragment to the Add/Edit section of the user account details.
- create a JSON into your omod → module → resources → app → customAddEditUserInfoName.json
Copy this JSON content into that file, and edit the values for your needs
Add/Edit User info - custom fragment extension.json{ "id": "${project.parent.groupId}.${project.parent.artifactId}.userAccount.userPropertyEditLocation", "extensionPointId": "userAccount.userPropertyEditFragment", "extensionParams": { "title" : "Location", "type": "userProperty", "userPropertyName" : "locationId", "label": "Select Location", "provider": "${project.parent.artifactId}", "fragment": "manageAccount/addLocation" } }- Do not change the "extensionPointId": "userAccount.userPropertyEditFragment", if you need to add this fragment to Add/Edit User Account section.
If the "type" is "userProperty", then replace the "userPropertyName" property with the respected user property name which should added with the user.
If the "type" is "userProperty" , then it will be automatically updated during the usual save/update though the dashboard.
Use the userPropertyName as your custom field Id value and name value to auto wire the Angular services with your custom fragments. Or use the fragment Configuration to retrieve the formFieldName as follows to get the actual formFieldName which can auto wire the HTML element with angular services.
<input type="text" id="${config.formFieldName}" name="${config.formFieldName}">- Update the other properties as usual way of creating the extensions for OpenMRS.
Required extension properties : id, extensionPointId, type, userPropertyName(use this as the formFiledName to auto wire with Angular services), provider, fragment, label(if only you want to use it through the fragment config), title(if only you want to use it through the fragment config)
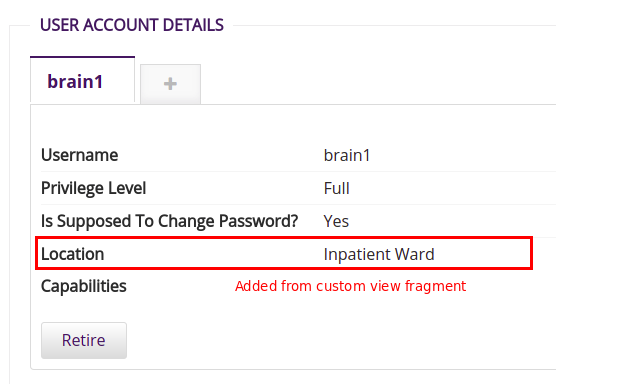
User Account Details - View custom fields
It will be used to add the custom fragments to view the additional information in the user account details section. Please follow these guidelines to create an extension with all required properties,
- create a JSON into your omod → module → resources → app → customViewUserInfoName.json
Copy this JSON content into that file, and edit the values for your needs
View user info - custom fragment extension.json{ "id": "${project.parent.groupId}.${project.parent.artifactId}.userAccount.userPropertyViewLocation", "extensionPointId": "userAccount.userPropertyViewFragment", "extensionParams": { "label": "Location", "type": "userProperty", "userPropertyName" : "locationId", "provider": "${project.parent.artifactId}", "fragment": "manageAccount/viewUserLocation" } }Do not change the "extensionPointId": "userAccount.userPropertyViewFragment", if you need to add this fragment to View User section.
- Update the other properties as usual way of creating the extensions for OpenMRS.
Required extension properties : id, extensionPointId, type, userPropertyName, provider, fragment, label(if only you want to use it through the fragment config)