Getting started with OpenMRS
This guide is for anyone who wants to setup their development environment to start working with OpenMRS.
OpenMRS Hackathon Registration
- Create a OpenMRS ID if you do not have one. This is used for accessing OpenMRS JIRA, Wiki (Including editing this page).
- Once you have your OpenMRS ID please make sure you add yourselves to the participant list.
- Have a Github account. You need this if you want to check in code.
Technical Prerequisites (Make sure you do this before the day of hackathon)
Make sure you have the following installed on your laptop before you get started.
- Java JDK 7. This also work with JDK 8, but officially is not supported yet.
- Git for checking out source code.
- Install Maven on your local machine. This is used for building OpenMRS.
- Optional - Docker Toolbox. Docker is only used for running mysql at the moment. You may choose to skip this step and install MySQL directly.
- Optional (If you don't have docker) - Install Mysql on your local machine. Make sure you set the root password for this MySQL and remember it. You will need this later to run OpenMRS.
- Intellij or Eclipse IDE for Java EE Developers can be used as the IDE for development. Make sure you have one of them.
- Follow the instructions below to setup OpenMRS SDK and try to get a running application before the day of hackathon. This will help a lot in terms of saving time as the installation usually takes about couple of hours.
Setting up Development Environment
If you want to install openmrs the traditional way you can follow the link here. But we recommend using the OpenMRS SDK for the hackathon because it makes installing easier. Make sure you do this before the hackathon because it takes around half an hour on a good internet connection to download all the dependencies.
mvn org.openmrs.maven.plugins:openmrs-sdk-maven-plugin:setup-sdk
mvn openmrs-sdk:help
Start MySQL
You can either install MYSQL locally on your machine or if you have docker installed you can use the command below to start a MYSQL server in a docker container. If you choose to start your mysql inside docker your jdbc url connection string would be based on the ip address of the docker daemon. By default it is 192.168.99.100.
docker run --name openmrs-mysql -e MYSQL_ROOT_PASSWORD=openmrs -d -p 3306:3306 mysql:5.6
#Make sure you substitute your mysql root password into the command before you run it.
mvn openmrs-sdk:setup -DserverId=openmrs -Dversion=2.3 -DdbDriver=mysql -DdbUser=root -DdbPassword=openmrs -DdbUri="jdbc:mysql://192.168.99.100:3306/openmrs?autoReconnect=true&sessionVariables=storage_engine=InnoDB&useUnicode=true&characterEncoding=UTF-8"
serverId is the server name under which the server would be installed.
#Make sure you substitute your mysql root password into the command before you run it.
mvn openmrs-sdk:setup -DserverId=openmrs -Dversion=2.3 -DdbDriver=mysql -DdbUri="jdbc:mysql://localhost:3306/openmrs?autoReconnect=true&sessionVariables=storage_engine=InnoDB&useUnicode=true&characterEncoding=UTF-8" -DdbUser=root -DdbPassword=<YOUR_ROOT_PASSWORD>
OpenMRS would be installed in the folder ~/openmrs/<serverId>
mvn openmrs-sdk:run -DserverId=openmrs
TroubleShooting tip
When you run the openmrs-sdk:run for the first time you may get the following error which can be ignored for the time being as this does not effect with the functioning of the application.
Caused by: java.sql.SQLException: Access denied for user 'test'@'localhost' (using password: YES)
Check out the the openmrs application at http://localhost:8080/openmrs
When you start openmrs for the first time it would go through initial setup. Complete the initial setup it may take a few minutes.
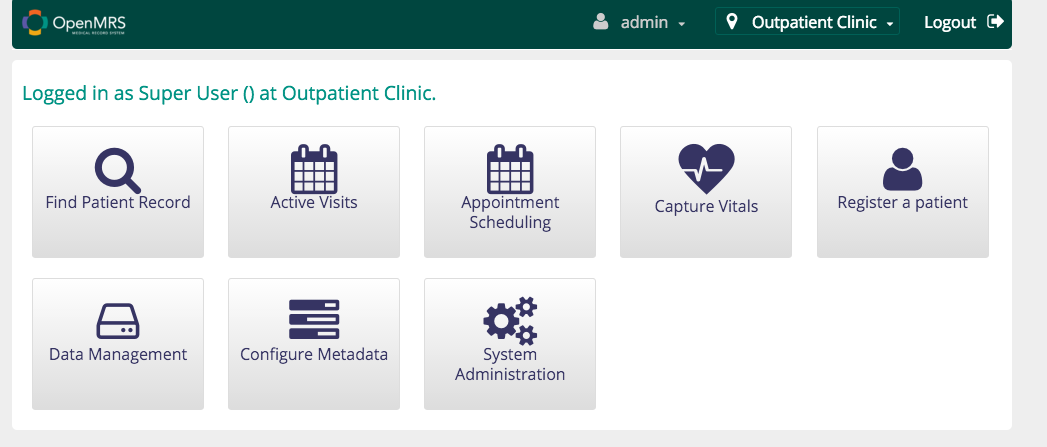
Congrats you are done with the installation. The username and password to login to OpenMRS would be admin/Admin123. You should be able to see the OpenMRS home page which would look like the following.
Make sure you have all you need ahead of your first hackathon by reviewing this quick Checklist for Hackathon
Whats NEXT
Find a story/ticket to work on here. Pair with someone if possible.
Find out which modules needs to be modified for your story. Go into github and fork those modules.
You can learn about process of code reviewing, merging etc here.
Download the OpenMRS modules
Download the required openmrs modules from your fork of the code in github. Do not clone the OpenMRS repos as you would not be able to directly commit to it. You would need different modules depending on which story you are working on.
git clone https://github.com/openmrs/openmrs-core.git
git clone https://github.com/openmrs/openmrs-module-legacyui.git
Running a server from module folder
During module development, we need to test how out module works. For that each time we need to install a module on server, and them run. SDK allows to do it much more simple. You can execute run task directly from module folder, and selected module will be installed on server before launching automatically.
cd <modulename>
mvn clean install
mvn openmrs-sdk:run -DserverId=openmrs
OpenMRS SDK has much more features that what is listed here. Refer to the guide OpenMRS SDK
Optional
- Play around with the openmrs demo server (admin/Admin123) .
- Quick functional overview of OpenMRS is available here. (Also includes a QA site to play around with OpenMRS).
- If you would like to get quick technical overview of OpenMRS architecture take a look here.
- Join the email group Bahmni-Hackathon-Dallas@googlegroups.com if you are interested in getting email updates about the hackathon.
Useful Links
- Demo server(admin/Admin123) – http://demo.openmrs.org/openmrs/login.htm
- Wiki – https://openmrs.atlassian.net/wiki/display/docs/Home
- Getting started as a developer - Get Started as a Developer
- https://openmrs.atlassian.net/wiki/display/docs/Step+by+Step+Installation+for+Developers
- OpenMRS SDK – https://openmrs.atlassian.net/wiki/display/docs/OpenMRS+SDK
- Functional Overview can be found here.
Troubleshooting Tips
Forgot your mac MYSQL root password - Follow the instructions in the link here to reset it.
Debugging
If you set the MAVEN_OPTS as the following before you start your server, you can attach a debugger to it.
export MAVEN_OPTS="-Xnoagent -Xrunjdwp:transport=dt_socket,server=y,suspend=y,address=8000"
mvn openmrs-sdk:run -DserverId=test